Netgear FS728TPv2 FS728TP Software Administration Manual - Page 127
DSCP to Queue Mapping, Cancel, Apply, Advanced, DSCP to Queue, Mapping
 |
View all Netgear FS728TPv2 manuals
Add to My Manuals
Save this manual to your list of manuals |
Page 127 highlights
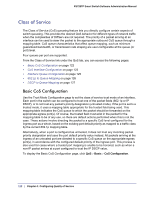
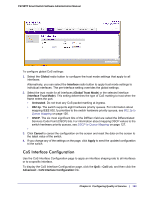
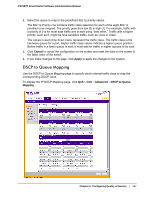
FS728TP Smart Switch Software Administration Manual 2. Select the queue to map to the predefined 802.1p priority values. The 802.1p Priority row contains traffic class selectors for each of the eight 802.1p priorities to be mapped. The priority goes from low (0) to high (7). For example, traffic with a priority of 0 is for most data traffic and is sent using "best effort." Traffic with a higher priority, such as 6, might be time-sensitive traffic, such as voice or video. The values in each drop down menu represent the traffic class. The traffic class is the hardware queue for a port. Higher traffic class values indicate a higher queue position. Before traffic in a lower queue is sent, it must wait for traffic in higher queues to be sent. 3. Click Cancel to cancel the configuration on the screen and reset the data on the screen to the latest value of the switch. 4. If you make changes to the page, click Apply to apply the changes to the system. DSCP to Queue Mapping Use the DSCP to Queue Mapping page to specify which internal traffic class to map the corresponding DSCP value. To display the IP DSCP Mapping page, click QoS CoS Advanced DSCP to Queue Mapping. Chapter 4: Configuring Quality of Service | 127
-
 1
1 -
2
-
3
-
4
-
5
-
6
-
7
-
8
-
9
-
10
-
11
-
12
-
13
-
14
-
15
-
16
-
17
-
18
-
19
-
20
-
21
-
22
-
23
-
24
-
25
-
26
-
27
-
28
-
29
-
30
-
31
-
32
-
33
-
34
-
35
-
36
-
37
-
38
-
39
-
40
-
41
-
42
-
43
-
44
-
45
-
46
-
47
-
48
-
49
-
50
-
51
-
52
-
53
-
54
-
55
-
56
-
57
-
58
-
59
-
60
-
61
-
62
-
63
-
64
-
65
-
66
-
67
-
68
-
69
-
70
-
71
-
72
-
73
-
74
-
75
-
76
-
77
-
78
-
79
-
80
-
81
-
82
-
83
-
84
-
85
-
86
-
87
-
88
-
89
-
90
-
91
-
92
-
93
-
94
-
95
-
96
-
97
-
98
-
99
-
100
-
101
-
102
-
103
-
104
-
105
-
106
-
107
-
108
-
109
-
110
-
111
-
112
-
113
-
114
-
115
-
116
-
117
-
118
-
119
-
120
-
121
-
 122
122 -
 123
123 -
 124
124 -
 125
125 -
 126
126 -
 127
127 -
 128
128 -
 129
129 -
 130
130 -
 131
131 -
 132
132 -
133
-
134
-
135
-
136
-
137
-
138
-
139
-
140
-
141
-
142
-
143
-
144
-
145
-
146
-
147
-
148
-
149
-
150
-
151
-
152
-
153
-
154
-
155
-
156
-
157
-
158
-
159
-
160
-
161
-
162
-
163
-
164
-
165
-
166
-
167
-
168
-
169
-
170
-
171
-
172
-
173
-
174
-
175
-
176
-
177
-
178
-
179
-
180
-
181
-
182
-
183
-
184
-
185
-
186
-
187
-
188
-
189
-
190
-
191
-
192
-
193
-
194
-
195
-
196
-
197
-
198
-
199
-
200
-
201
-
202
-
203
-
204
-
205
-
206
-
207
-
208
-
209
-
210
-
211
-
212
-
213
-
214
-
215
-
216
-
217
-
218
-
219
-
220
-
221
-
222
-
223
-
224
-
225
-
226
-
227
-
228
-
229
-
230
-
231
-
232
-
233
-
234
-
235
-
236
-
237
-
238
-
239
-
240
-
241
-
242
-
243
-
244
-
245
-
246
-
247
-
248
-
249
-
250
-
251
-
252
-
253
-
254
-
255
-
256
-
257
-
258
-
259
-
260
-
261
 |
 |
