Netgear FS728TPv2 FS728TP Software Administration Manual - Page 207
Server Log Configuration, Clear, Refresh, Cancel, Monitoring, Logs tab, Server Log, Admin Status
 |
View all Netgear FS728TPv2 manuals
Add to My Manuals
Save this manual to your list of manuals |
Page 207 highlights
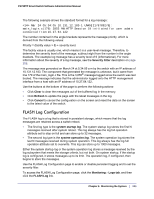
FS728TP Smart Switch Software Administration Manual Use the buttons at the bottom of the page to perform the following actions: • Click Clear to clear the messages out of the buffered log. • Click Refresh to refresh the page with the most current data from the switch. • Click Cancel to cancel the configuration on the screen and reset the data on the screen to the latest value of the switch. Server Log Configuration Use the Server Log Configuration page to allow the switch to send log messages to the remote logging hosts configured on the system. To access the Server Log Configuration page, click the Monitoring Logs tab, and then click the Server Log link. To configure local log server settings: 1. Use the radio buttons in the Admin Status field to determine whether to send log messages to the remote syslog hosts configured on the switch. • Enable: Messages will be sent to all configured hosts (syslog collectors or relays) using the values configured for each host. • Disable: Stops logging to all syslog hosts. Disable means no messages will be sent to any collector/relay. 2. In the Local UDP Port field, specify the port on the switch from which syslog messages are sent. 3. Click Apply to save the settings. The Server Log Configuration area also displays the following information: • The Messages Relayed field shows the number of messages forwarded by the syslog function to a syslog host. Messages forwarded to multiple hosts are counted once for each host. Chapter 6: Monitoring the System | 207
-
 1
1 -
2
-
3
-
4
-
5
-
6
-
7
-
8
-
9
-
10
-
11
-
12
-
13
-
14
-
15
-
16
-
17
-
18
-
19
-
20
-
21
-
22
-
23
-
24
-
25
-
26
-
27
-
28
-
29
-
30
-
31
-
32
-
33
-
34
-
35
-
36
-
37
-
38
-
39
-
40
-
41
-
42
-
43
-
44
-
45
-
46
-
47
-
48
-
49
-
50
-
51
-
52
-
53
-
54
-
55
-
56
-
57
-
58
-
59
-
60
-
61
-
62
-
63
-
64
-
65
-
66
-
67
-
68
-
69
-
70
-
71
-
72
-
73
-
74
-
75
-
76
-
77
-
78
-
79
-
80
-
81
-
82
-
83
-
84
-
85
-
86
-
87
-
88
-
89
-
90
-
91
-
92
-
93
-
94
-
95
-
96
-
97
-
98
-
99
-
100
-
101
-
102
-
103
-
104
-
105
-
106
-
107
-
108
-
109
-
110
-
111
-
112
-
113
-
114
-
115
-
116
-
117
-
118
-
119
-
120
-
121
-
122
-
123
-
124
-
125
-
126
-
127
-
128
-
129
-
130
-
131
-
132
-
133
-
134
-
135
-
136
-
137
-
138
-
139
-
140
-
141
-
142
-
143
-
144
-
145
-
146
-
147
-
148
-
149
-
150
-
151
-
152
-
153
-
154
-
155
-
156
-
157
-
158
-
159
-
160
-
161
-
162
-
163
-
164
-
165
-
166
-
167
-
168
-
169
-
170
-
171
-
172
-
173
-
174
-
175
-
176
-
177
-
178
-
179
-
180
-
181
-
182
-
183
-
184
-
185
-
186
-
187
-
188
-
189
-
190
-
191
-
192
-
193
-
194
-
195
-
196
-
197
-
198
-
199
-
200
-
201
-
 202
202 -
 203
203 -
 204
204 -
 205
205 -
 206
206 -
 207
207 -
 208
208 -
 209
209 -
 210
210 -
 211
211 -
 212
212 -
213
-
214
-
215
-
216
-
217
-
218
-
219
-
220
-
221
-
222
-
223
-
224
-
225
-
226
-
227
-
228
-
229
-
230
-
231
-
232
-
233
-
234
-
235
-
236
-
237
-
238
-
239
-
240
-
241
-
242
-
243
-
244
-
245
-
246
-
247
-
248
-
249
-
250
-
251
-
252
-
253
-
254
-
255
-
256
-
257
-
258
-
259
-
260
-
261
 |
 |
