Netgear FS728TPv2 FS728TP Software Administration Manual - Page 44
Host Configuration, Enable, Disable, DNS Server Address, Delete, Cancel, Apply, System, Management
 |
View all Netgear FS728TPv2 manuals
Add to My Manuals
Save this manual to your list of manuals |
Page 44 highlights
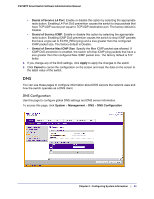
FS728TP Smart Switch Software Administration Manual To configure the global DNS settings: 1. Specify whether to enable or disable the administrative status of the DNS Client. • Enable. Allow the switch to send DNS queries to a DNS server to resolve a DNS domain name. • Disable. Prevent the switch from sending DNS queries. 2. Enter the DNS default domain name to include in DNS queries. When the system is performing a lookup on an unqualified hostname, this field is provided as the domain name (for example, if default domain name is netgear.com and the user enters test, then test is changed to test.netgear.com to resolve the name). 3. To specify the DNS server to which the switch sends DNS queries, enter an IP address in standard IPv4 dot notation in the DNS Server Address and click Add. The server appears in the list below. You can specify up to eight DNS servers. The precedence is set in the order created. 4. To remove a DNS server from the list, select the check box next to the server you want to remove and click Delete. If no DNS server is specified, the check box is global and will delete all the DNS servers listed. 5. Click Cancel to cancel the configuration on the screen and reset the data on the screen to the latest value of the switch. 6. Click Apply to send the updated configuration to the switch. Configuration changes take effect immediately. Host Configuration Use this page to manually map host names to IP addresses or to view dynamic DNS mappings. To access this page, click System Management DNS Host Configuration. 44 | Chapter 2: Configuring System Information
-
 1
1 -
2
-
3
-
4
-
5
-
6
-
7
-
8
-
9
-
10
-
11
-
12
-
13
-
14
-
15
-
16
-
17
-
18
-
19
-
20
-
21
-
22
-
23
-
24
-
25
-
26
-
27
-
28
-
29
-
30
-
31
-
32
-
33
-
34
-
35
-
36
-
37
-
38
-
 39
39 -
 40
40 -
 41
41 -
 42
42 -
 43
43 -
 44
44 -
 45
45 -
 46
46 -
 47
47 -
 48
48 -
 49
49 -
50
-
51
-
52
-
53
-
54
-
55
-
56
-
57
-
58
-
59
-
60
-
61
-
62
-
63
-
64
-
65
-
66
-
67
-
68
-
69
-
70
-
71
-
72
-
73
-
74
-
75
-
76
-
77
-
78
-
79
-
80
-
81
-
82
-
83
-
84
-
85
-
86
-
87
-
88
-
89
-
90
-
91
-
92
-
93
-
94
-
95
-
96
-
97
-
98
-
99
-
100
-
101
-
102
-
103
-
104
-
105
-
106
-
107
-
108
-
109
-
110
-
111
-
112
-
113
-
114
-
115
-
116
-
117
-
118
-
119
-
120
-
121
-
122
-
123
-
124
-
125
-
126
-
127
-
128
-
129
-
130
-
131
-
132
-
133
-
134
-
135
-
136
-
137
-
138
-
139
-
140
-
141
-
142
-
143
-
144
-
145
-
146
-
147
-
148
-
149
-
150
-
151
-
152
-
153
-
154
-
155
-
156
-
157
-
158
-
159
-
160
-
161
-
162
-
163
-
164
-
165
-
166
-
167
-
168
-
169
-
170
-
171
-
172
-
173
-
174
-
175
-
176
-
177
-
178
-
179
-
180
-
181
-
182
-
183
-
184
-
185
-
186
-
187
-
188
-
189
-
190
-
191
-
192
-
193
-
194
-
195
-
196
-
197
-
198
-
199
-
200
-
201
-
202
-
203
-
204
-
205
-
206
-
207
-
208
-
209
-
210
-
211
-
212
-
213
-
214
-
215
-
216
-
217
-
218
-
219
-
220
-
221
-
222
-
223
-
224
-
225
-
226
-
227
-
228
-
229
-
230
-
231
-
232
-
233
-
234
-
235
-
236
-
237
-
238
-
239
-
240
-
241
-
242
-
243
-
244
-
245
-
246
-
247
-
248
-
249
-
250
-
251
-
252
-
253
-
254
-
255
-
256
-
257
-
258
-
259
-
260
-
261
 |
 |
