Netgear GS724AT GS724AT Reference Manual - Page 186
Monitoring >RMON > Advanced > History Control, Current Number of Samples
 |
UPC - 606449056907
View all Netgear GS724AT manuals
Add to My Manuals
Save this manual to your list of manuals |
Page 186 highlights
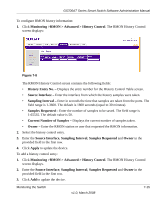
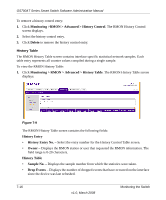
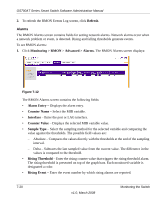
GS700AT Series Smart Switch Software Administration Manual To configure RMON history information: 1. Click Monitoring >RMON > Advanced > History Control. The RMON History Control screen displays: Figure 7-8 The RMON History Control screen contains the following fields: • History Entry No. - Displays the entry number for the History Control Table screen. • Source Interface - Enter the interface from which the history samples were taken. • Sampling Interval - Enter in seconds the time that samples are taken from the ports. The field range is 1-3600. The default is 1800 seconds (equal to 30 minutes). • Samples Requested - Enter the number of samples to be saved. The field range is 1-65535. The default value is 50. • Current Number of Samples - Displays the current number of samples taken. • Owner - Enter the RMON station or user that requested the RMON information. 2. Select the history control entry. 3. Enter the Source Interface, Sampling Interval, Samples Requested and Owner in the provided field in the first row. 4. Click Apply to update the device. To add a history control entry: 1. Click Monitoring >RMON > Advanced > History Control. The RMON History Control screen displays. 2. Enter the Source Interface, Sampling Interval, Samples Requested and Owner in the provided field in the first row. 3. Click Add to update the device. Monitoring the Switch v1.0, March 2008 7-15
-
 1
1 -
2
-
3
-
4
-
5
-
6
-
7
-
8
-
9
-
10
-
11
-
12
-
13
-
14
-
15
-
16
-
17
-
18
-
19
-
20
-
21
-
22
-
23
-
24
-
25
-
26
-
27
-
28
-
29
-
30
-
31
-
32
-
33
-
34
-
35
-
36
-
37
-
38
-
39
-
40
-
41
-
42
-
43
-
44
-
45
-
46
-
47
-
48
-
49
-
50
-
51
-
52
-
53
-
54
-
55
-
56
-
57
-
58
-
59
-
60
-
61
-
62
-
63
-
64
-
65
-
66
-
67
-
68
-
69
-
70
-
71
-
72
-
73
-
74
-
75
-
76
-
77
-
78
-
79
-
80
-
81
-
82
-
83
-
84
-
85
-
86
-
87
-
88
-
89
-
90
-
91
-
92
-
93
-
94
-
95
-
96
-
97
-
98
-
99
-
100
-
101
-
102
-
103
-
104
-
105
-
106
-
107
-
108
-
109
-
110
-
111
-
112
-
113
-
114
-
115
-
116
-
117
-
118
-
119
-
120
-
121
-
122
-
123
-
124
-
125
-
126
-
127
-
128
-
129
-
130
-
131
-
132
-
133
-
134
-
135
-
136
-
137
-
138
-
139
-
140
-
141
-
142
-
143
-
144
-
145
-
146
-
147
-
148
-
149
-
150
-
151
-
152
-
153
-
154
-
155
-
156
-
157
-
158
-
159
-
160
-
161
-
162
-
163
-
164
-
165
-
166
-
167
-
168
-
169
-
170
-
171
-
172
-
173
-
174
-
175
-
176
-
177
-
178
-
179
-
180
-
 181
181 -
 182
182 -
 183
183 -
 184
184 -
 185
185 -
 186
186 -
 187
187 -
 188
188 -
 189
189 -
 190
190 -
 191
191 -
192
-
193
-
194
-
195
-
196
-
197
-
198
-
199
-
200
-
201
-
202
-
203
-
204
-
205
-
206
-
207
-
208
-
209
 |
 |
