Netgear GS724AT GS724AT Reference Manual - Page 96
VLAN Configuration
 |
UPC - 606449056907
View all Netgear GS724AT manuals
Add to My Manuals
Save this manual to your list of manuals |
Page 96 highlights
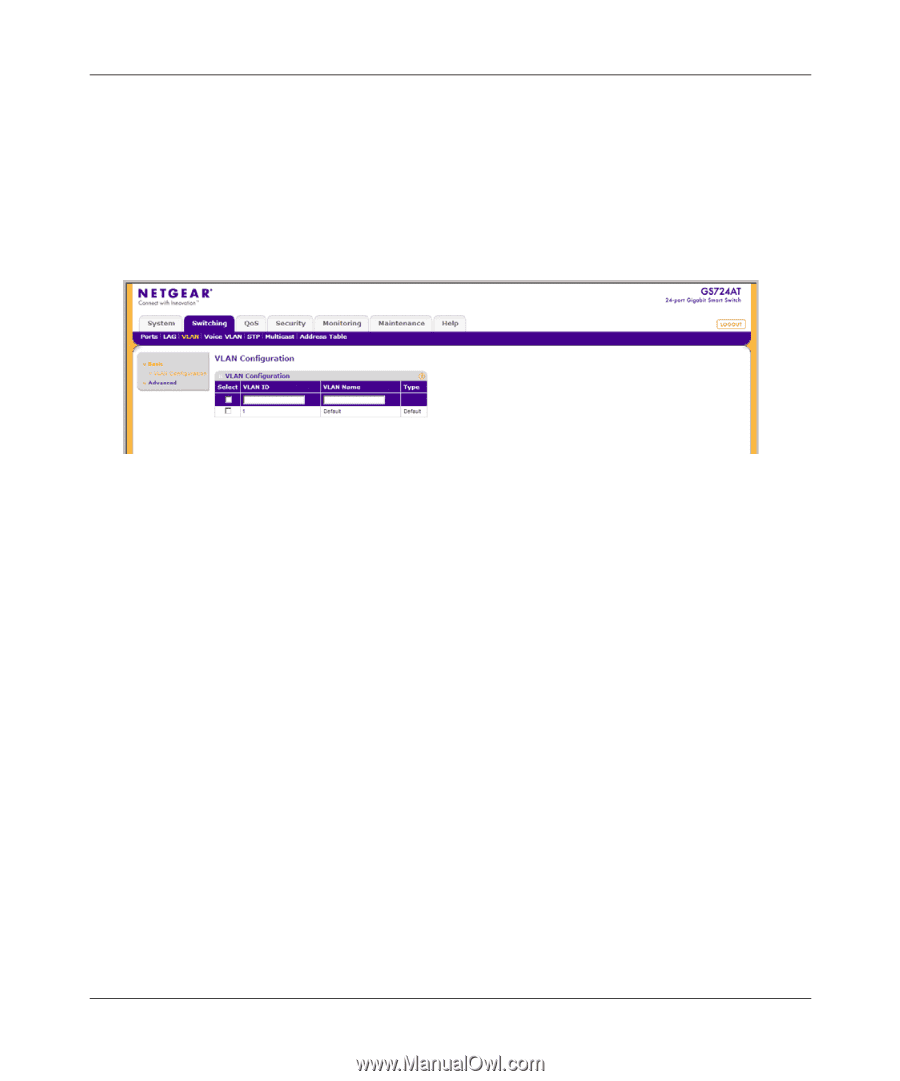
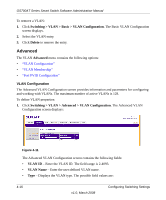
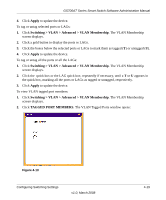
GS700AT Series Smart Switch Software Administration Manual VLAN Configuration The Basic VLAN Configuration screen provides information and parameters for configuring and working with VLANs. The maximum number of active VLANs is 128. To define VLAN properties: 1. Click Switching > VLAN > Basic > VLAN Configuration. The Basic VLAN Configuration screen displays: Figure 4-10 The Basic VLAN Configuration screen contains the following fields: • VLAN ID - Enter the VLAN ID. The field range is 2-4093. • VLAN Name - Enter the user-defined VLAN name. • Type - Displays the VLAN type. The possible field values are: - Static - The VLAN is user-defined. - Default - The default VLAN ID is 1. It cannot be modified by the user. 2. Select the VLAN entry. 3. Enter the VLAN ID and VLAN Name in the provided fields in the first row. 4. Click Apply to update the device. To add a new VLAN: 1. Click Switching > VLAN > Basic > VLAN Configuration. The Basic VLAN Configuration screen displays. 2. Enter the VLAN ID and VLAN Name in the provided fields in the first row. 3. Click Add to update the device. Configuring Switching Settings v1.0, March 2008 4-15
-
 1
1 -
2
-
3
-
4
-
5
-
6
-
7
-
8
-
9
-
10
-
11
-
12
-
13
-
14
-
15
-
16
-
17
-
18
-
19
-
20
-
21
-
22
-
23
-
24
-
25
-
26
-
27
-
28
-
29
-
30
-
31
-
32
-
33
-
34
-
35
-
36
-
37
-
38
-
39
-
40
-
41
-
42
-
43
-
44
-
45
-
46
-
47
-
48
-
49
-
50
-
51
-
52
-
53
-
54
-
55
-
56
-
57
-
58
-
59
-
60
-
61
-
62
-
63
-
64
-
65
-
66
-
67
-
68
-
69
-
70
-
71
-
72
-
73
-
74
-
75
-
76
-
77
-
78
-
79
-
80
-
81
-
82
-
83
-
84
-
85
-
86
-
87
-
88
-
89
-
90
-
 91
91 -
 92
92 -
 93
93 -
 94
94 -
 95
95 -
 96
96 -
 97
97 -
 98
98 -
 99
99 -
 100
100 -
 101
101 -
102
-
103
-
104
-
105
-
106
-
107
-
108
-
109
-
110
-
111
-
112
-
113
-
114
-
115
-
116
-
117
-
118
-
119
-
120
-
121
-
122
-
123
-
124
-
125
-
126
-
127
-
128
-
129
-
130
-
131
-
132
-
133
-
134
-
135
-
136
-
137
-
138
-
139
-
140
-
141
-
142
-
143
-
144
-
145
-
146
-
147
-
148
-
149
-
150
-
151
-
152
-
153
-
154
-
155
-
156
-
157
-
158
-
159
-
160
-
161
-
162
-
163
-
164
-
165
-
166
-
167
-
168
-
169
-
170
-
171
-
172
-
173
-
174
-
175
-
176
-
177
-
178
-
179
-
180
-
181
-
182
-
183
-
184
-
185
-
186
-
187
-
188
-
189
-
190
-
191
-
192
-
193
-
194
-
195
-
196
-
197
-
198
-
199
-
200
-
201
-
202
-
203
-
204
-
205
-
206
-
207
-
208
-
209
 |
 |