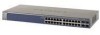
Netgear GS724AT GS724AT Reference Manual - Page 50
Community Configuration
 |
UPC - 606449056907
View all Netgear GS724AT manuals
Add to My Manuals
Save this manual to your list of manuals |
Page 50 highlights
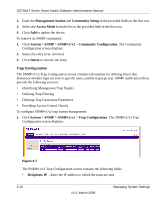
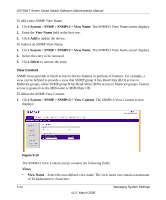
GS700AT Series Smart Switch Software Administration Manual • Object ID Subtree - Enter the device feature OID. • View Type - Select whether the defined OID branch will be included in or excluded from the selected SNMP view. The possible field values are: - Included - The OID is included in the SNMP view. - Excluded - The OID is excluded from the SNMP view. 2. Select the View Name from the list in the provided field in the Views table. 3. Enter the Object ID Subtree in the provided field in the first row. 4. Select either Included or Excluded from the View Type provided field in the first row. 5. Click Apply to update the device. To add a new SNMP OID entry: 1. Click System > SNMP > SNMPv3 > View Content. The SNMPv3 View Content screen displays. 2. Select the View Name from the list in the provided field in the Views table. 3. Enter the Object ID Subtree in the provided field in the first row. 4. Select either Included or Excluded from the View Type provided field in the first row. 5. Click Add to update the device. To remove an SNMP OID entry: 1. Click System > SNMP > SNMPv3 > View Content. The SNMPv3 View Content screen displays. 2. Select the View Name from the list in the provided field in the Views table. 3. Select the OID entry to be removed. 4. Click Delete to remove the entry. Community Configuration Access rights are managed by defining communities in the Community Configuration screen. When community names are changed, access rights are also changed. Managing System Settings v1.0, March 2008 3-15
-
 1
1 -
2
-
3
-
4
-
5
-
6
-
7
-
8
-
9
-
10
-
11
-
12
-
13
-
14
-
15
-
16
-
17
-
18
-
19
-
20
-
21
-
22
-
23
-
24
-
25
-
26
-
27
-
28
-
29
-
30
-
31
-
32
-
33
-
34
-
35
-
36
-
37
-
38
-
39
-
40
-
41
-
42
-
43
-
44
-
 45
45 -
 46
46 -
 47
47 -
 48
48 -
 49
49 -
 50
50 -
 51
51 -
 52
52 -
 53
53 -
 54
54 -
 55
55 -
56
-
57
-
58
-
59
-
60
-
61
-
62
-
63
-
64
-
65
-
66
-
67
-
68
-
69
-
70
-
71
-
72
-
73
-
74
-
75
-
76
-
77
-
78
-
79
-
80
-
81
-
82
-
83
-
84
-
85
-
86
-
87
-
88
-
89
-
90
-
91
-
92
-
93
-
94
-
95
-
96
-
97
-
98
-
99
-
100
-
101
-
102
-
103
-
104
-
105
-
106
-
107
-
108
-
109
-
110
-
111
-
112
-
113
-
114
-
115
-
116
-
117
-
118
-
119
-
120
-
121
-
122
-
123
-
124
-
125
-
126
-
127
-
128
-
129
-
130
-
131
-
132
-
133
-
134
-
135
-
136
-
137
-
138
-
139
-
140
-
141
-
142
-
143
-
144
-
145
-
146
-
147
-
148
-
149
-
150
-
151
-
152
-
153
-
154
-
155
-
156
-
157
-
158
-
159
-
160
-
161
-
162
-
163
-
164
-
165
-
166
-
167
-
168
-
169
-
170
-
171
-
172
-
173
-
174
-
175
-
176
-
177
-
178
-
179
-
180
-
181
-
182
-
183
-
184
-
185
-
186
-
187
-
188
-
189
-
190
-
191
-
192
-
193
-
194
-
195
-
196
-
197
-
198
-
199
-
200
-
201
-
202
-
203
-
204
-
205
-
206
-
207
-
208
-
209
 |
 |