Netgear GS724AT GS724AT Reference Manual - Page 58
User Name, Security Level, UDP Port, Filter Name, Timeout, Retries, Recipients IP, Notification Type
 |
UPC - 606449056907
View all Netgear GS724AT manuals
Add to My Manuals
Save this manual to your list of manuals |
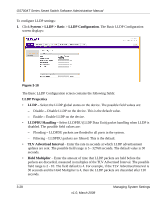
Page 58 highlights
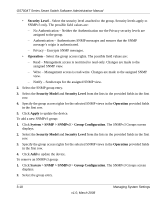
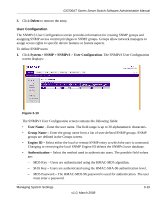
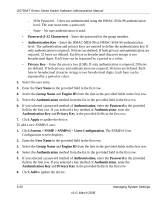
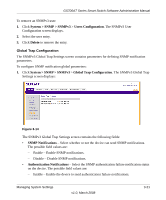
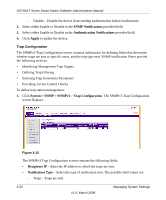
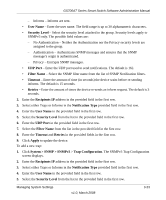
GS700AT Series Smart Switch Software Administration Manual - Informs - Informs are sent. • User Name - Enter the user name. The field range is up to 30 alphanumeric characters. • Security Level - Select the security level attached to the group. Security levels apply to SNMPv3 only. The possible field values are: - No Authentication - Neither the Authentication nor the Privacy security levels are assigned to the group. - Authentication - Authenticates SNMP messages and ensures that the SNMP message's origin is authenticated. - Privacy - Encrypts SNMP messages. • UDP Port - Enter the UDP port used to send notifications. The default is 162. • Filter Name - Select the SNMP filter name from the list of SNMP Notification filters. • Timeout - Enter the amount of time (in seconds) the device waits before re-sending informs. The default is 15 seconds. • Retries - Enter the amount of times the device re-sends an inform request. The default is 3 seconds. 2. Enter the Recipients IP address in the provided field in the first row. 3. Select either Traps or Informs in the Notification Type provided field in the first row. 4. Enter the User Name in the provided field in the first row. 5. Select the Security Level from the list in the provided field in the first row. 6. Enter the UDP Port in the provided field in the first row. 7. Select the Filter Name from the list in the provided field in the first row. 8. Enter the Timeout and Retries in the provided fields in the first row. 9. Click Apply to update the device. To add a new trap: 1. Click System > SNMP > SNMPv3 > Trap Configuration. The SNMPv3 Trap Configuration screen displays. 2. Enter the Recipients IP address in the provided field in the first row. 3. Select either Traps or Informs in the Notification Type provided field in the first row. 4. Enter the User Name in the provided field in the first row. 5. Select the Security Level from the list in the provided field in the first row. Managing System Settings v1.0, March 2008 3-23
-
 1
1 -
2
-
3
-
4
-
5
-
6
-
7
-
8
-
9
-
10
-
11
-
12
-
13
-
14
-
15
-
16
-
17
-
18
-
19
-
20
-
21
-
22
-
23
-
24
-
25
-
26
-
27
-
28
-
29
-
30
-
31
-
32
-
33
-
34
-
35
-
36
-
37
-
38
-
39
-
40
-
41
-
42
-
43
-
44
-
45
-
46
-
47
-
48
-
49
-
50
-
51
-
52
-
 53
53 -
 54
54 -
 55
55 -
 56
56 -
 57
57 -
 58
58 -
 59
59 -
 60
60 -
 61
61 -
 62
62 -
 63
63 -
64
-
65
-
66
-
67
-
68
-
69
-
70
-
71
-
72
-
73
-
74
-
75
-
76
-
77
-
78
-
79
-
80
-
81
-
82
-
83
-
84
-
85
-
86
-
87
-
88
-
89
-
90
-
91
-
92
-
93
-
94
-
95
-
96
-
97
-
98
-
99
-
100
-
101
-
102
-
103
-
104
-
105
-
106
-
107
-
108
-
109
-
110
-
111
-
112
-
113
-
114
-
115
-
116
-
117
-
118
-
119
-
120
-
121
-
122
-
123
-
124
-
125
-
126
-
127
-
128
-
129
-
130
-
131
-
132
-
133
-
134
-
135
-
136
-
137
-
138
-
139
-
140
-
141
-
142
-
143
-
144
-
145
-
146
-
147
-
148
-
149
-
150
-
151
-
152
-
153
-
154
-
155
-
156
-
157
-
158
-
159
-
160
-
161
-
162
-
163
-
164
-
165
-
166
-
167
-
168
-
169
-
170
-
171
-
172
-
173
-
174
-
175
-
176
-
177
-
178
-
179
-
180
-
181
-
182
-
183
-
184
-
185
-
186
-
187
-
188
-
189
-
190
-
191
-
192
-
193
-
194
-
195
-
196
-
197
-
198
-
199
-
200
-
201
-
202
-
203
-
204
-
205
-
206
-
207
-
208
-
209
 |
 |