Xerox 6500V_N User Guide - Page 113
Using Commands in Email Text, Save Changes, Port Enabling, Enable Mail Alerts, Examples of Commands
 |
View all Xerox 6500V_N manuals
Add to My Manuals
Save this manual to your list of manuals |
Page 113 highlights
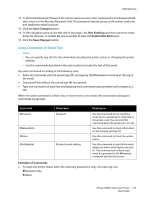
Maintenance 12. In the Email Password (Password for remote status) section, enter a password in the Password field, then enter it in the Re-enter Password field. This password controls access to the printer read only and read/write email functions. 13. Click the Save Changes button. 14. In the navigation pane on the left side of the page, click Port Enabling and then select the check boxes for the ports to enable. Be sure to enable at least the Enable Mail Alerts port. 15. Click the Save Changes button. Using Commands in Email Text Notes: • You can specify any title for the email when checking the printer status or changing the printer settings. • Use the commands described in the next section to create the text of the email. Use each command according to the following rules: • Prefix all commands with the pound sign (#), and specify the #Password command at the top of the email. • Command lines without the pound sign (#) are ignored. • Type one command on each line and separate each command and parameter with a space or a tab. When the same command is written two or more times in one email, the second and subsequent commands are ignored. Command #Password #NetworkInfo #Status #SetMsgAddr Parameter Password Recipient email address Description Use this command at the top of the email when a password for read only or full access is set. You can omit this command when the password is not set. Use this command to check information on the network settings list. Use this command to check the printer status. Use this command to specify the email address to which email reports are sent to. This command can only be used when the password in the #Password command specifies full access. Examples of Commands • To check the printer status when the read-only password is ronly, for read only, use: #Password ronly #Status Phaser 6500 Color Laser Printer 113 User Guide
-
 1
1 -
2
-
3
-
4
-
5
-
6
-
7
-
8
-
9
-
10
-
11
-
12
-
13
-
14
-
15
-
16
-
17
-
18
-
19
-
20
-
21
-
22
-
23
-
24
-
25
-
26
-
27
-
28
-
29
-
30
-
31
-
32
-
33
-
34
-
35
-
36
-
37
-
38
-
39
-
40
-
41
-
42
-
43
-
44
-
45
-
46
-
47
-
48
-
49
-
50
-
51
-
52
-
53
-
54
-
55
-
56
-
57
-
58
-
59
-
60
-
61
-
62
-
63
-
64
-
65
-
66
-
67
-
68
-
69
-
70
-
71
-
72
-
73
-
74
-
75
-
76
-
77
-
78
-
79
-
80
-
81
-
82
-
83
-
84
-
85
-
86
-
87
-
88
-
89
-
90
-
91
-
92
-
93
-
94
-
95
-
96
-
97
-
98
-
99
-
100
-
101
-
102
-
103
-
104
-
105
-
106
-
107
-
 108
108 -
 109
109 -
 110
110 -
 111
111 -
 112
112 -
 113
113 -
 114
114 -
 115
115 -
 116
116 -
 117
117 -
 118
118 -
119
-
120
-
121
-
122
-
123
-
124
-
125
-
126
-
127
-
128
-
129
-
130
-
131
-
132
-
133
-
134
-
135
-
136
-
137
-
138
-
139
-
140
-
141
-
142
-
143
-
144
-
145
-
146
-
147
-
148
-
149
-
150
-
151
-
152
-
153
-
154
-
155
-
156
-
157
-
158
-
159
-
160
-
161
-
162
 |
 |
