Xerox 6500V_N User Guide - Page 130
Supported Paper, Consumables, Paper, Storage Guidelines, Color Registration, Cleaning the Imaging
 |
View all Xerox 6500V_N manuals
Add to My Manuals
Save this manual to your list of manuals |
Page 130 highlights
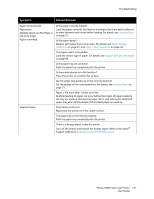
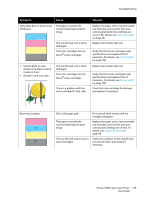
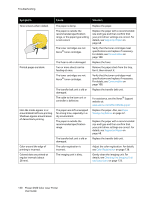
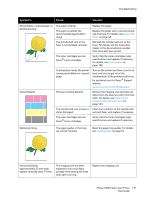
Troubleshooting Symptom Cause Solution Toner smears when rubbed. Printed pages are blank. Hair-like marks appear in or around black half-tone printing. Shadows appear around areas of dense black printing. Color around the edge of printing is incorrect. Colored dots are printed at regular intervals (about 28 mm). The paper is damp. The paper is outside the recommended specification range, or the paper type setting is not correct. The toner cartridges are not Xerox® toner cartridges. The fuser is old or damaged. Two or more sheets can be feeding at once. The toner cartridges are not Xerox® toner cartridges. The transfer belt unit is old or damaged. The cable to the laser unit or controller is defective. The paper was left unwrapped for a long time, especially in a dry environment. The paper is outside the recommended specification range. The transfer belt unit is old or damaged. The color registration is incorrect. The imaging unit is dirty. Replace the paper. Replace the paper with a recommended size and type and then confirm that your print driver settings are correct. For details, see Supported Paper on page 48. Verify that the toner cartridges meet specifications and replace if necessary. For details, see Consumables on page 108. Replace the fuser. Remove the paper stack from the tray, fan it, then reinsert it. Verify that the toner cartridges meet specifications and replace if necessary. For details, see Consumables on page 108. Replace the transfer belt unit. For assistance, see the Xerox® Support website at: www.xerox.com/office/6500support Replace the paper. Also, see Paper Storage Guidelines on page 47. Replace the paper with a recommended size and type and then confirm that your print driver settings are correct. For details, see Supported Paper on page 48. Replace the transfer belt unit. Adjust the color registration. For details, see Color Registration on page 136. Gently clean the imaging unit. For details, see Cleaning the Imaging Unit and Laser Lens on page 133. 130 Phaser 6500 Color Laser Printer User Guide
-
 1
1 -
2
-
3
-
4
-
5
-
6
-
7
-
8
-
9
-
10
-
11
-
12
-
13
-
14
-
15
-
16
-
17
-
18
-
19
-
20
-
21
-
22
-
23
-
24
-
25
-
26
-
27
-
28
-
29
-
30
-
31
-
32
-
33
-
34
-
35
-
36
-
37
-
38
-
39
-
40
-
41
-
42
-
43
-
44
-
45
-
46
-
47
-
48
-
49
-
50
-
51
-
52
-
53
-
54
-
55
-
56
-
57
-
58
-
59
-
60
-
61
-
62
-
63
-
64
-
65
-
66
-
67
-
68
-
69
-
70
-
71
-
72
-
73
-
74
-
75
-
76
-
77
-
78
-
79
-
80
-
81
-
82
-
83
-
84
-
85
-
86
-
87
-
88
-
89
-
90
-
91
-
92
-
93
-
94
-
95
-
96
-
97
-
98
-
99
-
100
-
101
-
102
-
103
-
104
-
105
-
106
-
107
-
108
-
109
-
110
-
111
-
112
-
113
-
114
-
115
-
116
-
117
-
118
-
119
-
120
-
121
-
122
-
123
-
124
-
 125
125 -
 126
126 -
 127
127 -
 128
128 -
 129
129 -
 130
130 -
 131
131 -
 132
132 -
 133
133 -
 134
134 -
 135
135 -
136
-
137
-
138
-
139
-
140
-
141
-
142
-
143
-
144
-
145
-
146
-
147
-
148
-
149
-
150
-
151
-
152
-
153
-
154
-
155
-
156
-
157
-
158
-
159
-
160
-
161
-
162
 |
 |
