Xerox 6500V_N User Guide - Page 88
Printing a Proof Print Job, Back Arrow, Down Arrow, Proof Print, Select Document, Delete after Print
 |
View all Xerox 6500V_N manuals
Add to My Manuals
Save this manual to your list of manuals |
Page 88 highlights
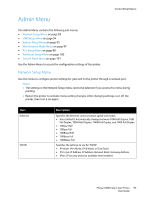
Printing 6. One set of the job prints. Review this set. If the set is satisfactory, you can print the remaining sets from the control panel. For details, see Printing a Proof Print Job on page 88. Printing a Proof Print Job 1. After reviewing the first set that printed when you sent the document, you can print the remaining sets from the control panel. At the printer control panel, press the Back Arrow button to access the Walk-Up printing feature. 2. Press the Down Arrow button to go to Proof Print and then press the OK button. 3. At your user name, or the name you supplied to use for retrieving the document when you set up the Proof Print. Press OK. 4. Do one of the following: • If you selected to retrieve the document using a specific name, then at the name of the document, press OK. • If you selected to retrieve the document using a timestamp, Select Document and a time stamp appear on the control panel menu. Press OK. 5. Select from the following: • To print the document and then delete it from memory after printing, at Delete after Print, press OK. • To print the document and keep it in the printer memory after printing, press the Down Arrow button to scroll to Print and Save and then press OK. Note: Any print jobs stored in the RAM are erased when the printer is turned off or loses power. 6. Press the Up Arrow or Down Arrow buttons to set the number of sets to print and then press OK. See also: Setting Up a Proof Print Job on page 87 88 Phaser 6500 Color Laser Printer User Guide
-
 1
1 -
2
-
3
-
4
-
5
-
6
-
7
-
8
-
9
-
10
-
11
-
12
-
13
-
14
-
15
-
16
-
17
-
18
-
19
-
20
-
21
-
22
-
23
-
24
-
25
-
26
-
27
-
28
-
29
-
30
-
31
-
32
-
33
-
34
-
35
-
36
-
37
-
38
-
39
-
40
-
41
-
42
-
43
-
44
-
45
-
46
-
47
-
48
-
49
-
50
-
51
-
52
-
53
-
54
-
55
-
56
-
57
-
58
-
59
-
60
-
61
-
62
-
63
-
64
-
65
-
66
-
67
-
68
-
69
-
70
-
71
-
72
-
73
-
74
-
75
-
76
-
77
-
78
-
79
-
80
-
81
-
82
-
 83
83 -
 84
84 -
 85
85 -
 86
86 -
 87
87 -
 88
88 -
 89
89 -
 90
90 -
 91
91 -
 92
92 -
 93
93 -
94
-
95
-
96
-
97
-
98
-
99
-
100
-
101
-
102
-
103
-
104
-
105
-
106
-
107
-
108
-
109
-
110
-
111
-
112
-
113
-
114
-
115
-
116
-
117
-
118
-
119
-
120
-
121
-
122
-
123
-
124
-
125
-
126
-
127
-
128
-
129
-
130
-
131
-
132
-
133
-
134
-
135
-
136
-
137
-
138
-
139
-
140
-
141
-
142
-
143
-
144
-
145
-
146
-
147
-
148
-
149
-
150
-
151
-
152
-
153
-
154
-
155
-
156
-
157
-
158
-
159
-
160
-
161
-
162
 |
 |
