ZyXEL P-794H User Guide - Page 61
Table 18
 |
View all ZyXEL P-794H manuals
Add to My Manuals
Save this manual to your list of manuals |
Page 61 highlights
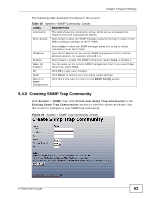
Chapter 5 System Settings The following table describes the labels in this screen. Table 18 System > SNMP Config LABEL SNMP System Configuration SysDescr SysObjectID SysLocation SysContact SysName Apply Reset Existing Snmp Communities Community Write Access DESCRIPTION You can input the information for the MIB data in this section. Enter the SysDescr here. The sysDescr defines the system description of the host on which the SNMP agent is running. It should include the full name and version identification of the system's hardware type, software operating-system, and networking software. This field displays the selected MIB object's ID. Data is formatted in MIB dot format, optionally with a leading text identifier, for example sysObjectID.0 or 1.3.6.1.2.1.1.2.0. Enter the SysLocation here. The SysLocation is the physical location of the the SNMP agent. Enter the SysContact here. The SysContact is the system contact address of the SNMP agent manager. Enter the SysName here. The SysName is the name of the SNMP agent. Click Apply to save your changes. Click Reset to restore your previously saved settings. You can configure, create SNMP communities, and associate rights to them in this section. SNMP communities act like passwords and are used to define the security parameters of SNMP clients. This field shows the community string, which act as a password for requests from the management station. Select true to allow the SNMP manager using this string to create or edit MIBs (configure settings on the P-794H). IPaddress Enabled Wake Up Enabled Delete? Apply Reset Create New Snmp Community Existing Snmp Trap Communities Community IPaddress Port Select false to allow the SNMP manager using this string to collect information from the P-794H. Type the IP address of the remote SNMP management host in dotted decimal notation, for example 192.168.1.1. Select true to enable this SNMP community. Select false to disable it. You can wake up the remote SNMP management host if you select true. Otherwise, select false. Select the checkbox to remove a specific community string. Click Apply to save your changes. Click Reset to restore your previously saved settings. Click this if you want to create a new SNMP community. See Section 5.4.5 on page 62 for more information. You can configure, create, or delete existing SNMP trap communities. This field shows the trap community string, which act as a password for requests from the management station. Enter the IP addresses of the manager to send your SNMP traps to. Enter the port number upon which the manager listens for SNMP traps. P-794H User's Guide 61
-
 1
1 -
2
-
3
-
4
-
5
-
6
-
7
-
8
-
9
-
10
-
11
-
12
-
13
-
14
-
15
-
16
-
17
-
18
-
19
-
20
-
21
-
22
-
23
-
24
-
25
-
26
-
27
-
28
-
29
-
30
-
31
-
32
-
33
-
34
-
35
-
36
-
37
-
38
-
39
-
40
-
41
-
42
-
43
-
44
-
45
-
46
-
47
-
48
-
49
-
50
-
51
-
52
-
53
-
54
-
55
-
 56
56 -
 57
57 -
 58
58 -
 59
59 -
 60
60 -
 61
61 -
 62
62 -
 63
63 -
 64
64 -
 65
65 -
 66
66 -
67
-
68
-
69
-
70
-
71
-
72
-
73
-
74
-
75
-
76
-
77
-
78
-
79
-
80
-
81
-
82
-
83
-
84
-
85
-
86
-
87
-
88
-
89
-
90
-
91
-
92
-
93
-
94
-
95
-
96
-
97
-
98
-
99
-
100
-
101
-
102
-
103
-
104
-
105
-
106
-
107
-
108
-
109
-
110
-
111
-
112
-
113
-
114
-
115
-
116
-
117
-
118
-
119
-
120
-
121
-
122
-
123
-
124
-
125
-
126
-
127
-
128
-
129
-
130
-
131
-
132
-
133
-
134
-
135
-
136
-
137
-
138
-
139
-
140
-
141
-
142
-
143
-
144
-
145
-
146
-
147
-
148
-
149
-
150
-
151
-
152
-
153
-
154
-
155
-
156
-
157
-
158
-
159
-
160
-
161
-
162
-
163
-
164
-
165
-
166
-
167
-
168
-
169
-
170
-
171
-
172
-
173
-
174
-
175
-
176
-
177
-
178
-
179
-
180
-
181
-
182
-
183
-
184
-
185
-
186
-
187
-
188
-
189
-
190
-
191
-
192
-
193
-
194
-
195
-
196
-
197
-
198
-
199
-
200
-
201
-
202
-
203
-
204
-
205
-
206
-
207
-
208
-
209
-
210
-
211
-
212
-
213
-
214
-
215
-
216
-
217
-
218
-
219
-
220
-
221
-
222
-
223
-
224
-
225
-
226
-
227
-
228
-
229
-
230
-
231
-
232
-
233
-
234
-
235
-
236
-
237
-
238
-
239
-
240
-
241
-
242
-
243
-
244
-
245
-
246
-
247
-
248
-
249
-
250
-
251
-
252
-
253
-
254
-
255
-
256
-
257
-
258
-
259
-
260
-
261
-
262
-
263
-
264
-
265
-
266
-
267
-
268
-
269
-
270
-
271
-
272
-
273
-
274
-
275
-
276
-
277
-
278
-
279
-
280
-
281
-
282
-
283
-
284
-
285
-
286
-
287
-
288
-
289
-
290
-
291
-
292
-
293
-
294
 |
 |
