ZyXEL P-870MH-C1 User Guide - Page 205
Ether Type, User defined, Vendor Class ID DHCP Option 60, User Class ID DHCP Option 77, Apply,
 |
View all ZyXEL P-870MH-C1 manuals
Add to My Manuals
Save this manual to your list of manuals |
Page 205 highlights
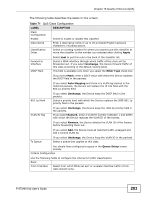
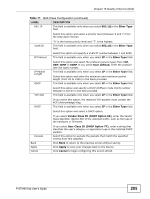
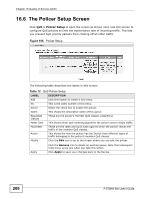
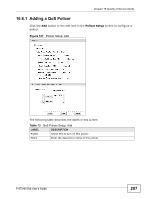
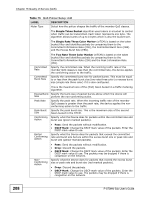
Chapter 16 Quality of Service (QoS) Table 71 QoS Class Configuration (continued) LABEL DESCRIPTION 802.1P This field is available only when you select 802.1Q in the Ether Type field. Select this option and select a priority level (between 0 and 7) from the drop down list box. VLAN ID "0" is the lowest priority level and "7" is the highest. This field is available only when you select 802.1Q in the Ether Type field. IP Protocol Select this option and specify a VLAN ID number between 1 and 4095. This field is available only when you select IP in the Ether Type field. IP Packet Length DSCP Select this option and select the protocol (service type) from TCP, UDP, ICMP or IGMP. If you select User defined, enter the protocol (service type) number. This field is available only when you select IP in the Ether Type field. Select this option and enter the minimum and maximum packet length (from 28 to 1500) in the fields provided. This field is available only when you select IP in the Ether Type field. TCP ACK Select this option and specify a DSCP (DiffServ Code Point) number between 0 and 63 in the field provided. This field is available only when you select IP in the Ether Type field. DHCP If you select this option, the matched TCP packets must contain the ACK (Acknowledge) flag. This field is available only when you select IP in the Ether Type field. Select this option and select a DHCP option. If you select Vendor Class ID (DHCP Option 60), enter the Vendor Class Identifier (Option 60) of the matched traffic, such as the type of the hardware or firmware. Exclude Back Apply Cancel If you select User Class ID (DHCP Option 77), enter a string that identifies the user's category or application type in the matched DHCP packets. Select this option to exclude the packets that match the specified criteria from this classifier. Click Back to return to the previous screen without saving. Click Apply to save your changes back to the Device. Click Cancel to begin configuring this screen afresh. P-870HN-5xb User's Guide 205
-
 1
1 -
2
-
3
-
4
-
5
-
6
-
7
-
8
-
9
-
10
-
11
-
12
-
13
-
14
-
15
-
16
-
17
-
18
-
19
-
20
-
21
-
22
-
23
-
24
-
25
-
26
-
27
-
28
-
29
-
30
-
31
-
32
-
33
-
34
-
35
-
36
-
37
-
38
-
39
-
40
-
41
-
42
-
43
-
44
-
45
-
46
-
47
-
48
-
49
-
50
-
51
-
52
-
53
-
54
-
55
-
56
-
57
-
58
-
59
-
60
-
61
-
62
-
63
-
64
-
65
-
66
-
67
-
68
-
69
-
70
-
71
-
72
-
73
-
74
-
75
-
76
-
77
-
78
-
79
-
80
-
81
-
82
-
83
-
84
-
85
-
86
-
87
-
88
-
89
-
90
-
91
-
92
-
93
-
94
-
95
-
96
-
97
-
98
-
99
-
100
-
101
-
102
-
103
-
104
-
105
-
106
-
107
-
108
-
109
-
110
-
111
-
112
-
113
-
114
-
115
-
116
-
117
-
118
-
119
-
120
-
121
-
122
-
123
-
124
-
125
-
126
-
127
-
128
-
129
-
130
-
131
-
132
-
133
-
134
-
135
-
136
-
137
-
138
-
139
-
140
-
141
-
142
-
143
-
144
-
145
-
146
-
147
-
148
-
149
-
150
-
151
-
152
-
153
-
154
-
155
-
156
-
157
-
158
-
159
-
160
-
161
-
162
-
163
-
164
-
165
-
166
-
167
-
168
-
169
-
170
-
171
-
172
-
173
-
174
-
175
-
176
-
177
-
178
-
179
-
180
-
181
-
182
-
183
-
184
-
185
-
186
-
187
-
188
-
189
-
190
-
191
-
192
-
193
-
194
-
195
-
196
-
197
-
198
-
199
-
 200
200 -
 201
201 -
 202
202 -
 203
203 -
 204
204 -
 205
205 -
 206
206 -
 207
207 -
 208
208 -
 209
209 -
 210
210 -
211
-
212
-
213
-
214
-
215
-
216
-
217
-
218
-
219
-
220
-
221
-
222
-
223
-
224
-
225
-
226
-
227
-
228
-
229
-
230
-
231
-
232
-
233
-
234
-
235
-
236
-
237
-
238
-
239
-
240
-
241
-
242
-
243
-
244
-
245
-
246
-
247
-
248
-
249
-
250
-
251
-
252
-
253
-
254
-
255
-
256
-
257
-
258
-
259
-
260
-
261
-
262
-
263
-
264
-
265
-
266
-
267
-
268
-
269
-
270
-
271
-
272
-
273
-
274
-
275
-
276
-
277
-
278
-
279
-
280
-
281
-
282
-
283
-
284
-
285
-
286
-
287
-
288
-
289
-
290
-
291
-
292
-
293
-
294
-
295
-
296
-
297
-
298
-
299
-
300
-
301
-
302
-
303
-
304
-
305
-
306
-
307
-
308
-
309
-
310
-
311
-
312
-
313
-
314
-
315
-
316
-
317
-
318
-
319
-
320
-
321
-
322
-
323
-
324
-
325
-
326
-
327
-
328
-
329
-
330
-
331
-
332
-
333
-
334
-
335
-
336
-
337
-
338
-
339
-
340
-
341
-
342
-
343
-
344
-
345
-
346
-
347
-
348
-
349
-
350
-
351
-
352
-
353
-
354
-
355
-
356
-
357
-
358
-
359
-
360
-
361
-
362
-
363
-
364
-
365
-
366
-
367
-
368
-
369
-
370
-
371
-
372
-
373
-
374
-
375
-
376
-
377
-
378
-
379
-
380
-
381
-
382
-
383
-
384
-
385
-
386
-
387
-
388
-
389
-
390
-
391
-
392
-
393
-
394
-
395
-
396
-
397
-
398
-
399
-
400
 |
 |