| Section |
Page |
| Cover1 |
1 |
| If You Need to Call Customer Service |
2 |
| Year 2000 Compliant |
2 |
| Brother Numbers |
3 |
| Brother fax-back system |
3 |
| Frequently Asked Questions (FAQs) |
3 |
| Brother Bulletin Board |
3 |
| For Customer Service |
3 |
| Ordering Accessories and Supplies |
4 |
| Compilation and Publication Notice |
5 |
| Quick Reference Guide |
9 |
| Sending Faxes |
9 |
| Automatic Transmission |
9 |
| Sending a Cover Page |
9 |
| Real Time Transmission |
9 |
| Receiving Faxes |
9 |
| Select Receive Mode |
9 |
| Storing Numbers |
10 |
| Storing One Touch Dial Numbers |
10 |
| Storing Speed Dial Numbers |
10 |
| Dialing Operations |
10 |
| One Touch Dialing / Speed Dialing |
10 |
| Search/Speed Dial |
10 |
| Making Copies |
10 |
| Making a Single Copy |
10 |
| Sorting Multiple Copies (Using the ADF) |
10 |
| Table of Contents |
11 |
| Introduction |
24 |
| Using This Manual |
24 |
| Finding Information |
24 |
| Conventions Used in this Manual |
24 |
| Test Sheet Procedures (For USA Only) |
25 |
| MFC 9200C Control Panel Overview |
26 |
| About Fax Machines |
28 |
| Fax Tones and Handshake |
28 |
| ECM (Error Correction Mode) |
28 |
| Assembly and Connections |
29 |
| Packing List |
29 |
| Choosing a Location |
30 |
| IMPORTANT SAFETY INSTRUCTIONS |
31 |
| Release the Scanner Lock |
31 |
| Paper |
32 |
| About Brother Paper |
32 |
| Paper Specifications for Paper Cassette and Manual Feed Slot |
33 |
| Print Area |
34 |
| Loading Paper in the Multi-Purpose Paper Cassette |
35 |
| Connecting the MFC |
36 |
| Installing the Ink Cartridges |
37 |
| Important |
38 |
| Connections |
40 |
| Connecting an External Telephone |
40 |
| Connecting an External Telephone Answering Device (TAD) |
40 |
| Sequence |
40 |
| Connections |
41 |
| Recording Outgoing Message (OGM) |
41 |
| Special Line Considerations |
42 |
| Roll Over Phone Lines |
42 |
| Two-Line Phone System |
42 |
| Converting Telephone Wall Outlets |
42 |
| Installing MFC, External Two-Line TAD, and Two-Line Telephone |
43 |
| Multi-Line Connections (PBX) |
44 |
| If you are installing the MFC to work with a PBX: |
44 |
| Custom Features on a Single Line |
44 |
| On-Screen Programming |
45 |
| User-Friendly Programming |
45 |
| Function Mode |
45 |
| Alternating Displays |
46 |
| Function Selection Table |
46 |
| 1. Fax Functions |
46 |
| 2. Printer Functions |
49 |
| 3. Copy Functions |
49 |
| 4. Video Functions |
49 |
| 5. PhotoCapture Center™ Functions |
50 |
| Initial Setup |
51 |
| Getting Started |
51 |
| Setting Date and Time |
51 |
| Setting Station ID |
51 |
| Entering Text |
52 |
| Inserting spaces |
52 |
| Making corrections |
52 |
| Repeating letters |
52 |
| Special characters and symbols |
53 |
| Setting Tone/Pulse Dialing Mode (For Canada only) |
53 |
| Setting Beeper Volume |
53 |
| Speaker Volume |
54 |
| Ring Volume |
54 |
| Memory Storage |
54 |
| Turning On Automatic Daylight Savings Time |
54 |
| Setup Receive |
55 |
| Basic Receiving Operations |
55 |
| Select Receive Mode |
55 |
| To select or change your Receive Mode |
55 |
| Setting Ring Delay |
56 |
| Easy Receive |
56 |
| Printing a Reduced Incoming Document |
57 |
| Recommended Reductions |
57 |
| Setting Paper Size |
57 |
| Advanced Receiving Operations |
58 |
| Operation from Extension Telephone |
58 |
| Changing the Fax Receive Code |
58 |
| Printing a Fax in Memory |
58 |
| Polling |
59 |
| Setting Up Polling Receive |
59 |
| Setting Up Sequential Polling Receive |
59 |
| Canceling a Scheduled Job |
60 |
| Setup Send |
61 |
| Before You Begin |
61 |
| Sending Faxes Using Multiple Settings |
61 |
| Faxing from the ADF (Automatic Document Feeder) |
61 |
| Faxing from the Scanner Glass |
62 |
| Fax Resolution |
63 |
| Contrast |
63 |
| Manual Transmission (With an External Telephone) |
64 |
| Automatic Transmission |
64 |
| Color Fax transmission |
64 |
| Manual and Automatic Fax Redial |
64 |
| Dual Access (Not Available for Color Fax) |
65 |
| Real Time Transmission |
66 |
| Checking the Job Status |
66 |
| Canceling a Job in Memory |
67 |
| Basic Sending Operations |
67 |
| Composing Electronic Cover Page |
67 |
| Composing Your Own Comments |
68 |
| Cover Page For Next Fax Only |
68 |
| Always Send Cover Page |
68 |
| Using a Printed Cover Page |
69 |
| Advanced Sending Operations |
69 |
| Overseas Mode |
69 |
| Delayed Fax (Not Available for Color Fax) |
70 |
| Delayed Batch Transmission (Not Available for Color Fax) |
70 |
| Multiple Resolution Transmission (Not Available for Color Fax) |
71 |
| Setting Up Polled Transmit (Not Available for Color Fax) |
71 |
| Auto Dial Numbers and Dialing Options |
72 |
| Storing Numbers for Easy Dialing |
72 |
| Storing One Touch Dial Numbers |
72 |
| Storing Speed Dial Numbers |
73 |
| Changing One Touch and Speed Dial Numbers |
73 |
| Setting Up Groups for Broadcasting |
74 |
| Dialing Options |
75 |
| One Touch Dialing |
75 |
| Speed Dialing |
75 |
| Broadcasting (Not Available for Color Fax) |
75 |
| Access Codes and Credit Card Numbers |
76 |
| Search |
77 |
| Pause |
77 |
| Fax Redial |
77 |
| Tone/Pulse (For Canada only) |
77 |
| Remote Fax Options (Not Available for Color Fax) |
78 |
| Fax Forwarding/Paging |
78 |
| Programming a Fax Forwarding Number |
78 |
| Programming Paging Number |
78 |
| Setting Fax Storage |
79 |
| Changing Remote Retrieval Access Code |
79 |
| Remote Retrieval |
80 |
| Using Remote Retrieval Access Code |
80 |
| Remote Commands |
81 |
| Retrieving Memory Status List |
81 |
| Retrieving Fax Messages |
82 |
| Changing Fax Forwarding Number |
82 |
| Printing Reports |
83 |
| MFC Settings and Activity |
83 |
| To Print a Report |
83 |
| Transmission Verification (Xmit) Report |
84 |
| Activity Report Interval |
84 |
| Making Copies |
85 |
| Basic Copy Operations |
85 |
| Making a Single Copy |
85 |
| Multiple Copies (Using the ADF) |
85 |
| Memory Full Message |
86 |
| Multiple Copies (Using the Scanner Glass) |
86 |
| Temporary Copy Settings |
87 |
| Using the Enlarge/Reduce Key |
87 |
| Selecting a Fixed Reduction Ratio: |
88 |
| Using the Options Key |
88 |
| 2in1 |
90 |
| 4in1 |
90 |
| Poster |
90 |
| Choosing the Quality |
91 |
| Changing Default Copy Settings |
92 |
| Paper Type |
93 |
| Copy Quality |
93 |
| Color Adjustment |
93 |
| Copy Contrast |
94 |
| Single Color (One Color) |
94 |
| Legal Limitations |
95 |
| Walk-Up Video Printing |
96 |
| Getting Started |
96 |
| Auto Switch |
96 |
| Color Video Printing |
97 |
| Black & White Video Printing |
97 |
| Temporary Video Print Setting |
98 |
| Using the Options Key |
98 |
| Changing Default Settings |
100 |
| Paper Type |
101 |
| Video Printing Quality |
101 |
| Video Type |
101 |
| Print Size |
102 |
| Video Printing Color Adjustment |
102 |
| Video Printing Contrast |
103 |
| Video Capture to PC |
103 |
| Walk-Up PhotoCapture Center™ |
104 |
| Introduction |
104 |
| Getting Started |
104 |
| DPOF Printing |
105 |
| Printing the Index (Thumbnails) |
106 |
| Printing Images |
106 |
| Using the Options Key |
107 |
| Changing Default Settings |
109 |
| Paper Type |
110 |
| PhotoCapture Center™ Quality |
110 |
| Photo Brightness |
110 |
| Photo Contrast |
110 |
| Color Adjustment |
111 |
| Color Enhancement |
111 |
| Understand Error Messages |
111 |
| PhotoCaputure Center™ Requirements |
112 |
| Using PhotoCapture Center™ from your PC (For Windows® Only) |
112 |
| Setting Up the MFC and PC to Work Together |
113 |
| Using the Brother Machine with Your PC |
113 |
| Before You Install Multi-Function Link® Pro |
113 |
| Computer Requirements |
114 |
| Using a Bi-directional IEEE-1284 Compliant Parallel Cable to Connect the MFC to the PC (Using Win... |
114 |
| Notice to PC User |
114 |
| How to Attach the Filter Core to a Bi-directional Parallel Cable: |
115 |
| Using Windows® 95, 98, 98SE and ME |
116 |
| Using Windows® 2000 Professional |
120 |
| Using Windows NT® Workstation Version 4.0 |
124 |
| Using a USB Cable to Connect the MFC to the PC (Using Windows® 98, 98SE, ME and Windows® 2000 Pro... |
129 |
| Using Windows® 98, 98SE and ME |
130 |
| Using Windows® 2000 Professional |
136 |
| Installing the Brother Software |
139 |
| To install Multi-Function Link® Pro (Main Application): |
139 |
| To Install Automatic E-mail Printing (Optional Application): |
140 |
| To Register Your MFC 9200C On-Line (For USA only): |
141 |
| To view On-Line Documentation: |
141 |
| To Install PhotoPrinter Pro : |
142 |
| To View Brother Support Information: |
142 |
| Helpful Hints for Windows® 95/98/98SE/ME/ 2000 Professional or Windows NT® 4.0 |
143 |
| Receiving Faxes into the PC |
144 |
| Using the MFC as a Printer |
145 |
| Features |
145 |
| Printer Driver |
145 |
| Choosing the Right Kind of Paper |
146 |
| Multi-purpose Paper Cassette |
146 |
| Loading Paper in Multi-purpose Paper Cassette |
146 |
| Adjusting for Thick Paper and Envelopes |
146 |
| Manual Feed Slot |
147 |
| Setup for Envelopes |
148 |
| Simultaneous Printing/Fax |
148 |
| Printer Operation Keys |
148 |
| Reset Key |
148 |
| Ink Management Key |
149 |
| Turning Off Bi-directional Printing |
149 |
| Printer Driver Settings |
150 |
| Using the Brother MFC9200C Series Printer Driver |
150 |
| The Paper Tab |
150 |
| Paper Size |
151 |
| User Defined Paper Size |
151 |
| Orientation |
152 |
| Copies |
152 |
| Collate |
152 |
| Reverse Order |
152 |
| Paper Thickness |
153 |
| Scaling |
153 |
| 2 in 1 |
153 |
| Paper Source |
153 |
| Multi-purpose Paper Cassette |
153 |
| Manual Feed |
153 |
| The Quality/Color Tab |
154 |
| Quality |
155 |
| Media |
155 |
| Document |
156 |
| Color/Mono |
156 |
| Color |
156 |
| Mono |
156 |
| Color Matching |
156 |
| Custom Setting |
157 |
| Halftone Pattern |
157 |
| True2Life |
157 |
| Printing from your PC |
158 |
| Using the Windows®-Based Brother Control Center |
159 |
| Brother Control Center |
159 |
| AutoLoad the Brother Control Center |
160 |
| How to Turn Off AutoLoad |
160 |
| Using the Scan Keys |
160 |
| Using the Control Panel Keys |
161 |
| Scan Image |
161 |
| Scan/OCR |
161 |
| Scan to E-mail |
161 |
| Brother Control Center Features |
162 |
| Auto Configuration |
162 |
| Scanning Operations |
162 |
| Copy Operations |
163 |
| PC Fax Operation |
163 |
| Scanner Settings for Scan, Copy and PC Fax Buttons |
163 |
| Global Settings |
164 |
| Setting Up the Scanner Configurations |
164 |
| To access the Scanner Configurations screen: |
164 |
| Perform an Operation from the Control Center Screen |
165 |
| Scan to File |
165 |
| Scanner Settings |
165 |
| Destination Folder |
166 |
| Send Scan to E-mail |
166 |
| Scanner Settings |
167 |
| Email Application |
167 |
| File Attachments |
167 |
| Conversion Options |
168 |
| Format |
168 |
| Show QuickSend Menu |
168 |
| QuickSend List |
168 |
| Send Scan to Word Processor |
169 |
| Scanner Settings |
169 |
| Word Processor |
169 |
| User Defined Button |
170 |
| Scanner Settings |
170 |
| Target Application |
171 |
| Copy/Two on One Copy |
171 |
| Scanner Settings |
171 |
| Copy Settings |
171 |
| Send a Fax |
172 |
| Scanner Settings |
172 |
| FAX Settings |
173 |
| Using ScanSoft™ PaperPort® for Brother/ TextBridge® |
174 |
| Using ScanSoft™ PaperPort® and TextBridge® |
174 |
| Viewing Items in ScanSoft™ PaperPort® |
175 |
| Organizing Your Items in Folders |
175 |
| Links to Many Other Applications |
176 |
| Using ScanSoft™ TextBridge® OCR (Converting Image Text to Text You Can Edit) |
176 |
| Importing Items from Other Applications |
177 |
| Exporting Items in Other Formats |
177 |
| Scanning a Document |
177 |
| TWAIN COMPLIANT |
177 |
| Accessing the Scanner |
178 |
| Scanning a Document into the PC |
178 |
| Settings in the Scanner Window |
179 |
| Resolution: |
179 |
| Color Type: |
179 |
| Size: |
180 |
| Custom: |
180 |
| Adjust: |
180 |
| Paper: |
181 |
| Video Capture: |
181 |
| PreScanning an Image |
181 |
| How to use PreScan to adjust an image: |
181 |
| Video Capture from the PC |
183 |
| Connecting Your Video Equipment |
183 |
| To connect your video equipment: |
183 |
| Capturing An Image |
183 |
| To capture a frame as an image: |
184 |
| Using Multi-Function Link® Pro Software |
186 |
| Introduction |
186 |
| Brother Resource Manager |
186 |
| MFC Remote Setup |
187 |
| Multi-Function Link® Pro Main Menu |
188 |
| Sending a Fax from Your PC |
188 |
| Sending a Quick Fax |
188 |
| Sending a Fax from the Main Menu |
189 |
| Sending a Fax from a Windows® Application |
190 |
| Receiving Faxes into the PC |
190 |
| Checklist for Your PC |
190 |
| Viewing Received Faxes |
191 |
| Using the PhotoCapture Center™ from Your PC (For Windows® Only) |
192 |
| Introduction |
192 |
| PhotoPrinter 2000 Pro |
193 |
| Overview of Basic Steps |
193 |
| Using Automatic E-Mail Printing |
195 |
| For Windows® 95/98/98SE, ME only |
195 |
| Main Features |
195 |
| To Access the On-Line Documentation |
195 |
| Using the Brother MFC with a New Power Macintosh® G3, G4 or iMac™/iBook |
196 |
| Set up Your USB Equipped Apple® Macintosh® G3,G4 or iMac™ with Mac OS 8.5/8.51/8.6/9.0 |
196 |
| Installing the Brother Printer and Scanner Drivers |
196 |
| Installing PaperPort® |
197 |
| Using the Brother Printer Driver with your Apple® Macintosh® |
197 |
| Using Brother TWAIN Scanner Driver with Your Apple® Macintosh® |
199 |
| Accessing the Scanner |
200 |
| Scanning a Document into Your Macintosh G3, G4 or iMac |
200 |
| Settings in the Scanner Window |
201 |
| Image |
201 |
| Resolution |
201 |
| Color Type |
201 |
| Scanning Area |
202 |
| Business Card Size |
202 |
| Miscellaneous |
203 |
| Brightness |
203 |
| Contrast |
203 |
| Color Sync Dialog |
203 |
| Scanner Profile |
204 |
| PreScanning an Image |
205 |
| Important Information |
206 |
| Standard Telephone and FCC Notices |
206 |
| These notices are in effect on models sold and used in the United States only. |
206 |
| Federal Communications Commission (FCC) Declaration of Conformity (For USA only) |
207 |
| Industry Canada Compliance Statement (For Canada only) |
208 |
| ENERGY STAR® Compliance Statement |
208 |
| Important Safety Instructions |
208 |
| Trademarks |
210 |
| Troubleshooting and Routine Maintenance |
211 |
| Troubleshooting |
211 |
| Brother fax-back system |
211 |
| Frequently Asked Questions (FAQs) |
211 |
| Brother Bulletin Board |
211 |
| Error Messages |
212 |
| Document Jams and Paper Jams |
214 |
| Original is Jammed in the Top of the ADF Unit |
214 |
| Original is Jammed Inside the ADF Unit |
214 |
| Paper is Jammed Inside the MFC |
215 |
| If You Are Having Difficulty with Your MFC |
216 |
| How to Improve Print Quality |
219 |
| Test Print |
219 |
| Cleaning the Print Head |
219 |
| Aligning Ink Cartridges |
220 |
| Turning Off Bi-directional Printing |
221 |
| Packing and Shipping the MFC |
221 |
| Routine Maintenance |
224 |
| Cleaning the Scanner |
224 |
| Cleaning the MFC Printer Platen |
225 |
| Cleaning the Pick-up Roller |
225 |
| Replacing the Ink Cartridges |
226 |
| For Customer Service |
228 |
| Specifications |
229 |
| Product Description |
229 |
| Fax |
229 |
| Fax (Continued) |
230 |
| Printer |
230 |
| Printing |
230 |
| Controller |
230 |
| Print Media |
231 |
| Consumable Items |
231 |
| Glossary |
232 |
| Index |
236 |
| Remote Retrieval Access Card |
241 |
| Cover3 |
243 |

 1
1 33
33 34
34 35
35 36
36 37
37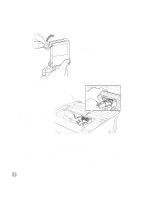 38
38 39
39 40
40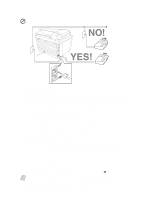 41
41 42
42 43
43

