Canon PIXMA MG6320 User Guide - Page 209
Scan Buttons Area
 |
View all Canon PIXMA MG6320 manuals
Add to My Manuals
Save this manual to your list of manuals |
Page 209 highlights
Scan View You can perform various scans according to item and use. Click Scan in Global Menu to switch to the Scan view. (1) Scan Buttons Area (2) Scanned Image Thumbnails Area (3) Operation Buttons (4) Display Size Setting Bar (1) Scan Buttons Area Auto Allows you to scan easily by automatically detecting the types of placed items. Photo Scans placed items as photos. Document Scans placed items as documents. Custom Scans with the settings specified as favorite. Stitch Combines scanned images into one image. Click to start IJ Scan Utility.
-
 1
1 -
2
-
3
-
4
-
5
-
6
-
7
-
8
-
9
-
10
-
11
-
12
-
13
-
14
-
15
-
16
-
17
-
18
-
19
-
20
-
21
-
22
-
23
-
24
-
25
-
26
-
27
-
28
-
29
-
30
-
31
-
32
-
33
-
34
-
35
-
36
-
37
-
38
-
39
-
40
-
41
-
42
-
43
-
44
-
45
-
46
-
47
-
48
-
49
-
50
-
51
-
52
-
53
-
54
-
55
-
56
-
57
-
58
-
59
-
60
-
61
-
62
-
63
-
64
-
65
-
66
-
67
-
68
-
69
-
70
-
71
-
72
-
73
-
74
-
75
-
76
-
77
-
78
-
79
-
80
-
81
-
82
-
83
-
84
-
85
-
86
-
87
-
88
-
89
-
90
-
91
-
92
-
93
-
94
-
95
-
96
-
97
-
98
-
99
-
100
-
101
-
102
-
103
-
104
-
105
-
106
-
107
-
108
-
109
-
110
-
111
-
112
-
113
-
114
-
115
-
116
-
117
-
118
-
119
-
120
-
121
-
122
-
123
-
124
-
125
-
126
-
127
-
128
-
129
-
130
-
131
-
132
-
133
-
134
-
135
-
136
-
137
-
138
-
139
-
140
-
141
-
142
-
143
-
144
-
145
-
146
-
147
-
148
-
149
-
150
-
151
-
152
-
153
-
154
-
155
-
156
-
157
-
158
-
159
-
160
-
161
-
162
-
163
-
164
-
165
-
166
-
167
-
168
-
169
-
170
-
171
-
172
-
173
-
174
-
175
-
176
-
177
-
178
-
179
-
180
-
181
-
182
-
183
-
184
-
185
-
186
-
187
-
188
-
189
-
190
-
191
-
192
-
193
-
194
-
195
-
196
-
197
-
198
-
199
-
200
-
201
-
202
-
203
-
 204
204 -
 205
205 -
 206
206 -
 207
207 -
 208
208 -
 209
209 -
 210
210 -
 211
211 -
 212
212 -
 213
213 -
 214
214 -
215
-
216
-
217
-
218
-
219
-
220
-
221
-
222
-
223
-
224
-
225
-
226
-
227
-
228
-
229
-
230
-
231
-
232
-
233
-
234
-
235
-
236
-
237
-
238
-
239
-
240
-
241
-
242
-
243
-
244
-
245
-
246
-
247
-
248
-
249
-
250
-
251
-
252
-
253
-
254
-
255
-
256
-
257
-
258
-
259
-
260
-
261
-
262
-
263
-
264
-
265
-
266
-
267
-
268
-
269
 |
 |

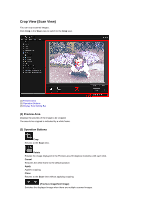
Scan View
You can perform various scans according to item and use.
Click
Scan
in Global Menu to switch to the
Scan
view.
(1)
Scan Buttons Area
(2)
Scanned Image Thumbnails Area
(3)
Operation Buttons
(4)
Display Size Setting Bar
(1) Scan Buttons Area
Auto
Allows you to scan easily by automatically detecting the types of placed items.
Photo
Scans placed items as photos.
Document
Scans placed items as documents.
Custom
Scans with the settings specified as favorite.
Stitch
Combines scanned images into one image.
Click to start IJ Scan Utility.