Dell 964 User's Guide2
Dell 964 Manual
 |
UPC - 940356014026
View all Dell 964 manuals
Add to My Manuals
Save this manual to your list of manuals |
Dell 964 manual content summary:
- Dell 964 | User's Guide2 - Page 1
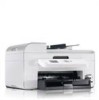
Dell™ Photo All-In-One Printer 964 User's Guide Click the links to the left for information on the features and operation of your printer. For information on other documentation included with your printer, see Finding Information. To order ink or supplies from Dell: 1. Double-click the icon on your - Dell 964 | User's Guide2 - Page 2
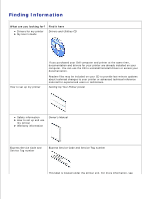
What are you looking for? Find it here Drivers for my printer My User's Guide Drivers and Utilities CD How to set up my printer If you purchased your Dell computer and printer at the same time, documentation and drivers for your printer are already installed on your computer. You can - Dell 964 | User's Guide2 - Page 3
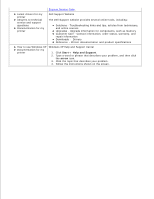
, and repair information Downloads - Drivers Reference - Printer documentation and product specifications How to use Windows XP Documentation for my printer Windows XP Help and Support Center 1. Click Start Help and Support. 2. Type a word or phrase that describes your problem, and then click - Dell 964 | User's Guide2 - Page 4
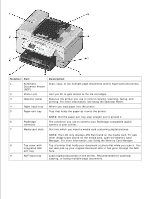
Paper Type Sensor Loading Paper You can use the Dell Photo AIO Printer 964 to do a variety of things. A few important things to note: If your printer is connected to a computer, you can use either the printer operator panel or the printer software to produce quality documents quickly. You do need to - Dell 964 | User's Guide2 - Page 5
sized documents. Unit you lift to gain access to the ink cartridges. Panel on the printer you use to control copying, scanning, faxing, and printing. the Memory Card Manager . 8 Top cover with Top of printer that holds your document or photo flat while you scan it. You integrated ADF can also - Dell 964 | User's Guide2 - Page 6
Reorder Label 11 Express Service Code To order ink cartridges or paper, visit www.dell.com/supplies . Identify your printer when you use support.dell.com or contact technical support. Enter the Express Service Code to direct your call when contacting technical support. NOTE: The Express Code - Dell 964 | User's Guide2 - Page 7
Dell Photo All-In-One Printer 964 supports Microsoft® Windows® 2000, Windows XP, and Windows XP Professional X64 Edition. To set up your printer, follow the steps on your Setting Up Your Printer poster. If you encounter problems during setup, see Troubleshooting . NOTE: The Dell Photo AIO Printer - Dell 964 | User's Guide2 - Page 8
Using the Operator Panel The operator panel buttons allow you to copy documents and photos, fax documents, and print photos from a memory card or PictBridge-enabled camera without connecting to a computer. The printer is on when Power is illuminated. You can change settings using the Menu , Select - Dell 964 | User's Guide2 - Page 9
. Type numbers to enter or edit the date and time shown on the printer display. In copy mode, select the number of copies you want to make begun entering the number. Start a scan, copy, or fax job. In photo mode, print photos. NOTE: If you initiate a copy without specifying color or black and white, - Dell 964 | User's Guide2 - Page 10
Main Menu From this menu, you can navigate to the Copy , Photo , Fax , Scan , Setup , or Maintenance modes available on your printer. You can also view photos, send a fax, or perform quick copy or quick scan directly from the main menu. Copy Mode To change Copy Mode settings: 1. From the main menu, - Dell 964 | User's Guide2 - Page 11
Settings menu. For more information, see Copy Default Settings Menu . *Factory default setting Photo Mode Most digital cameras use a memory card to store photos. The Dell Photo AIO Printer 964 supports the following digital media: CompactFlash Type I and II Memory Stick Memory Stick PRO Memory - Dell 964 | User's Guide2 - Page 12
the JPG format can be printed directly from the memory card. If you want to print photos stored on the memory card in a different file format, the photos must be transferred to your computer before printing. Save Photos to Press Select computer to your PC. to enter Save to PC mode. You can - Dell 964 | User's Guide2 - Page 13
preview. Remove Red Eye No* Yes *Factory default setting Photo Print Settings Menu You can access the Photo Print Settings menu by selecting Change Photo Print Settings from the Photo Mode main menu. Menu item Paper Size Photo Size Layout Settings Hagaki L 2L A6 10x15cm A5 13x18cm B5 A4 4x6 - Dell 964 | User's Guide2 - Page 14
One Photo Centered 1 per page 2 per page 3 per page 4 per page 6 per page 8per page 16 per page Draft Normal* Photo Auto Detect* Plain Coated Photo . In order for faxing to function properly: The printer's FAX connector ( -right side connector) must be connected to an active phone line. See Setting Up - Dell 964 | User's Guide2 - Page 15
line filter. Contact your Internet Service Provider for more details. If you are using the Dell Printer Fax tools to send a fax from within an application, the printer must be connected to a computer with a USB cable. Fax Options Menu Menu item Fax Number Window Action Use the keypad to enter - Dell 964 | User's Guide2 - Page 16
to enter a number. The list automatically scrolls to the appropriate place Window in the phonebook. Speed dial The fax numbers for the speed speed dials listed depends on the number of speed dials specified on your printer. Phonebook Edit Entry Menu You can access the Phonebook Edit Entry menu - Dell 964 | User's Guide2 - Page 17
selecting Group Search from the Phonebook menu. Menu item Search Criteria Window Speed dial Action Use the keypad to enter a letter. The number of groups listed depends on the number of groups specified on your printer. Phonebook Edit Group Menu You can access the Phonebook Edit Group menu by - Dell 964 | User's Guide2 - Page 18
selecting Add Group from the Phonebook menu. Menu item Name Fax number window Name Search Phone Number Search Redial History Speed Dial Number Action Use . When Auto Answer is turned off, incoming faxes must be answered manually. Menu item Action Turn Auto Answer On at Use the keypad to - Dell 964 | User's Guide2 - Page 19
Edit Fax Settings Menu You can access the Edit Fax Settings menu by selecting Edit Fax Settings from the Fax Options menu. Menu item Settings Quality Standard* Fine Superfine Ultrafine Lighter/Darker Use the left and right Arrow buttons is default). *Factory default settings to specify a - Dell 964 | User's Guide2 - Page 20
about pending faxes on the screen. Report Manual print* Every 40 jobs Print Fax Activity History the Fax History More Options menu by highlighting one of the numbers shown on the Fax History the selected number displayed in the Fax Number Window. Press Select to enter the Phonebook Add Entry - Dell 964 | User's Guide2 - Page 21
code, use the keypad to specify a new code, and press Select . NOTE: The default code is DELL# (3355#) . Error Correction On* Off *Factory default settings Fax Printing Menu You can access the Fax 8.5x14 A4 Fit to page* Use two pages Draft Normal* Photo On* Off Dialing and Sending Menu - Dell 964 | User's Guide2 - Page 22
Your Fax Name screen. Use the keypad to specify the name for the printer. This is the name shown on the fax header of outgoing faxes. Dial to modify an existing prefix used to obtain an outside to create a prefix if one is necessary to obtain an outside Dial Volume Off Low* High Scan Before dial - Dell 964 | User's Guide2 - Page 23
on, calls received from fax machines that have a caller ID that matches one specified on the block list or have blocked their caller ID are disconnected. a letter. The list automatically scrolls to the appropriate place in Window the phonebook. Blocked Fax List The number assigned to the fax - Dell 964 | User's Guide2 - Page 24
a number. The list automatically scrolls to the appropriate place Window in the phonebook. Blocked Fax List The number assigned to the assigned number. Scan Mode To edit the Scan Mode settings: 1. Ensure your printer and computer are connected via a USB cable. 1. From the main menu, use the - Dell 964 | User's Guide2 - Page 25
screen and enter a four-digit PIN number, if necessary, for the selected host. 4. Press Select . Scan Options Menu Menu item Settings Scan To Email Software File Color Color* Black & White Quality Automatic* 150 dpi 300 dpi 600 dpi Original Size Auto Detect* L 2L A6 A5 B5 A4 Wallet 3x5 - Dell 964 | User's Guide2 - Page 26
menu. For more information, see Printer Default Settings Menu . Change Copy Default Press Select to enter the Change Copy Default Settings menu. For more Settings information, see Copy Default Settings Menu . Change Photo Default Press Select to enter the Photo Print Settings menu. For more - Dell 964 | User's Guide2 - Page 27
Set Date and Time menu by selecting Set Date and Time from the Printer Default Settings menu or by selecting Select Date and Time from the initial *Factory default setting Settings Color* Black & White Draft Normal* Photo Text & Graphics* Photo Text Only Line Drawing Hagaki L 2L A6 A5 B5 A4 3x5 - Dell 964 | User's Guide2 - Page 28
A6 10x15cm A5 13x18cm B5 A4 4x6 5x7 8.5x11* Hagaki L 2L 60x80mm A6 10x15cm A5 13x18cm B5 A4 3.5x5 4x6 5x7 8x10 8.5x11 Automatic* Borderless (one per page) One Photo Centered 1 per page 2 per page 3 per page 4 per page 6 per page 8per page 16 per page Draft Normal - Dell 964 | User's Guide2 - Page 29
menu or by selecting Change Default Settings from the Scan Mode menu. Menu item Scan To Color Quality Original Size *Factory default settings Settings Email Software File Color* Black & White Automatic 150 dpi* 300 dpi 600 dpi Auto Detect* L 2L A6 A5 B5 A4 Wallet 3x5 4x6 5x7 8x10 8.5x11 - Dell 964 | User's Guide2 - Page 30
Select to clean the ink cartridges. Align Cartridges Press Select to align the ink cartridges. Change Print Cartridges printer enters PictBridge Mode . While a PictBridge camera is connected to your printer, the camera controls the selection and printing of all photos. However, while the printer - Dell 964 | User's Guide2 - Page 31
8x10 8.5x11 Automatic* Borderless (one per page) One Photo Centered 1 per page 2 per page 3 per page 4 per page 6 per page 8per page 16 per page Draft Normal* Photo Auto Detect* Plain Coated Photo Transparency Understanding the Automatic Paper Type Sensor Your printer has an automatic paper type - Dell 964 | User's Guide2 - Page 32
To turn off the automatic paper type sensor for all print jobs: 1. In Windows XP, click Start Faxes. Control Panel Printers and Other Hardware Printers and In Windows 2000, click Start Settings Printers. 2. Right-click the Dell Photo AIO Printer 964 icon. 3. Click Printing Preferences . 4. 5. - Dell 964 | User's Guide2 - Page 33
Type drop-down menu. 6. Click OK . Loading Paper Load Plain Paper Into the Paper Support 1. Lift the paper exit tray, and extend the paper support. 2. Insert paper into the paper input tray. 3. Squeeze and slide the paper guides to rest against the left and right edges and bottom of the paper. NOTE - Dell 964 | User's Guide2 - Page 34
4. Lower the paper exit tray. 5. Extend the paper exit tray stop to catch paper as it exits the printer. NOTE: The paper exit tray can hold up to 50 sheets of paper. For information on print media guidelines, see Print Media Guidelines for the Paper Support . - Dell 964 | User's Guide2 - Page 35
The ADF is recommended for loading multiple-page documents. For more information, see Paper Guidelines for the ADF . NOTE: Do not load postcards, photo cards, photo paper, or small images in the ADF. Place these items on the scanner glass. Placing Your Original Document on the Scanner Glass 1. Open - Dell 964 | User's Guide2 - Page 36
3. - Dell 964 | User's Guide2 - Page 37
-Enabled Camera Printing Photos From a Memory Card Printing Collated Copies of Your Document Printing Last Page First Printing More Than One Page on a Sheet of Paper Printing an Image as a Multi-page Poster Printing a Banner Printing a Document 1. Turn on your computer and printer, and make sure - Dell 964 | User's Guide2 - Page 38
your photos from sticking together or smudging, remove each photo after it exits the printer. NOTE: Before placing your prints in a nonadhesive photo album Support. 2. Make sure you have a color cartridge and a photo cartridge (sold separately) installed. For more information, see Replacing Ink - Dell 964 | User's Guide2 - Page 39
sides. Printing Photos From a PictBridge-Enabled Camera Your printer supports PictBridge-enabled cameras. 1. Insert one end of the USB cable into the camera. 2. Insert the other end of the USB cable into the PictBridge port on the front of the printer. Refer to the instructions included with your - Dell 964 | User's Guide2 - Page 40
Most digital cameras use a memory card to store photos. The Dell Photo AIO Printer 964 supports the following digital media: CompactFlash Type I and II Memory Stick Memory Stick PRO Memory Stick Duo Microdrive SmartMedia Secure Digital MultiMediaCard xD-Picture Card Memory - Dell 964 | User's Guide2 - Page 41
NOTE: The printer supports FAT32 data format. Files stored in NTFS should be converted to FAT32 data format. Viewing or Printing Photos 1. Insert a memory card or USB key. The printer automatically switches to Photo Mode. 2. Press Select to access the Photo Mode menu. 3. From the Photo Mode menu, - Dell 964 | User's Guide2 - Page 42
, the photos must be transferred to your computer before printing. Printing Collated Copies of Your Document When your printer is attached to your computer, you can print black and white or color collated copies. To print collated copies: 1. Make sure you have paper loaded in the paper support - Dell 964 | User's Guide2 - Page 43
or Print (depending on the program or operating system). Printing More Than One Page on a Sheet of Paper 1. Make sure you have paper loaded in the paper support. For help, see Load Plain Paper Into the Paper Support. 2. With your document open, click File Print. 3. Click Properties, Options, Setup - Dell 964 | User's Guide2 - Page 44
Make sure you have paper loaded in the paper support. For help, see Load Plain Paper Into the Paper Support. 2. With your image open, click File Print Place a stack of banner paper (20 sheets or less) in front of the printer, and feed in the first sheet. 2. With your document open, click File Print - Dell 964 | User's Guide2 - Page 45
- Dell 964 | User's Guide2 - Page 46
Panel Copying Photos Using Your Computer Collating Copies Using the Operator Panel Changing Copy Settings To make copies, you can use the printer operator panel or your computer. Copying Documents Using the Operator Panel 1. Turn on your printer. 2. Load paper in the paper support. For more - Dell 964 | User's Guide2 - Page 47
Programs or All Programs Dell Printers Dell Photo AIO Printer 964 Dell All-In-One Center. The Dell All-In-One Center opens. 7. Select Photos Using the Operator Panel 1. Load photo paper. For more information, see Print Media Guidelines for the Paper Support. 2. Open the top cover. 3. Place the photo - Dell 964 | User's Guide2 - Page 48
Click Start Programs or All Programs Dell Printers Dell Photo AIO Printer 964 Dell All-In-One Center. The Dell All-In-One Center opens. 5. Click Preview printer without a computer, you can print collated copies: 1. Load paper in the paper support. For help, see Load Plain Paper Into the Paper Support - Dell 964 | User's Guide2 - Page 49
image to a black and white dot pattern (dither). Remove image patterns from magazines or newspapers (descreen). Select whether to process with Best quality or Best speed. Reduce the background noise on your color document. 6. When you finish customizing your copy settings, click OK, and then click - Dell 964 | User's Guide2 - Page 50
scan settings, and press Select . Using the Printer Software 1. Turn on your computer and printer, and make sure they are connected. 2. Load Click Start Programs or All Programs Dell Printers Dell Photo AIO Printer 964 Dell All-In-One Center. The Dell All-In-One Center opens. 4. Click Preview - Dell 964 | User's Guide2 - Page 51
Glass. 3. Click Start Programs or All Programs Dell Printers Dell Photo AIO Printer 964 Dell All-In-One Center. The Dell All-In-One Center opens. NOTE: You can also open the Dell All-In-One Center from the operator panel on your printer. When your printer is in Scan mode, press the Start button - Dell 964 | User's Guide2 - Page 52
not support multiple-page scanning. You can scan multiple images at once to save time: 1. Place the first sheet on the scanner glass. For more information, see Placing Your Original Document on the Scanner Glass. 2. Click Start Programs or All Programs Dell Printers Dell Photo AIO Printer 964 Dell - Dell 964 | User's Guide2 - Page 53
as your printer drivers. 1. Load your original document. For help, see Load an Original Document Into the ADF or Placing Your Original Document on the Scanner Glass. 2. Click Start Programs or All Programs Dell Printers Dell Photo AIO Printer 964 Dell All-In-One Center. The Dell All-In-One Center - Dell 964 | User's Guide2 - Page 54
image. 1. Click Start Programs or All Programs Dell Printers Dell Photo AIO Printer 964 Dell All-In-One Center. The Dell All-In-One Center opens. NOTE: You can also open the Dell All-In-One Center from the operator panel on your printer. When your printer is in Scan mode, press the Start button - Dell 964 | User's Guide2 - Page 55
Computer 1. Click Start Programs or All Programs Dell Printers Dell Photo AIO Printer 964 Dell All-In-One Center. The Dell All-In-One Center opens. NOTE: You can also open the Dell All-In-One Center from the operator panel on your printer. When your printer is in Scan mode, press the Start button - Dell 964 | User's Guide2 - Page 56
the Paper Support. 2. Load your original document. For help, see Placing Your Original Document on the Scanner Glass or Load an Original Document Into the ADF. 3. Click Start Programs or All Programs Dell Printers Dell Photo AIO Printer 964 Dell All-In-One Center. The Dell All-In-One Center opens - Dell 964 | User's Guide2 - Page 57
Using Auto Fax Convert You do not need to connect your printer to a computer in order to fax. Use the printer operator panel for basic faxing. See Faxing Using the Printer Operator Panel. NOTE: For faxing instructions using the computer software, see Sending a Fax From the Computer. Setting Up the - Dell 964 | User's Guide2 - Page 58
wall jack Connect a phone cord from the FAX connector ( - left side connector) on the printer to the telephone wall jack. 1. Connect one end of the phone cord to the FAX connector ( - left side connector) of the printer. 2. Connect the other end of the phone cord to an active telephone wall jack - Dell 964 | User's Guide2 - Page 59
to the telephone wall jack. 2. Remove the protective plug from the PHONE jack connector ( - right side connector) on the back of the printer. 3. Connect a phone cord from the telephone to the answering machine. 4. Connect a phone cord from the answering machine to the PHONE jack connector ( - right - Dell 964 | User's Guide2 - Page 60
devices in these countries. What if I Have a Digital Subscriber Line (DSL)? DSL delivers digital data to a computer through a telephone line. Your Dell Photo AIO Printer 964 is designed to work with analog data. If you are faxing over a telephone line connected to a DSL modem, install a DSL filter - Dell 964 | User's Guide2 - Page 61
down Arrow buttons . 4. Use the keypad to enter the fax number. to scroll to Fax, and press Select The numbers display in the Fax Number Window. 5. Press Start . The printer scans your document and sends your fax to the number you entered. After the transmission is complete, the - Dell 964 | User's Guide2 - Page 62
to enter the fax number. The numbers display in the Fax Number Window. 5. Press the down Arrow button to go to the next fax the rest of the list has been completed. NOTE: Fax numbers to which the printer could not establish a connection are retried based on the number of retries specified in the - Dell 964 | User's Guide2 - Page 63
of set rings is detected, the printer automatically receives the fax. Receive a Fax Manually 1. Make sure your printer is on, and an active When the printer rings, pick up the telephone, and listen for the fax calling tone. 4. Press DELL# (3355#) on the printer operator panel. NOTE: DELL# is the - Dell 964 | User's Guide2 - Page 64
the computer's fax modem. What if I Have a Digital Subscriber Line (DSL)? DSL delivers digital data to a computer through a telephone line. Your Dell Photo AIO Printer 964 is designed to work with analog data. If you are faxing over a telephone line connected to a DSL modem, install a DSL filter to - Dell 964 | User's Guide2 - Page 65
Click Start Programs or All Programs Dell Printers Dell Photo AIO Printer 964 Dell All-In-One Center. 4. Place the document you want to fax face down under the lid of the printer. 5. Select Fax from the Scan drop-down menu. 6. Click Scan Now. 7. Follow the instructions on the computer screen to send - Dell 964 | User's Guide2 - Page 66
Dell Printers Dell Photo AIO Printer 964 Dell All-In-One Center. 2. From the Dell All-In-One Center, click the Maintain/Troubleshoot tab, and then click Display the Printer Setup Utility. Printer how (manually, if fax Windows XP Only) or Fax Service Management (Windows 2000 Only) to send and - Dell 964 | User's Guide2 - Page 67
Dell All-In-One Center to first scan a document to a file, and then use Fax Console or Fax Service Management to print the file to fax. Install Fax Console (Windows XP Only) 1. Click Start Control Panel. 2. Click Add or Remove Programs. 3. Click Add/Remove Windows Dell Photo AIO Printer 964. e. - Dell 964 | User's Guide2 - Page 68
Load an Original Document Into the ADF. 3. Click Start Programs or All Programs Dell Printers Dell Photo AIO Printer 964 Dell All-In-One Center. 4. Place the document you want to fax face down under the lid of the printer. 5. Select File from the Scan drop-down menu. 6. Save your file to a desired - Dell 964 | User's Guide2 - Page 69
printer list, select Fax. 10. Click Print. 11. Follow the instructions on the computer screen to send your fax. Receive a Fax Using Fax Console or Fax Service voice mail. View Sent and Received Faxes Using Fax Console or Fax Service Management NOTE: Only faxes sent and received by Fax Console can be - Dell 964 | User's Guide2 - Page 70
4. Click the folder of your choice. 5. Click the fax in the right pane for which you want to view the status, and then click Preferences or Properties. 6. Click the General tab, and view the Status line. 7. Click Close when you are finished. Speed Dial To make sending faxes easier, you can enter - Dell 964 | User's Guide2 - Page 71
. 8. Press Select . Create a Speed Dial List From the Computer 1. Click Start Programs or All Programs Dell Printers Dell Photo AIO Printer 964 Printer Setup Utility. 2. Click the Speed Dial tab. 3. Follow the instructions on the Speed Dial tab to add a new number to your speed dial list. Create - Dell 964 | User's Guide2 - Page 72
fax between two fax machines within an office that utilizes one- or two-digit extensions, the printer recognizes the numbers entered as an extension instead of a speed dial if you press star (*), pound (#), and then the extension. Manually Dialing a Fax While Listening to a Telephone Line (On Hook - Dell 964 | User's Guide2 - Page 73
2. 3. Press Select to make the printer go off hook. 4. Enter the number to which you want to send a fax. 5. Press Start when you are ready to send a fax. Send a Delayed Fax 1. - Dell 964 | User's Guide2 - Page 74
then press Select . NOTE: The lowest possible blocked fax number is automatically assigned to this contact. You cannot change the blocked fax number. Your printer no longer accepts faxes from the fax numbers you entered when fax blocking is turned on. Turning Fax Blocking On 1. From the main menu - Dell 964 | User's Guide2 - Page 75
3. The Fax Blocking menu opens. 4. Use the left and right Arrow buttons to choose On from Blocked List. If the printer detects a fax from one of the numbers on the Blocked Fax List, the transmission is disconnected. 5. Press Select . Blocking Faxes Without Caller ID 1. From the main menu, use - Dell 964 | User's Guide2 - Page 76
. The Pickup Code window opens. 5. Using the keypad, specify a new one- to seven-digit keycode manually, use the keypad to enter the new code. Using Auto Fax Convert If you are faxing a high-resolution document to a fax machine that prints at a lower resolution, the Dell Photo AIO Printer 964 - Dell 964 | User's Guide2 - Page 77
Understanding the Software Using the Dell All-In-One Center Using Printing Preferences Using Dell Picture Studio Using the Memory Card Manager Dell Ink Management System Removing and Reinstalling Software The printer software includes: Dell All-In-One Center - Allows you to perform various scan, - Dell 964 | User's Guide2 - Page 78
. Access troubleshooting and maintenance information. Preview images you want to print or copy. Manage photos (copy them to folders, print them, perform creative copying). To access the Dell All-In-One Center: Click Start Programs or All Programs Dell Printers Dell Photo AIO Printer 964 Dell All - Dell 964 | User's Guide2 - Page 79
Preferences dialog box opens. To access Printing Preferences when a document is not open: 1. In Windows XP, click Start Control Panel Printers and Other Hardware Printers and Faxes. In Windows 2000, click Start Settings Printers. 2. Right-click the printer icon, and then select Printing Preferences. - Dell 964 | User's Guide2 - Page 80
a photo cartridge installed. Media Type - Allows you to set the paper type manually, or have the printer sensor . Automatic Image Sharpening - Automatically select the best image sharpening level based on image content. Test Page Network Support Using Dell Picture Studio In Dell Picture Studio, - Dell 964 | User's Guide2 - Page 81
read, the printer automatically switches to Photo mode. 2. Use the up or down Arrow buttons Select . to scroll to Save Photos to Computer, and then press You can also launch MCM from your computer by clicking Start Programs or All Programs Dell Printers Dell Photo AIO Printer 964 Activate Memory - Dell 964 | User's Guide2 - Page 82
warning is displayed every time you print until you install a new ink cartridge. For more information on replacing ink cartridges, see Replacing Ink Cartridges. When one or both of your ink cartridges are empty, the Reserve Tank window appears on your screen when you try to print. If you continue - Dell 964 | User's Guide2 - Page 83
Start Programs or All Programs Dell Printers Dell Photo AIO Printer 964 Uninstall Dell Photo AIO Printer 964. 2. Follow the instructions on the computer screen to remove the printer software. 3. Restart your computer before installing the software again. 4. Insert the Drivers and Utilities CD, and - Dell 964 | User's Guide2 - Page 84
INSTRUCTIONS" in your Owner's Manual. Dell ink cartridges are available only through Dell. You can order more ink online at www.dell.com/supplies or by phone. To order by phone, see "Ordering Ink Cartridges and Supplies" in your Owner's Manual. Dell recommends Dell ink cartridges for your printer - Dell 964 | User's Guide2 - Page 85
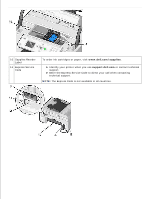
Store the cartridges in an air-tight container (one is included with each photo cartridge you purchase), or dispose of them. 6. If you are installing new ink cartridges, remove the sticker and transparent tape from the back and bottom of each ink cartridge. NOTE: The illustration below shows a black - Dell 964 | User's Guide2 - Page 86
7. Insert the new ink cartridges. Make sure the black or photo ink cartridge is secure in the left ink cartridge carrier, and the color ink cartridge is secure in the right ink cartridge carrier. 8. Snap each lid closed. 9. - Dell 964 | User's Guide2 - Page 87
. An alignment page automatically prints. Aligning Ink Cartridges Your printer automatically aligns the ink cartridges when they are installed or replaced. To verify your ink cartridges are aligned, you can print an alignment page. After you close the printer unit, press Select . The alignment page - Dell 964 | User's Guide2 - Page 88
. To clean the ink cartridge nozzles: 1. Load the paper. For more information, see Loading Paper. 2. In Windows XP, click Start Control Panel Printers and Other Hardware Printers and Faxes. In Windows 2000, click Start Settings Printers. 3. Right-click the Dell Photo AIO Printer 964 icon. 4. Click - Dell 964 | User's Guide2 - Page 89
the improved print quality. 9. If you are still not satisfied with the print quality, wipe the ink cartridge nozzles, and then print your document again. NOTE: You can also clean the ink cartridge nozzles from the printer's operator panel by selecting Clean Cartridges from the Maintenance menu. - Dell 964 | User's Guide2 - Page 90
operator panel display, write down the exact message. Setup Problems Computer Problems Verify that your printer is compatible with your computer. The Dell Photo AIO Printer 964 supports Windows 2000, Windows XP, and Windows XP Professional x64 Edition. Verify your computer meets the minimum system - Dell 964 | User's Guide2 - Page 91
printer. Windows XP 1. Click Start Control Panel Printers and Other Hardware Printers and Faxes. 2. Right-click Dell Photo AIO Printer 964, and select Set as Default. Windows 2000 1. Click Start Settings Printers. 2. Right-click Dell Photo AIO Printer 964, and select Set as Default. Printer Problems - Dell 964 | User's Guide2 - Page 92
XP, click Start Control Panel Printers and Other Hardware Printers and Faxes. In Windows 2000, click Start Settings Printers. 2. Check for multiple printer objects for your Dell printer, which might be shown as Dell 964, Dell 964 (Copy 1), Dell 964 (Copy 2), and so on. 3. Print a job to each one - Dell 964 | User's Guide2 - Page 93
Problems Make sure you loaded the paper correctly. For more information, see Loading Paper. Use only paper recommended for your printer. For more information, see Print Media Guidelines for the Paper Support Support. Make sure the paper is not wrinkled, torn or damaged. Make sure the paper guides - Dell 964 | User's Guide2 - Page 94
. 4. Press Select . 5. Resend your print job to print any missing pages. Near the paper exit tray 1. Raise the printer unit. 2. Pull firmly on the paper to remove it. 3. Close the printer unit. 4. Press Select . 5. Resend your print job to print any missing pages. Near the rear access door 1. Open - Dell 964 | User's Guide2 - Page 95
in Printing Preferences. Network Problems Scanning Programs Unavailable Through the Network After installing your Dell 964 All-in-One Printer and Dell Wireless Printer Adapter 3300 on your computer with Microsoft® Windows® XP Service Pack 2 installed, the Downloading Application List fails to work - Dell 964 | User's Guide2 - Page 96
information, see Check for a paper jam.. Load Paper then Press Your printer is out of paper. Select Left cartridge The Black or Photo ink cartridge is missing. Insert Black missing. or Photo cartridge Follow the instructions on the display to clear the message, and then print your document - Dell 964 | User's Guide2 - Page 97
reinstall the printer software. See Removing and Reinstalling Software. Improving Print Quality If you are not satisfied with the print quality of your documents, there are several different ways to improve the print quality. Use the appropriate paper. For example, use Dell Premium Photo Paper if - Dell 964 | User's Guide2 - Page 98
again. If the print quality does not improve, try aligning or cleaning the ink cartridges. For more information on aligning, see Aligning Ink Cartridges. For more information on cleaning ink cartridges, see Cleaning the Ink Cartridge Nozzles. For additional solutions, go to support.dell.com. - Dell 964 | User's Guide2 - Page 99
Consumption and Requirements Fax Mode Capabilities Print and Scan Mode Capabilities Operating System Support Memory Specifications and Requirements Print Media Guidelines Cables Overview Memory Connectivity Duty cycle (average) Printer life 32 MB SDRAM 4 MB FLASH 2 MB Fax USB 2.0 high-speed 5,000 - Dell 964 | User's Guide2 - Page 100
analog fax modem signal. NOTE: You cannot fax with an ISDN (integrated services digital network) or cable modem. ISDN and cable modems are not fax modems and are not supported for faxing. Print and Scan Mode Capabilities Your Dell Photo AIO Printer 964 can scan from 50 to 19,200 dpi. Although your - Dell 964 | User's Guide2 - Page 101
Support The Dell Photo AIO Printer 964 supports: Windows XP Professional x64 Windows XP Windows 2000 Memory Specifications and Requirements Your operating system must meet the minimum system requirements. Operating system Processor speed (Mhz) Windows XP Professional x64 Windows XP Windows - Dell 964 | User's Guide2 - Page 102
designed for inkjet printers. NOTE: You must select A4 Banner or Letter Banner paper size in Print Properties. Failure to do so will cause a paper jam. See Paper Problems. The print side of the envelopes faces down. The envelopes are centered in the paper support. The paper guides rest against the - Dell 964 | User's Guide2 - Page 103
down. The paper is centered in the paper support. You select Normal or Photo print quality. The paper guides rest against the right and left edges of the paper. The paper guide rests against the bottom edge of the paper. You follow the loading instructions on the iron-on transfer packaging. The - Dell 964 | User's Guide2 - Page 104
letterhead feeds into the printer first. The paper guides rest against the right and left edges of the paper. The paper guide rests against the bottom The paper guide is against the edge of the paper. Your paper size fits within the dimensions allowable. You choose a media that absorbs ink well. - Dell 964 | User's Guide2 - Page 105
Your Dell Photo AIO Printer 964 uses a Universal Serial Bus (USB) cable (sold separately). - Dell 964 | User's Guide2 - Page 106
does cause interference with radio communications services, which can be determined by turning to try to correct the interference by one or more of the following measures: Reorient Dell Technical Support representative or an experienced radio/television technician for additional suggestions. Dell - Dell 964 | User's Guide2 - Page 107
services. Using shielded cables ensures that you maintain the appropriate EMC classification for the intended environment. For parallel printers, a cable is available from Dell. If you prefer, you can order a cable from Dell and on the cards themselves. If any one of the labels carries a Class A - Dell 964 | User's Guide2 - Page 108
in accordance with the manufacturer's instruction manual, may cause interference with radio communications with FCC regulations: Model number: 964 Company name: Dell Inc. One Dell Way Round Rock, Texas 78682 USA than five to ensure proper service from the telephone company. To be certain of the number - Dell 964 | User's Guide2 - Page 109
service. If you experience trouble with this telephone equipment, see "Getting Help" in your product's troubleshooting documentation or, for some products, the section titled "Contacting Dell" in your product's online guide located on one of these labels. Note that Industry Canada regulations - Dell 964 | User's Guide2 - Page 110
Directive 89/336/CEE and the Low Voltage Directive 73/23/CEE of the European Union. Such marking is indicative that this Dell device meets the following technical standards: EN 55022 "Information Technology Equipment Radio Disturbance Characteristics Limits and Methods of Measurement." EN 55024 - Dell 964 | User's Guide2 - Page 111
A "Declaration of Conformity" in accordance with the preceding directives and standards has been made and is on file at Dell Inc. Products Europe BV, Limerick, Ireland. CE Mark Notice This equipment complies with the essential requirements of the European Union Directive 1999/5/EC. Simplified - Dell 964 | User's Guide2 - Page 112
Dell devices are classified by the Voluntary Control Council for Interference (VCCI) as Class B information technology equipment (ITE). However, the inclusion of certain options can change the rating of some configurations to Class A. ITE, including devices, expansion cards, printers such trouble - Dell 964 | User's Guide2 - Page 113
environment, it may cause radio interference. Install and use the equipment according to the instruction manual. VCCI Class B ITE Regulatory Mark If the regulatory label includes the following marking, your device is a Class B product: MIC Notice (Republic of Korea Only) To - Dell 964 | User's Guide2 - Page 114
The equipment should draw power from a socket with an attached protection circuit (a 3-prong socket). All equipment that works together (computer, monitor, printer, and so on) should have the same power supply source. The phasing conductor of the room's electrical installation should have a reserve - Dell 964 | User's Guide2 - Page 115
BSMI Notice (Taiwan Only) If you find a or mark on the regulatory label on the bottom, side, or back panel of your device, the following section is applicable: - Dell 964 | User's Guide2 - Page 116
NOM Information (Mexico Only) The following information is provided on the device(s) described in this document in compliance with the requirements of the official Mexican standards (NOM): - Dell 964 | User's Guide2 - Page 117
One Dell Way Round Rock, TX 78682 Dell Computer de México, S.A. de C.V. Paseo de la Reforma 2620 - 11° Piso Col. Lomas Altas 11950 México, D.F. Dell Computer de México, S.A. de C.V. al Cuidado de Kuehne & Nagel de México S. de R.L. Avenida Soles No. 55 Col. Peñon de los Baños 15520 México, D.F. 964 - Dell 964 | User's Guide2 - Page 118
at an appropriate facility to enable recovery and recycling. For information on how to recycle this product responsibly in your country, please visit: www.euro.dell.com/recycling. WEE www.euro.dell.com/recycling. Diretiva WEEE (Waste from Electrical and Electronic Equipment) - Dell 964 | User's Guide2 - Page 119
para coleta e reciclagem. Para obter informações sobre como reciclar este produto de forma responsável em seu país, visite: www.euro.dell.com/recycling. Smernice o odpadních elektrických a elektronických zarízeních (WEEE) V Evropské unii tento štítek oznacuje, že tento produkt nesmí být likvidov - Dell 964 | User's Guide2 - Page 120
en recyclage mogelijk zijn. Raadpleeg voor informatie over de milieuvriendelijke wijze van recyclage van dit product in uw land: www.euro.dell.com/recycling. WEEE-direktiivi käytöstä poistettujen laitteiden hävittämisestä Euroopan unionissa tämä merkintä kertoo, että tuote tulee hävittää kotitalousj - Dell 964 | User's Guide2 - Page 121
de plus amples informations sur le recyclage de ce produit dans votre pays, vous pouvez consulter notre site à l'adresse suivante : www.euro.dell.com/recycling. Richtlinie für Abfall von elektrischen und elektronischen Geräten (WEEE) In der Europäischen Union bedeutet diese Markierung, dass dieses - Dell 964 | User's Guide2 - Page 122
www.euro.dell.com/recycling. Waste Electrical and Electronic Equipment (WEEE) Directive www.euro.dell.com/recycling. Direttiva WEEE (Waste from Electrical and Electronic Equipment) - Dell 964 | User's Guide2 - Page 123
nel paese di appartenenza, visitare il sito all'indirizzo: www.euro.dell.com/recycling. EE-direktivet (direktivet om elektrisk og elektronisk avfall) produktet pе en sikker mеte i ditt land, pе www.euro.dell.com/recycling. Dyrektywa w sprawie zuzytego sprzetu elektrycznego i elektronicznego (WEEE - Dell 964 | User's Guide2 - Page 124
WEEE) www.euro.dell.com/recycling. Directiva sobre el desecho de material eléctrico y electrónico (WEEE) En la ón sobre cómo reciclar este producto de manera responsable en su país, visite el sitio Web: www.euro.dell.com/recycling. WEEE-direktivet (Waste from Electrical and Electronic Equipment) - Dell 964 | User's Guide2 - Page 125
med hushållsavfall. Den ska lämnas in på en återvinningsstation. Information om hur produkten återvinns i ditt land finns på: www.euro.dell.com/recycling. Atik Elektrikli ve Elektronik Donanimlar (WEEE) Direktifi Avrupa Birliginde, bu etiket bu ürünün ev atiklari ile birlikte atilmamasi gerektigini - Dell 964 | User's Guide2 - Page 126
Contacting Dell Warranty and Return Policy Dell Technical Support Policy Technician-assisted technical support requires the cooperation and participation of the customer in the troubleshooting process and provides for restoration of the Operating System, application software and hardware drivers to - Dell 964 | User's Guide2 - Page 127
Service [email protected] Warranty and Return Policy Dell Inc. ("Dell") manufactures its hardware products from parts and components that are new or equivalent to new in accordance with industry-standard practices. For information about the Dell warranty for your printer, refer to the Owner's Manual - Dell 964 | User's Guide2 - Page 128
disclaimers in the referenced licenses for additional details. To obtain source code files for the Dell modified GNU licensed software, launch the Drivers and Utilities CD that shipped with your printer and click Contact Dell, or refer to the "Contacting Dell" section of your Owner's Manual.
-
 1
1 -
 2
2 -
 3
3 -
 4
4 -
 5
5 -
 6
6 -
 7
7 -
8
-
9
-
10
-
11
-
12
-
13
-
14
-
15
-
16
-
17
-
18
-
19
-
20
-
21
-
22
-
23
-
24
-
25
-
26
-
27
-
28
-
29
-
30
-
31
-
32
-
33
-
34
-
35
-
36
-
37
-
38
-
39
-
40
-
41
-
42
-
43
-
44
-
45
-
46
-
47
-
48
-
49
-
50
-
51
-
52
-
53
-
54
-
55
-
56
-
57
-
58
-
59
-
60
-
61
-
62
-
63
-
64
-
65
-
66
-
67
-
68
-
69
-
70
-
71
-
72
-
73
-
74
-
75
-
76
-
77
-
78
-
79
-
80
-
81
-
82
-
83
-
84
-
85
-
86
-
87
-
88
-
89
-
90
-
91
-
92
-
93
-
94
-
95
-
96
-
97
-
98
-
99
-
100
-
101
-
102
-
103
-
104
-
105
-
106
-
107
-
108
-
109
-
110
-
111
-
112
-
113
-
114
-
115
-
116
-
117
-
118
-
119
-
120
-
121
-
122
-
123
-
124
-
125
-
126
-
127
-
128
 |
 |
Dell™ Photo All-In-One Printer 964 User's Guide
Click the links to the left for information on the features and operation of your printer. For information on
other documentation included with your printer, see
Finding Information
.
To order ink or supplies from Dell:
Double-click the icon on your desktop.
1.
Visit Dell's website:
www.dell.com/supplies
.
2.
Order Dell printer supplies by phone. Refer to the
Owner's Manual
for the correct phone number for
your country.
3.
For the best service, make sure you have the Dell printer Service Tag available. See
Express Service
Code and Service Tag number
.
Notes, Notices, and Cautions
NOTE:
A
NOTE
indicates important information that helps you make better use of your printer.
NOTICE:
A
NOTICE
indicates either potential damage to hardware or loss of data and tells you how
to avoid the problem.
CAUTION:
A CAUTION indicates a potential for property damage, personal injury, or death.
Information in this document is subject to change without notice.
© 2005 Dell Inc. All rights reserved.
Reproduction in any manner whatsoever without the written permission of Dell Inc.
is strictly forbidden.
Trademarks used in this text:
Dell
, the
DELL
logo,
Dell Picture Studio
, and
Dell Ink Management System
are trademarks of Dell
Inc.;
Microsoft
and
Windows
are registered trademarks of Microsoft Corporation.
Other trademarks and trade names may be used in this document to refer to either the entities claiming the marks and names or
their products. Dell Inc. disclaims any proprietary interest in trademarks and trade names other than its own.
Model 964
July 2005
SRV DC840
Rev. A00