Dell 964 User's Guide2 - Page 5
Number, Description, Manager. For more information, see Using the Memory Card Manager . - printer ink cartridge
 |
UPC - 940356014026
View all Dell 964 manuals
Add to My Manuals
Save this manual to your list of manuals |
Page 5 highlights
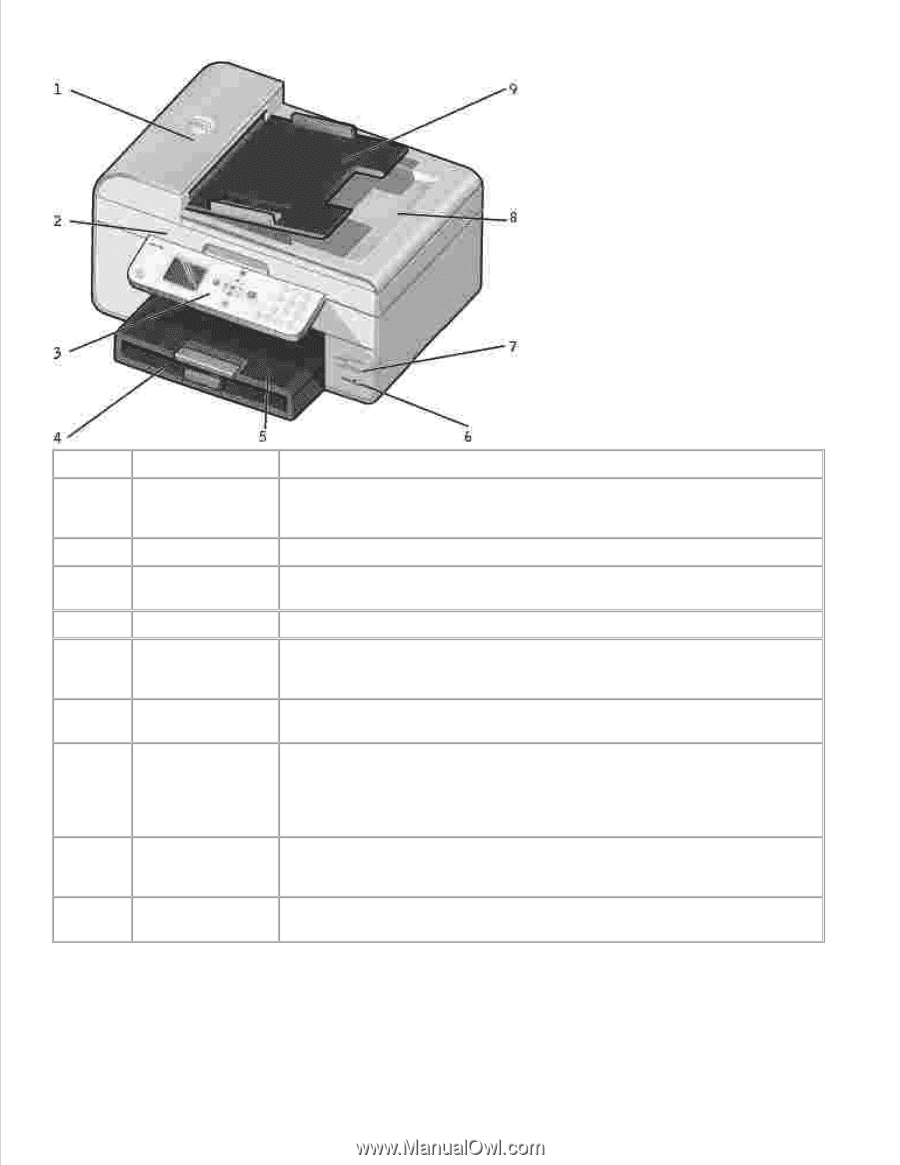
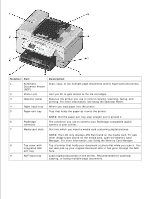
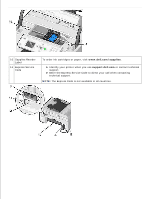
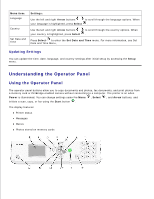
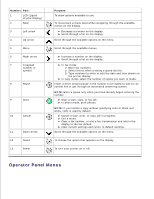
Number: Part: 1 Automatic Document Feeder (ADF) 2 Printer unit 3 Operator panel 4 Paper input tray 5 Paper exit tray Description: Scan, copy, or fax multiple page documents and/or legal sized documents. Unit you lift to gain access to the ink cartridges. Panel on the printer you use to control copying, scanning, faxing, and printing. For more information, see Using the Operator Panel . Where you load paper into the printer. Tray that holds the paper as it exits the printer. NOTE: Pull the paper exit tray stop straight out to extend it. 6 PictBridge connector The connector you use to connect your PictBridge-compatible digital camera to your printer. 7 Media card slots Slot into which you insert a media card containing digital pictures. NOTE: The LCD only displays JPG files found on the media card. To view other image types stored on the media card, open the Memory Card Manager. For more information, see Using the Memory Card Manager . 8 Top cover with Top of printer that holds your document or photo flat while you scan it. You integrated ADF can also pick up your original document after it has gone through the ADF exit tray here. 9 ADF input tray Load original documents in the printer. Recommended for scanning, copying, or faxing multiple-page documents.
-
 1
1 -
 2
2 -
 3
3 -
 4
4 -
 5
5 -
 6
6 -
 7
7 -
 8
8 -
 9
9 -
 10
10 -
 11
11 -
12
-
13
-
14
-
15
-
16
-
17
-
18
-
19
-
20
-
21
-
22
-
23
-
24
-
25
-
26
-
27
-
28
-
29
-
30
-
31
-
32
-
33
-
34
-
35
-
36
-
37
-
38
-
39
-
40
-
41
-
42
-
43
-
44
-
45
-
46
-
47
-
48
-
49
-
50
-
51
-
52
-
53
-
54
-
55
-
56
-
57
-
58
-
59
-
60
-
61
-
62
-
63
-
64
-
65
-
66
-
67
-
68
-
69
-
70
-
71
-
72
-
73
-
74
-
75
-
76
-
77
-
78
-
79
-
80
-
81
-
82
-
83
-
84
-
85
-
86
-
87
-
88
-
89
-
90
-
91
-
92
-
93
-
94
-
95
-
96
-
97
-
98
-
99
-
100
-
101
-
102
-
103
-
104
-
105
-
106
-
107
-
108
-
109
-
110
-
111
-
112
-
113
-
114
-
115
-
116
-
117
-
118
-
119
-
120
-
121
-
122
-
123
-
124
-
125
-
126
-
127
-
128
 |
 |