Dell 964 User's Guide2 - Page 18
Phonebook Add Group Menu, Auto Answer Schedule Menu, Phonebook Phone Number Search
 |
UPC - 940356014026
View all Dell 964 manuals
Add to My Manuals
Save this manual to your list of manuals |
Page 18 highlights
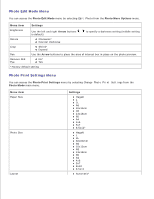
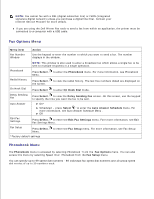
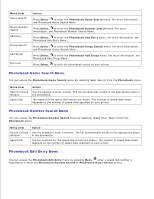
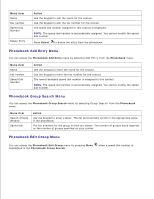
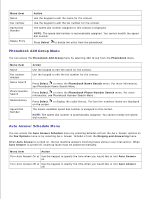
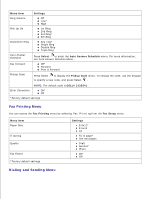
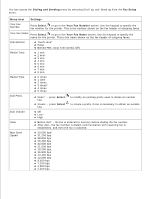
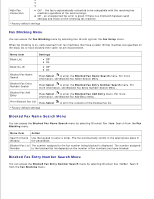
Menu item Name Fax number Speed Dial Number Delete Entry Action Use the keypad to edit the name for the contact. Use the keypad to edit the fax number for the contact. The speed dial number assigned to this contact is displayed. NOTE: The speed dial number is automatically assigned. You cannot modify the speed dial number. Press Select to delete the entry from the phonebook. Phonebook Add Group Menu You can access the Phonebook Add Group menu by selecting Add Group from the Phonebook menu. Menu item Name Fax number window Name Search Phone Number Search Redial History Speed Dial Number Action Use the keypad to edit the name for the contact. Use the keypad to edit the fax number for the contact. Press Select to enter the Phonebook Name Search menu. For more information, see Phonebook Name Search Menu . Press Select to enter the Phonebook Phone Number Search menu. For more information, see Phonebook Number Search Menu . Press Select to display the redial history. The last five numbers dialed are displayed on the screen. The lowest available speed dial number is assigned to this contact. NOTE: The speed dial number is automatically assigned. You cannot modify the speed dial number. Auto Answer Schedule Menu You can access the Auto Answer Schedule menu by selecting Scheduled from the Auto Answer options on the Fax Options menu or by selecting Auto Answer Schedule from the Ringing and Answering menu. When Auto Answer is turned on, the fax machine answers incoming faxes without user intervention. When Auto Answer is turned off, incoming faxes must be answered manually. Menu item Action Turn Auto Answer On at Use the keypad to specify the time when you would like to turn Auto Answer on. Turn Auto Answer Off at Use the keypad to specify the time when you would like to turn Auto Answer off.
-
 1
1 -
2
-
3
-
4
-
5
-
6
-
7
-
8
-
9
-
10
-
11
-
12
-
 13
13 -
 14
14 -
 15
15 -
 16
16 -
 17
17 -
 18
18 -
 19
19 -
 20
20 -
 21
21 -
 22
22 -
 23
23 -
24
-
25
-
26
-
27
-
28
-
29
-
30
-
31
-
32
-
33
-
34
-
35
-
36
-
37
-
38
-
39
-
40
-
41
-
42
-
43
-
44
-
45
-
46
-
47
-
48
-
49
-
50
-
51
-
52
-
53
-
54
-
55
-
56
-
57
-
58
-
59
-
60
-
61
-
62
-
63
-
64
-
65
-
66
-
67
-
68
-
69
-
70
-
71
-
72
-
73
-
74
-
75
-
76
-
77
-
78
-
79
-
80
-
81
-
82
-
83
-
84
-
85
-
86
-
87
-
88
-
89
-
90
-
91
-
92
-
93
-
94
-
95
-
96
-
97
-
98
-
99
-
100
-
101
-
102
-
103
-
104
-
105
-
106
-
107
-
108
-
109
-
110
-
111
-
112
-
113
-
114
-
115
-
116
-
117
-
118
-
119
-
120
-
121
-
122
-
123
-
124
-
125
-
126
-
127
-
128
 |
 |
