Dell Latitude 7030 Rugged Extreme Tablet Owners Manual - Page 47
Installing the stylus, Installing the stylus
 |
View all Dell Latitude 7030 Rugged Extreme Tablet manuals
Add to My Manuals
Save this manual to your list of manuals |
Page 47 highlights
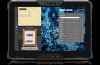
NOTE: Avoid pulling the stylus with the stretchable thread. 2. Loosen the knot and slip the stylus through the hole to remove the tether from the tablet. 3. Loosen the knot and remove the lanyard from the stylus. Installing the stylus Prerequisites If you are replacing a component, remove the existing component before performing the installation procedure. About this task The following images indicate the location of the stylus and provide a visual representation of the installation procedure. Figure 39. Installing the stylus Removing and installing Customer Replaceable Units (CRUs) 47
-
 1
1 -
2
-
3
-
4
-
5
-
6
-
7
-
8
-
9
-
10
-
11
-
12
-
13
-
14
-
15
-
16
-
17
-
18
-
19
-
20
-
21
-
22
-
23
-
24
-
25
-
26
-
27
-
28
-
29
-
30
-
31
-
32
-
33
-
34
-
35
-
36
-
37
-
38
-
39
-
40
-
41
-
 42
42 -
 43
43 -
 44
44 -
 45
45 -
 46
46 -
 47
47 -
 48
48 -
 49
49 -
 50
50 -
 51
51 -
 52
52 -
53
-
54
-
55
-
56
-
57
-
58
-
59
-
60
-
61
-
62
-
63
-
64
-
65
-
66
-
67
-
68
-
69
-
70
-
71
-
72
-
73
-
74
-
75
-
76
-
77
-
78
-
79
-
80
-
81
-
82
-
83
-
84
-
85
-
86
-
87
-
88
-
89
-
90
-
91
-
92
-
93
-
94
-
95
-
96
-
97
-
98
-
99
-
100
-
101
-
102
-
103
-
104
-
105
-
106
-
107
-
108
-
109
-
110
-
111
-
112
-
113
-
114
-
115
-
116
-
117
-
118
-
119
-
120
-
121
-
122
-
123
-
124
-
125
-
126
-
127
-
128
-
129
-
130
-
131
-
132
-
133
-
134
-
135
-
136
-
137
-
138
-
139
-
140
-
141
-
142
-
143
-
144
-
145
-
146
-
147
-
148
-
149
-
150
-
151
-
152
-
153
-
154
-
155
-
156
-
157
 |
 |

NOTE:
Avoid pulling the stylus with the stretchable thread.
2.
Loosen the knot and slip the stylus through the hole to remove the tether from the tablet.
3.
Loosen the knot and remove the lanyard from the stylus.
Installing the stylus
Prerequisites
If you are replacing a component, remove the existing component before performing the installation procedure.
About this task
The following images indicate the location of the stylus and provide a visual representation of the installation procedure.
Figure 39. Installing the stylus
Removing and installing Customer Replaceable Units (CRUs)
47