Dell Latitude 7030 Rugged Extreme Tablet Owners Manual - Page 68
I/O daughter-board, Removing the I/O daughter-board
 |
View all Dell Latitude 7030 Rugged Extreme Tablet manuals
Add to My Manuals
Save this manual to your list of manuals |
Page 68 highlights
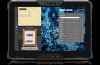
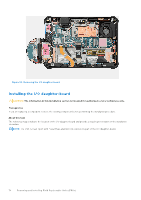
I/O daughter-board Removing the I/O daughter-board CAUTION: The information in this removal section is intended for authorized service technicians only. Prerequisites 1. Follow the procedure in Before working inside your tablet. 2. Remove the stylus. 3. Remove the handle, if applicable. 4. Remove the hot-swappable batteries, if applicable. 5. Remove the back-cover assembly. About this task The following images indicate the location of the I/O daughter-board and provide a visual representation of the removal procedure. NOTE: The USB 3.2 Gen 1 port with PowerShare and microSD-card slot is part of the I/O daughter-board. 68 Removing and installing Field Replaceable Units (FRUs)
-
 1
1 -
2
-
3
-
4
-
5
-
6
-
7
-
8
-
9
-
10
-
11
-
12
-
13
-
14
-
15
-
16
-
17
-
18
-
19
-
20
-
21
-
22
-
23
-
24
-
25
-
26
-
27
-
28
-
29
-
30
-
31
-
32
-
33
-
34
-
35
-
36
-
37
-
38
-
39
-
40
-
41
-
42
-
43
-
44
-
45
-
46
-
47
-
48
-
49
-
50
-
51
-
52
-
53
-
54
-
55
-
56
-
57
-
58
-
59
-
60
-
61
-
62
-
 63
63 -
 64
64 -
 65
65 -
 66
66 -
 67
67 -
 68
68 -
 69
69 -
 70
70 -
 71
71 -
 72
72 -
 73
73 -
74
-
75
-
76
-
77
-
78
-
79
-
80
-
81
-
82
-
83
-
84
-
85
-
86
-
87
-
88
-
89
-
90
-
91
-
92
-
93
-
94
-
95
-
96
-
97
-
98
-
99
-
100
-
101
-
102
-
103
-
104
-
105
-
106
-
107
-
108
-
109
-
110
-
111
-
112
-
113
-
114
-
115
-
116
-
117
-
118
-
119
-
120
-
121
-
122
-
123
-
124
-
125
-
126
-
127
-
128
-
129
-
130
-
131
-
132
-
133
-
134
-
135
-
136
-
137
-
138
-
139
-
140
-
141
-
142
-
143
-
144
-
145
-
146
-
147
-
148
-
149
-
150
-
151
-
152
-
153
-
154
-
155
-
156
-
157
 |
 |

I/O daughter-board
Removing the I/O daughter-board
CAUTION:
The information in this removal section is intended for authorized service technicians only.
Prerequisites
1.
Follow the procedure in
Before working inside your tablet
.
2.
Remove the
stylus
.
3.
Remove the
handle
, if applicable.
4.
Remove the
hot-swappable batteries
, if applicable.
5.
Remove the
back-cover assembly
.
About this task
The following images indicate the location of the I/O daughter-board and provide a visual representation of the removal
procedure.
NOTE:
The USB 3.2 Gen 1 port with PowerShare and microSD-card slot is part of the I/O daughter-board.
68
Removing and installing Field Replaceable Units (FRUs)