Dell PowerVault NX3500 Hardware Owner's Manual - Page 77
Power Supplies, Removing a Power Supply
 |
View all Dell PowerVault NX3500 manuals
Add to My Manuals
Save this manual to your list of manuals |
Page 77 highlights
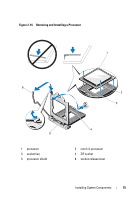
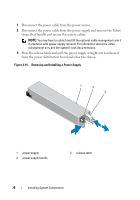
11 Replace the cooling shroud. See "Installing the Cooling Shroud" on page 63. 12 Close the system. See "Closing the System" on page 53. 13 Reconnect the system to its electrical outlet and turn the system on, including any attached peripherals. 14 Press to enter the System Setup program, and check that the processor information matches the new system configuration. 15 Run the system diagnostics to verify that the new processor operates correctly. See "Running the System Diagnostics" on page 105 for information about running the diagnostics. Power Supplies Your system supports 400 W power supply modules. The second power supply provides hot-swappable, power redundancy in your system. In redundant mode, the system distributes the power load across both power supplies to maximize efficiency. When a power supply is removed with the system powered on, the full power load is picked up by the remaining power supply. Removing a Power Supply CAUTION: Many repairs may only be done by a certified service technician. You should only perform troubleshooting and simple repairs as authorized in your product documentation, or as directed by the online or telephone service and support team. Damage due to servicing that is not authorized by Dell is not covered by your warranty. Read and follow the safety instructions that came with the product. CAUTION: The system requires one power supply for normal operation. On power-redundant systems, remove and replace only one power supply at a time in a system that is powered on. Installing System Components 77
-
 1
1 -
2
-
3
-
4
-
5
-
6
-
7
-
8
-
9
-
10
-
11
-
12
-
13
-
14
-
15
-
16
-
17
-
18
-
19
-
20
-
21
-
22
-
23
-
24
-
25
-
26
-
27
-
28
-
29
-
30
-
31
-
32
-
33
-
34
-
35
-
36
-
37
-
38
-
39
-
40
-
41
-
42
-
43
-
44
-
45
-
46
-
47
-
48
-
49
-
50
-
51
-
52
-
53
-
54
-
55
-
56
-
57
-
58
-
59
-
60
-
61
-
62
-
63
-
64
-
65
-
66
-
67
-
68
-
69
-
70
-
71
-
 72
72 -
 73
73 -
 74
74 -
 75
75 -
 76
76 -
 77
77 -
 78
78 -
 79
79 -
 80
80 -
 81
81 -
 82
82 -
83
-
84
-
85
-
86
-
87
-
88
-
89
-
90
-
91
-
92
-
93
-
94
-
95
-
96
-
97
-
98
-
99
-
100
-
101
-
102
-
103
-
104
-
105
-
106
-
107
-
108
-
109
-
110
-
111
-
112
-
113
-
114
-
115
-
116
-
117
-
118
 |
 |
