HP 1320 Service Manual - Page 182
Clearing jams, Print-cartridge area
 |
UPC - 829160406831
View all HP 1320 manuals
Add to My Manuals
Save this manual to your list of manuals |
Page 182 highlights
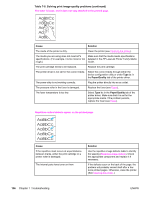
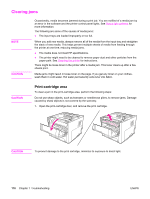
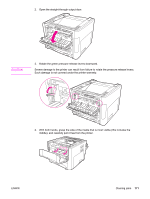
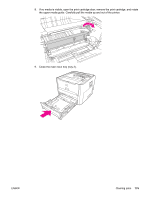
Clearing jams NOTE CAUTION Occasionally, media becomes jammed during a print job. You are notified of a media jam by an error in the software and the printer control panel lights. See Status light patterns for more information. The following are some of the causes of media jams: ● The input trays are loaded improperly or too full. When you add new media, always remove all of the media from the input tray and straighten the stack of new media. This helps prevent multiple sheets of media from feeding through the printer at one time, reducing media jams. ● The media does not meet HP specifications. ● The printer might need to be cleaned to remove paper dust and other particles from the paper path. See Cleaning the printer for instructions. There might be loose toner in the printer after a media jam. This toner clears up after a few sheets print. Media jams might result in loose toner on the page. If you get any toner on your clothes, wash them in cold water. Hot water permanently sets toner into fabric. CAUTION Print-cartridge area To clear a jam in the print-cartridge area, perform the following steps: Do not use sharp objects, such as tweezers or needlenose pliers, to remove jams. Damage caused by sharp objects is not covered by the warranty. 1. Open the print-cartridge door, and remove the print cartridge. CAUTION To prevent damage to the print cartridge, minimize its exposure to direct light. 170 Chapter 7 Troubleshooting ENWW
-
 1
1 -
2
-
3
-
4
-
5
-
6
-
7
-
8
-
9
-
10
-
11
-
12
-
13
-
14
-
15
-
16
-
17
-
18
-
19
-
20
-
21
-
22
-
23
-
24
-
25
-
26
-
27
-
28
-
29
-
30
-
31
-
32
-
33
-
34
-
35
-
36
-
37
-
38
-
39
-
40
-
41
-
42
-
43
-
44
-
45
-
46
-
47
-
48
-
49
-
50
-
51
-
52
-
53
-
54
-
55
-
56
-
57
-
58
-
59
-
60
-
61
-
62
-
63
-
64
-
65
-
66
-
67
-
68
-
69
-
70
-
71
-
72
-
73
-
74
-
75
-
76
-
77
-
78
-
79
-
80
-
81
-
82
-
83
-
84
-
85
-
86
-
87
-
88
-
89
-
90
-
91
-
92
-
93
-
94
-
95
-
96
-
97
-
98
-
99
-
100
-
101
-
102
-
103
-
104
-
105
-
106
-
107
-
108
-
109
-
110
-
111
-
112
-
113
-
114
-
115
-
116
-
117
-
118
-
119
-
120
-
121
-
122
-
123
-
124
-
125
-
126
-
127
-
128
-
129
-
130
-
131
-
132
-
133
-
134
-
135
-
136
-
137
-
138
-
139
-
140
-
141
-
142
-
143
-
144
-
145
-
146
-
147
-
148
-
149
-
150
-
151
-
152
-
153
-
154
-
155
-
156
-
157
-
158
-
159
-
160
-
161
-
162
-
163
-
164
-
165
-
166
-
167
-
168
-
169
-
170
-
171
-
172
-
173
-
174
-
175
-
176
-
 177
177 -
 178
178 -
 179
179 -
 180
180 -
 181
181 -
 182
182 -
 183
183 -
 184
184 -
 185
185 -
 186
186 -
 187
187 -
188
-
189
-
190
-
191
-
192
-
193
-
194
-
195
-
196
-
197
-
198
-
199
-
200
-
201
-
202
-
203
-
204
-
205
-
206
-
207
-
208
-
209
-
210
-
211
-
212
-
213
-
214
-
215
-
216
-
217
-
218
-
219
-
220
-
221
-
222
-
223
-
224
-
225
-
226
-
227
-
228
-
229
-
230
-
231
-
232
-
233
-
234
-
235
-
236
-
237
-
238
-
239
-
240
-
241
-
242
-
243
-
244
-
245
-
246
-
247
-
248
-
249
-
250
-
251
-
252
-
253
-
254
 |
 |