HP 7310 User Guide - Page 130
Send a scanned image, Send from Where?, Memory card, Scanner - all in one scanner not working
 |
View all HP 7310 manuals
Add to My Manuals
Save this manual to your list of manuals |
Page 130 highlights
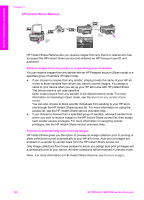
The Send from Where? menu appears on the color graphics display. 3 Press 1 to select Memory card. The first photo on your memory card appears on the color graphics display. 4 Follow the steps (starting with step 2) in To send photos immediately upon inserting your memory card. Send a scanned image Share a scanned image by pressing HP Instant Share on the control panel. To use the HP Instant Share button, place the image on the glass, select the scanner as the means by which you are going to send the image, select a destination, and start the scan. Note For more information on scanning an image, see Use the scan features. To send a scanned image from your HP all-in-one 1 Load your original face down on the right front corner of the glass. 2 Press HP Instant Share on the control panel of your HP all-in-one. The Send from Where? menu appears on the color graphics display. 3 Press 2 to select Scanner. The image is scanned and uploaded to your computer. For Windows users, the HP Image Zone software opens on your computer. The HP Instant Share tab appears. A thumbnail of the scanned image appears in the Selection Tray. For more information on the HP Image Zone, see Use the HP Image Zone in the onscreen help. For Macintosh users, the HP Instant Share client application software opens on your computer. A thumbnail of the scanned image appears in the HP Instant Share window. Note If you are using a Macintosh OS earlier than X v10.1.5 (including OS 9 v9.1.5), your photos are uploaded to the HP Gallery on your Macintosh. Click E-mail. Send the scanned image as an e-mail attachment by following the prompts on your computer screen. 4 Follow the steps appropriate for your operating system: If you are using a Windows-based computer: a From either the Control or Work areas of the HP Instant Share tab, click the link or icon of the service you want to use to send your scanned image. Note If you click See All Services, you can choose from among all of the services available in your country/region, for example: HP Instant Share E-mail and Create Online Albums. Follow the onscreen instructions. The Go Online screen appears in the Work area. b Click Next and follow the onscreen instructions. If you are using a Macintosh: a Make sure the scanned image you want to share displays in the HP Instant Share window. Use the - button to remove photos, or the + button to add photos to the window. b Click Continue and follow the onscreen instructions. Use HP Instant Share (USB) User Guide 127
-
 1
1 -
2
-
3
-
4
-
5
-
6
-
7
-
8
-
9
-
10
-
11
-
12
-
13
-
14
-
15
-
16
-
17
-
18
-
19
-
20
-
21
-
22
-
23
-
24
-
25
-
26
-
27
-
28
-
29
-
30
-
31
-
32
-
33
-
34
-
35
-
36
-
37
-
38
-
39
-
40
-
41
-
42
-
43
-
44
-
45
-
46
-
47
-
48
-
49
-
50
-
51
-
52
-
53
-
54
-
55
-
56
-
57
-
58
-
59
-
60
-
61
-
62
-
63
-
64
-
65
-
66
-
67
-
68
-
69
-
70
-
71
-
72
-
73
-
74
-
75
-
76
-
77
-
78
-
79
-
80
-
81
-
82
-
83
-
84
-
85
-
86
-
87
-
88
-
89
-
90
-
91
-
92
-
93
-
94
-
95
-
96
-
97
-
98
-
99
-
100
-
101
-
102
-
103
-
104
-
105
-
106
-
107
-
108
-
109
-
110
-
111
-
112
-
113
-
114
-
115
-
116
-
117
-
118
-
119
-
120
-
121
-
122
-
123
-
124
-
 125
125 -
 126
126 -
 127
127 -
 128
128 -
 129
129 -
 130
130 -
 131
131 -
 132
132 -
 133
133 -
 134
134 -
 135
135 -
136
-
137
-
138
-
139
-
140
-
141
-
142
-
143
-
144
-
145
-
146
-
147
-
148
-
149
-
150
-
151
-
152
-
153
-
154
-
155
-
156
-
157
-
158
-
159
-
160
-
161
-
162
-
163
-
164
-
165
-
166
-
167
-
168
-
169
-
170
-
171
-
172
-
173
-
174
-
175
-
176
-
177
-
178
-
179
-
180
-
181
-
182
-
183
-
184
-
185
-
186
-
187
-
188
-
189
-
190
-
191
-
192
-
193
-
194
-
195
-
196
-
197
-
198
-
199
-
200
-
201
-
202
-
203
-
204
-
205
-
206
-
207
-
208
-
209
-
210
-
211
-
212
-
213
-
214
-
215
-
216
-
217
-
218
-
219
-
220
-
221
-
222
-
223
-
224
-
225
-
226
-
227
-
228
-
229
-
230
-
231
-
232
-
233
-
234
-
235
-
236
-
237
-
238
-
239
-
240
-
241
-
242
 |
 |
