HP 7310 User Guide - Page 155
Maintain your HP all-in-one, Clean the HP all-in-one, Clean the glass - officejet power cord
 |
View all HP 7310 manuals
Add to My Manuals
Save this manual to your list of manuals |
Page 155 highlights
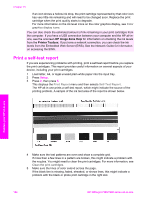
15 Maintain your HP all-in-one The HP all-in-one requires little maintenance. Sometimes you might want to clean the glass and lid backing to remove surface dust and ensure that your copies and scans remain clear. You will also need to replace, align, or clean your print cartridges occasionally. This chapter provides instructions for keeping your HP all-in-one in top working condition. Perform these simple maintenance procedures as necessary. Clean the HP all-in-one Fingerprints, smudges, hair, and other debris on the glass or lid backing slow down performance and affect the accuracy of special features such as Fit to Page. To ensure that your copies and scans remain clear, you might need to clean the glass and lid backing. You might also want to dust the exterior. Clean the glass Dirty glass from fingerprints, smudges, hair, and dust slows down performance and affects the accuracy of features such as Fit to Page. 1 Turn off the HP all-in-one, unplug the power cord, and raise the lid. Note When you unplug the power cord, the date and time are erased. You will need to reset the date and time later, when you plug the power cord back in. Any faxes stored in memory are also erased. 2 Clean the glass with a soft cloth or sponge slightly moistened with a nonabrasive glass cleaner. Warning Do not use abrasives, acetone, benzene, or carbon tetrachloride on the glass; they can damage it. Do not place or spray liquid directly on the glass; the liquid might seep under the glass and damage the device. 3 Dry the glass with a chamois or cellulose sponge to prevent spotting. Note Make sure you clean the small glass strip to the left of the main glass surface. This strip is for processing jobs from the automatic document feeder. Streaks can occur if the glass strip is dirty. Maintain your HP all-in-one 152 HP Officejet 7300/7400 series all-in-one
-
 1
1 -
2
-
3
-
4
-
5
-
6
-
7
-
8
-
9
-
10
-
11
-
12
-
13
-
14
-
15
-
16
-
17
-
18
-
19
-
20
-
21
-
22
-
23
-
24
-
25
-
26
-
27
-
28
-
29
-
30
-
31
-
32
-
33
-
34
-
35
-
36
-
37
-
38
-
39
-
40
-
41
-
42
-
43
-
44
-
45
-
46
-
47
-
48
-
49
-
50
-
51
-
52
-
53
-
54
-
55
-
56
-
57
-
58
-
59
-
60
-
61
-
62
-
63
-
64
-
65
-
66
-
67
-
68
-
69
-
70
-
71
-
72
-
73
-
74
-
75
-
76
-
77
-
78
-
79
-
80
-
81
-
82
-
83
-
84
-
85
-
86
-
87
-
88
-
89
-
90
-
91
-
92
-
93
-
94
-
95
-
96
-
97
-
98
-
99
-
100
-
101
-
102
-
103
-
104
-
105
-
106
-
107
-
108
-
109
-
110
-
111
-
112
-
113
-
114
-
115
-
116
-
117
-
118
-
119
-
120
-
121
-
122
-
123
-
124
-
125
-
126
-
127
-
128
-
129
-
130
-
131
-
132
-
133
-
134
-
135
-
136
-
137
-
138
-
139
-
140
-
141
-
142
-
143
-
144
-
145
-
146
-
147
-
148
-
149
-
 150
150 -
 151
151 -
 152
152 -
 153
153 -
 154
154 -
 155
155 -
 156
156 -
 157
157 -
 158
158 -
 159
159 -
 160
160 -
161
-
162
-
163
-
164
-
165
-
166
-
167
-
168
-
169
-
170
-
171
-
172
-
173
-
174
-
175
-
176
-
177
-
178
-
179
-
180
-
181
-
182
-
183
-
184
-
185
-
186
-
187
-
188
-
189
-
190
-
191
-
192
-
193
-
194
-
195
-
196
-
197
-
198
-
199
-
200
-
201
-
202
-
203
-
204
-
205
-
206
-
207
-
208
-
209
-
210
-
211
-
212
-
213
-
214
-
215
-
216
-
217
-
218
-
219
-
220
-
221
-
222
-
223
-
224
-
225
-
226
-
227
-
228
-
229
-
230
-
231
-
232
-
233
-
234
-
235
-
236
-
237
-
238
-
239
-
240
-
241
-
242
 |
 |
