HP 7310 User Guide - Page 8
Start Copy Color, Start Copy Black - power supply
 |
View all HP 7310 manuals
Add to My Manuals
Save this manual to your list of manuals |
Page 8 highlights
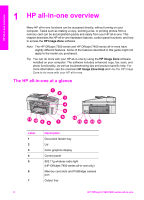
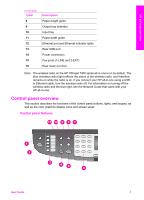
HP all-in-one overview (continued) Label 15 16 17 18 19 20 21a 21b 22 23 24 25 26 27 28 29 30 31 32 Name and Decription OK: Select a menu, setting, or select photos in the color graphics display for printing. Cancel: Stop a job, exit a menu, or exit settings. Down arrow: Navigate down through menu options. Right arrow: Increase values, or go forward when viewing photos on the color graphics display. Start Copy Black: Start a black and white copy job. Start Copy Color: Start a color copy job. Collate: Produce sets of copies in the exact order they are scanned from the document feeder tray. (HP Officejet 7400 series all-in-one only) Lighter/Darker: Access a menu that allows you to lighten or darken copy output. (HP Officejet 7300 series all-in-one only) Print Photos: Print the photo from your memory card currently displayed in the color graphics display, or print all of the photos you selected using the OK button. Proof Sheet: Print a proof sheet when a memory card has been inserted in a memory card slot. A proof sheet shows thumbnail views of all the photos on the memory card. You can select photos on the proof sheet, then print those photos by scanning the proof sheet. Rotate: Rotate the currently displayed photo on the color graphics display 90 degrees. Subsequent presses continue to rotate the photo 90 degrees. On: Turn the HP all-in-one on or off. When the HP all-in-one is off, a minimal amount of power is still supplied to the device. To completely disconnect the power supply to the HP all-in-one, turn the device off, and then unplug the power cord. On light: When lit, the On light indicates that the HP all-in-one is on. The light blinks while performing a job. Zoom: Enlarge the image on the color graphics display. You can also use this button to adjust the crop box when printing. Menu: Print a photo, transfer photos to your computer, see a slide show, or share photos with HP Instant Share using the Menu button in the Photo area. Number of Copies: Select the number of copies using either the or the , or enter the number directly using the keypad. Quality: Control the speed and quality of copies. Menu: Select copy options, including Tray Select, Paper Type, Paper Size, and several other options using the Menu button in the Copy area. Reduce/Enlarge: Change the size of the photo for printing. User Guide 5
-
 1
1 -
2
-
 3
3 -
 4
4 -
 5
5 -
 6
6 -
 7
7 -
 8
8 -
 9
9 -
 10
10 -
 11
11 -
 12
12 -
 13
13 -
14
-
15
-
16
-
17
-
18
-
19
-
20
-
21
-
22
-
23
-
24
-
25
-
26
-
27
-
28
-
29
-
30
-
31
-
32
-
33
-
34
-
35
-
36
-
37
-
38
-
39
-
40
-
41
-
42
-
43
-
44
-
45
-
46
-
47
-
48
-
49
-
50
-
51
-
52
-
53
-
54
-
55
-
56
-
57
-
58
-
59
-
60
-
61
-
62
-
63
-
64
-
65
-
66
-
67
-
68
-
69
-
70
-
71
-
72
-
73
-
74
-
75
-
76
-
77
-
78
-
79
-
80
-
81
-
82
-
83
-
84
-
85
-
86
-
87
-
88
-
89
-
90
-
91
-
92
-
93
-
94
-
95
-
96
-
97
-
98
-
99
-
100
-
101
-
102
-
103
-
104
-
105
-
106
-
107
-
108
-
109
-
110
-
111
-
112
-
113
-
114
-
115
-
116
-
117
-
118
-
119
-
120
-
121
-
122
-
123
-
124
-
125
-
126
-
127
-
128
-
129
-
130
-
131
-
132
-
133
-
134
-
135
-
136
-
137
-
138
-
139
-
140
-
141
-
142
-
143
-
144
-
145
-
146
-
147
-
148
-
149
-
150
-
151
-
152
-
153
-
154
-
155
-
156
-
157
-
158
-
159
-
160
-
161
-
162
-
163
-
164
-
165
-
166
-
167
-
168
-
169
-
170
-
171
-
172
-
173
-
174
-
175
-
176
-
177
-
178
-
179
-
180
-
181
-
182
-
183
-
184
-
185
-
186
-
187
-
188
-
189
-
190
-
191
-
192
-
193
-
194
-
195
-
196
-
197
-
198
-
199
-
200
-
201
-
202
-
203
-
204
-
205
-
206
-
207
-
208
-
209
-
210
-
211
-
212
-
213
-
214
-
215
-
216
-
217
-
218
-
219
-
220
-
221
-
222
-
223
-
224
-
225
-
226
-
227
-
228
-
229
-
230
-
231
-
232
-
233
-
234
-
235
-
236
-
237
-
238
-
239
-
240
-
241
-
242
 |
 |
