HP 7310 User Guide - Page 196
Start Copy Black, To remove the face plate from the front of the automatic document feeder
 |
View all HP 7310 manuals
Add to My Manuals
Save this manual to your list of manuals |
Page 196 highlights
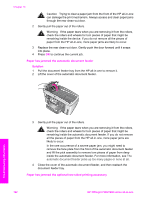
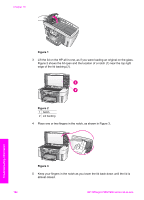
Solution You might need to remove the two-sided printing accessory. For more information, see the printed guide that came with your two-sided printing accessory. Note If you turned the HP all-in-one off before clearing the paper jam, turn it back on, and then restart your print, copy, or fax job. The automatic document feeder picks up too many pages or none at all Cause You need to clean the separator pad or rollers inside the automatic document feeder. Pencil lead, wax, or ink can build up on the rollers and separator pad after extensive use, or if you copy handwritten originals or originals that are heavy with ink. ● If the automatic document feeder does not pick up any pages at all, the rollers inside the automatic document feeder need to be cleaned. ● If the automatic document feeder picks up multiple pages instead of single sheets, the separator pad inside the automatic document feeder needs to be cleaned. Solution Load one or two sheets of unused plain white full-size paper into the document feeder tray, and then press Start Copy Black to pull the pages through the automatic document feeder. The plain paper releases and absorbs residue from the rollers and separator pad. Tip If the automatic document feeder does not pick up the plain paper, try cleaning the front roller. Wipe the roller with a soft lint-free cloth dampened with distilled water. If the problem persists, or the automatic document feeder does not pick up the plain paper, you can clean the rollers and separator pad manually. Remove the face plate from the front of the automatic document feeder to access the pick assembly inside the automatic document feeder, clean the rollers or separator pad, and then reattach the face plate, as described in the following procedures. To remove the face plate from the front of the automatic document feeder 1 Remove all originals from the document feeder tray. Tip You might find it easier to work with the automatic document feeder if you first remove the document feeder tray. 2 Lift the cover of the automatic document feeder, as shown in Figure 1. Troubleshooting information User Guide 193
-
 1
1 -
2
-
3
-
4
-
5
-
6
-
7
-
8
-
9
-
10
-
11
-
12
-
13
-
14
-
15
-
16
-
17
-
18
-
19
-
20
-
21
-
22
-
23
-
24
-
25
-
26
-
27
-
28
-
29
-
30
-
31
-
32
-
33
-
34
-
35
-
36
-
37
-
38
-
39
-
40
-
41
-
42
-
43
-
44
-
45
-
46
-
47
-
48
-
49
-
50
-
51
-
52
-
53
-
54
-
55
-
56
-
57
-
58
-
59
-
60
-
61
-
62
-
63
-
64
-
65
-
66
-
67
-
68
-
69
-
70
-
71
-
72
-
73
-
74
-
75
-
76
-
77
-
78
-
79
-
80
-
81
-
82
-
83
-
84
-
85
-
86
-
87
-
88
-
89
-
90
-
91
-
92
-
93
-
94
-
95
-
96
-
97
-
98
-
99
-
100
-
101
-
102
-
103
-
104
-
105
-
106
-
107
-
108
-
109
-
110
-
111
-
112
-
113
-
114
-
115
-
116
-
117
-
118
-
119
-
120
-
121
-
122
-
123
-
124
-
125
-
126
-
127
-
128
-
129
-
130
-
131
-
132
-
133
-
134
-
135
-
136
-
137
-
138
-
139
-
140
-
141
-
142
-
143
-
144
-
145
-
146
-
147
-
148
-
149
-
150
-
151
-
152
-
153
-
154
-
155
-
156
-
157
-
158
-
159
-
160
-
161
-
162
-
163
-
164
-
165
-
166
-
167
-
168
-
169
-
170
-
171
-
172
-
173
-
174
-
175
-
176
-
177
-
178
-
179
-
180
-
181
-
182
-
183
-
184
-
185
-
186
-
187
-
188
-
189
-
190
-
 191
191 -
 192
192 -
 193
193 -
 194
194 -
 195
195 -
 196
196 -
 197
197 -
 198
198 -
 199
199 -
 200
200 -
 201
201 -
202
-
203
-
204
-
205
-
206
-
207
-
208
-
209
-
210
-
211
-
212
-
213
-
214
-
215
-
216
-
217
-
218
-
219
-
220
-
221
-
222
-
223
-
224
-
225
-
226
-
227
-
228
-
229
-
230
-
231
-
232
-
233
-
234
-
235
-
236
-
237
-
238
-
239
-
240
-
241
-
242
 |
 |
