HP CP3525x HP Color LaserJet CP3525 Series Printers - User Guide - Page 106
Load custom-size paper into Tray 3, CUSTOM, X DIMENSION
 |
UPC - 883585892105
View all HP CP3525x manuals
Add to My Manuals
Save this manual to your list of manuals |
Page 106 highlights
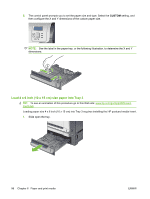
5. The control panel shows the tray's paper type and size. If the configuration is not correct, follow the instructions on the control panel to change the size or type. Load custom-size paper into Tray 3 To use custom media, change the size setting on the control panel to CUSTOM and set the unit of measure, X DIMENSION and Y DIMENSION. 1. Slide open the tray. 2. Adjust the paper-length and paper-width guides by squeezing the adjustment latches and sliding the guides to the size of the paper being used. 94 Chapter 6 Paper and print media ENWW
-
 1
1 -
2
-
3
-
4
-
5
-
6
-
7
-
8
-
9
-
10
-
11
-
12
-
13
-
14
-
15
-
16
-
17
-
18
-
19
-
20
-
21
-
22
-
23
-
24
-
25
-
26
-
27
-
28
-
29
-
30
-
31
-
32
-
33
-
34
-
35
-
36
-
37
-
38
-
39
-
40
-
41
-
42
-
43
-
44
-
45
-
46
-
47
-
48
-
49
-
50
-
51
-
52
-
53
-
54
-
55
-
56
-
57
-
58
-
59
-
60
-
61
-
62
-
63
-
64
-
65
-
66
-
67
-
68
-
69
-
70
-
71
-
72
-
73
-
74
-
75
-
76
-
77
-
78
-
79
-
80
-
81
-
82
-
83
-
84
-
85
-
86
-
87
-
88
-
89
-
90
-
91
-
92
-
93
-
94
-
95
-
96
-
97
-
98
-
99
-
100
-
 101
101 -
 102
102 -
 103
103 -
 104
104 -
 105
105 -
 106
106 -
 107
107 -
 108
108 -
 109
109 -
 110
110 -
 111
111 -
112
-
113
-
114
-
115
-
116
-
117
-
118
-
119
-
120
-
121
-
122
-
123
-
124
-
125
-
126
-
127
-
128
-
129
-
130
-
131
-
132
-
133
-
134
-
135
-
136
-
137
-
138
-
139
-
140
-
141
-
142
-
143
-
144
-
145
-
146
-
147
-
148
-
149
-
150
-
151
-
152
-
153
-
154
-
155
-
156
-
157
-
158
-
159
-
160
-
161
-
162
-
163
-
164
-
165
-
166
-
167
-
168
-
169
-
170
-
171
-
172
-
173
-
174
-
175
-
176
-
177
-
178
-
179
-
180
-
181
-
182
-
183
-
184
-
185
-
186
-
187
-
188
-
189
-
190
-
191
-
192
-
193
-
194
-
195
-
196
-
197
-
198
-
199
-
200
-
201
-
202
-
203
-
204
-
205
-
206
-
207
-
208
-
209
-
210
-
211
-
212
-
213
-
214
-
215
-
216
-
217
-
218
-
219
-
220
-
221
-
222
-
223
-
224
-
225
-
226
-
227
-
228
-
229
-
230
-
231
-
232
-
233
-
234
-
235
-
236
-
237
-
238
-
239
-
240
-
241
-
242
-
243
-
244
-
245
-
246
-
247
-
248
-
249
-
250
-
251
-
252
-
253
-
254
-
255
-
256
-
257
-
258
-
259
-
260
-
261
-
262
-
263
-
264
 |
 |

5.
The control panel shows the tray’s paper type and size. If the configuration is not correct, follow
the instructions on the control panel to change the size or type.
Load custom-size paper into Tray 3
To use custom media, change the size setting on the control panel to
CUSTOM
and set the unit of
measure,
X DIMENSION
and
Y DIMENSION
.
1.
Slide open the tray.
2.
Adjust the paper-length and paper-width guides by squeezing the adjustment latches and sliding
the guides to the size of the paper being used.
94
Chapter 6
Paper and print media
ENWW