HP CP3525x HP Color LaserJet CP3525 Series Printers - User Guide - Page 76
Print on both sides of the duplex printing), Store jobs, Manually Print on 2nd Side
 |
UPC - 883585892105
View all HP CP3525x manuals
Add to My Manuals
Save this manual to your list of manuals |
Page 76 highlights
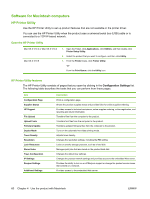
Print on both sides of the page (duplex printing) Use automatic duplex printing 1. Insert enough paper into one of the trays to accommodate the print job. If you are loading special paper such as letterhead, load it in one of the following ways: ● For Tray 1, load the letterhead paper face-down with the top edge feeding into the product first. ● For all other trays, load the letterhead paper face-up with the top edge at the right of the tray. 2. On the File menu, click Print. 3. Open the Layout menu. 4. Next to Two-Sided, select either Long-Edge Binding or Short-Edge Binding. 5. Click Print. Print on both sides manually 1. Insert enough paper into one of the trays to accommodate the print job. If you are loading special paper such as letterhead, load it in one of the following ways: ● For Tray 1, load the letterhead paper face-down with the top edge feeding into the product first. ● For all other trays, load the letterhead paper face-up with the top edge at the right of the tray. 2. On the File menu, click Print. 3. On the Finishing menu, select Manually Print on 2nd Side. 4. Click Print. Follow the instructions in the pop-up window that appears on the computer screen before replacing the output stack in Tray 1 for printing the second half. 5. Go to the printer, and remove any blank paper that is in Tray 1. 6. Insert the printed stack face-up with the bottom edge feeding into the printer first in Tray 1. You must print the second side from Tray 1. 7. If prompted, press the appropriate control-panel button to continue. Store jobs You can store jobs on the product so you can print them at any time. You can share stored jobs with other users, or you can make them private. NOTE: For more information about job storage features, see Use job storage features on page 107 and Set job storage options on page 117. 1. On the File menu, click Print. 2. Open the Job Storage menu. 3. In the Job Storage: drop-down list, select the type of stored job. 4. For the Stored Job and Personal Job types of stored jobs, enter a name for the stored job in the box next to Job Name:. 64 Chapter 4 Use the product with Macintosh ENWW
-
 1
1 -
2
-
3
-
4
-
5
-
6
-
7
-
8
-
9
-
10
-
11
-
12
-
13
-
14
-
15
-
16
-
17
-
18
-
19
-
20
-
21
-
22
-
23
-
24
-
25
-
26
-
27
-
28
-
29
-
30
-
31
-
32
-
33
-
34
-
35
-
36
-
37
-
38
-
39
-
40
-
41
-
42
-
43
-
44
-
45
-
46
-
47
-
48
-
49
-
50
-
51
-
52
-
53
-
54
-
55
-
56
-
57
-
58
-
59
-
60
-
61
-
62
-
63
-
64
-
65
-
66
-
67
-
68
-
69
-
70
-
 71
71 -
 72
72 -
 73
73 -
 74
74 -
 75
75 -
 76
76 -
 77
77 -
 78
78 -
 79
79 -
 80
80 -
 81
81 -
82
-
83
-
84
-
85
-
86
-
87
-
88
-
89
-
90
-
91
-
92
-
93
-
94
-
95
-
96
-
97
-
98
-
99
-
100
-
101
-
102
-
103
-
104
-
105
-
106
-
107
-
108
-
109
-
110
-
111
-
112
-
113
-
114
-
115
-
116
-
117
-
118
-
119
-
120
-
121
-
122
-
123
-
124
-
125
-
126
-
127
-
128
-
129
-
130
-
131
-
132
-
133
-
134
-
135
-
136
-
137
-
138
-
139
-
140
-
141
-
142
-
143
-
144
-
145
-
146
-
147
-
148
-
149
-
150
-
151
-
152
-
153
-
154
-
155
-
156
-
157
-
158
-
159
-
160
-
161
-
162
-
163
-
164
-
165
-
166
-
167
-
168
-
169
-
170
-
171
-
172
-
173
-
174
-
175
-
176
-
177
-
178
-
179
-
180
-
181
-
182
-
183
-
184
-
185
-
186
-
187
-
188
-
189
-
190
-
191
-
192
-
193
-
194
-
195
-
196
-
197
-
198
-
199
-
200
-
201
-
202
-
203
-
204
-
205
-
206
-
207
-
208
-
209
-
210
-
211
-
212
-
213
-
214
-
215
-
216
-
217
-
218
-
219
-
220
-
221
-
222
-
223
-
224
-
225
-
226
-
227
-
228
-
229
-
230
-
231
-
232
-
233
-
234
-
235
-
236
-
237
-
238
-
239
-
240
-
241
-
242
-
243
-
244
-
245
-
246
-
247
-
248
-
249
-
250
-
251
-
252
-
253
-
254
-
255
-
256
-
257
-
258
-
259
-
260
-
261
-
262
-
263
-
264
 |
 |
