HP CP3525x HP Color LaserJet CP3525 Series Printers - User Guide - Page 113
Con a tray by using the Paper Handling menu - color laserjet specifications
 |
UPC - 883585892105
View all HP CP3525x manuals
Add to My Manuals
Save this manual to your list of manuals |
Page 113 highlights
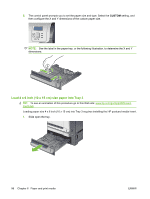
Configure a tray by using the Paper Handling menu You can also configure the trays for type and size without a prompt from the product. 1. Press the Menu button . 2. Press the down arrow to highlight the PAPER HANDLING menu, and then press the OK button. 3. Press the down arrow to highlight the size or type setting for the desired tray, and then press the OK button. 4. Press the up arrow or the down arrow to highlight the size or type. If you select a custom size, select the unit of measure, and then set the X dimension and the Y dimension. 5. Press the OK button to save your selection. 6. Press the Menu button to exit the menus. Automatic overhead transparency sensing (auto sense mode) The automatic media type sensor functions only when that tray is configured to the ANY TYPE setting. Configuring a tray to any other type, such as Bond or Glossy, deactivates the media sensor in that tray. The HP Color LaserJet CP3525 Series printers can automatically classify paper types into one of two categories: ● Non-transparency ● Transparency For more control, a specific type must be selected in the job or configured in a tray. Auto-sense settings Full sensing (Tray 1 only) ● The product distinguishes between transparencies (Transparency mode) and paper (Normal mode). ● Each time the product prints a page, it senses transparencies or non-transparencies. ● This is the slowest mode. Transparency only ● The product distinguishes between transparencies (Transparency mode) and paper (Normal mode). ● The product assumes that the second and all subsequent pages are of the same media type as the first page. ● This is the fastest mode and is useful for high-volume printing in Normal mode. For more information about setting these options, see Print Quality menu on page 24. ENWW Configure trays 101
-
 1
1 -
2
-
3
-
4
-
5
-
6
-
7
-
8
-
9
-
10
-
11
-
12
-
13
-
14
-
15
-
16
-
17
-
18
-
19
-
20
-
21
-
22
-
23
-
24
-
25
-
26
-
27
-
28
-
29
-
30
-
31
-
32
-
33
-
34
-
35
-
36
-
37
-
38
-
39
-
40
-
41
-
42
-
43
-
44
-
45
-
46
-
47
-
48
-
49
-
50
-
51
-
52
-
53
-
54
-
55
-
56
-
57
-
58
-
59
-
60
-
61
-
62
-
63
-
64
-
65
-
66
-
67
-
68
-
69
-
70
-
71
-
72
-
73
-
74
-
75
-
76
-
77
-
78
-
79
-
80
-
81
-
82
-
83
-
84
-
85
-
86
-
87
-
88
-
89
-
90
-
91
-
92
-
93
-
94
-
95
-
96
-
97
-
98
-
99
-
100
-
101
-
102
-
103
-
104
-
105
-
106
-
107
-
 108
108 -
 109
109 -
 110
110 -
 111
111 -
 112
112 -
 113
113 -
 114
114 -
 115
115 -
 116
116 -
 117
117 -
 118
118 -
119
-
120
-
121
-
122
-
123
-
124
-
125
-
126
-
127
-
128
-
129
-
130
-
131
-
132
-
133
-
134
-
135
-
136
-
137
-
138
-
139
-
140
-
141
-
142
-
143
-
144
-
145
-
146
-
147
-
148
-
149
-
150
-
151
-
152
-
153
-
154
-
155
-
156
-
157
-
158
-
159
-
160
-
161
-
162
-
163
-
164
-
165
-
166
-
167
-
168
-
169
-
170
-
171
-
172
-
173
-
174
-
175
-
176
-
177
-
178
-
179
-
180
-
181
-
182
-
183
-
184
-
185
-
186
-
187
-
188
-
189
-
190
-
191
-
192
-
193
-
194
-
195
-
196
-
197
-
198
-
199
-
200
-
201
-
202
-
203
-
204
-
205
-
206
-
207
-
208
-
209
-
210
-
211
-
212
-
213
-
214
-
215
-
216
-
217
-
218
-
219
-
220
-
221
-
222
-
223
-
224
-
225
-
226
-
227
-
228
-
229
-
230
-
231
-
232
-
233
-
234
-
235
-
236
-
237
-
238
-
239
-
240
-
241
-
242
-
243
-
244
-
245
-
246
-
247
-
248
-
249
-
250
-
251
-
252
-
253
-
254
-
255
-
256
-
257
-
258
-
259
-
260
-
261
-
262
-
263
-
264
 |
 |
