JVC GZ-E200 User Manual - English - Page 114
Bottom, Interior, Names of Parts
 |
View all JVC GZ-E200 manuals
Add to My Manuals
Save this manual to your list of manuals |
Page 114 highlights
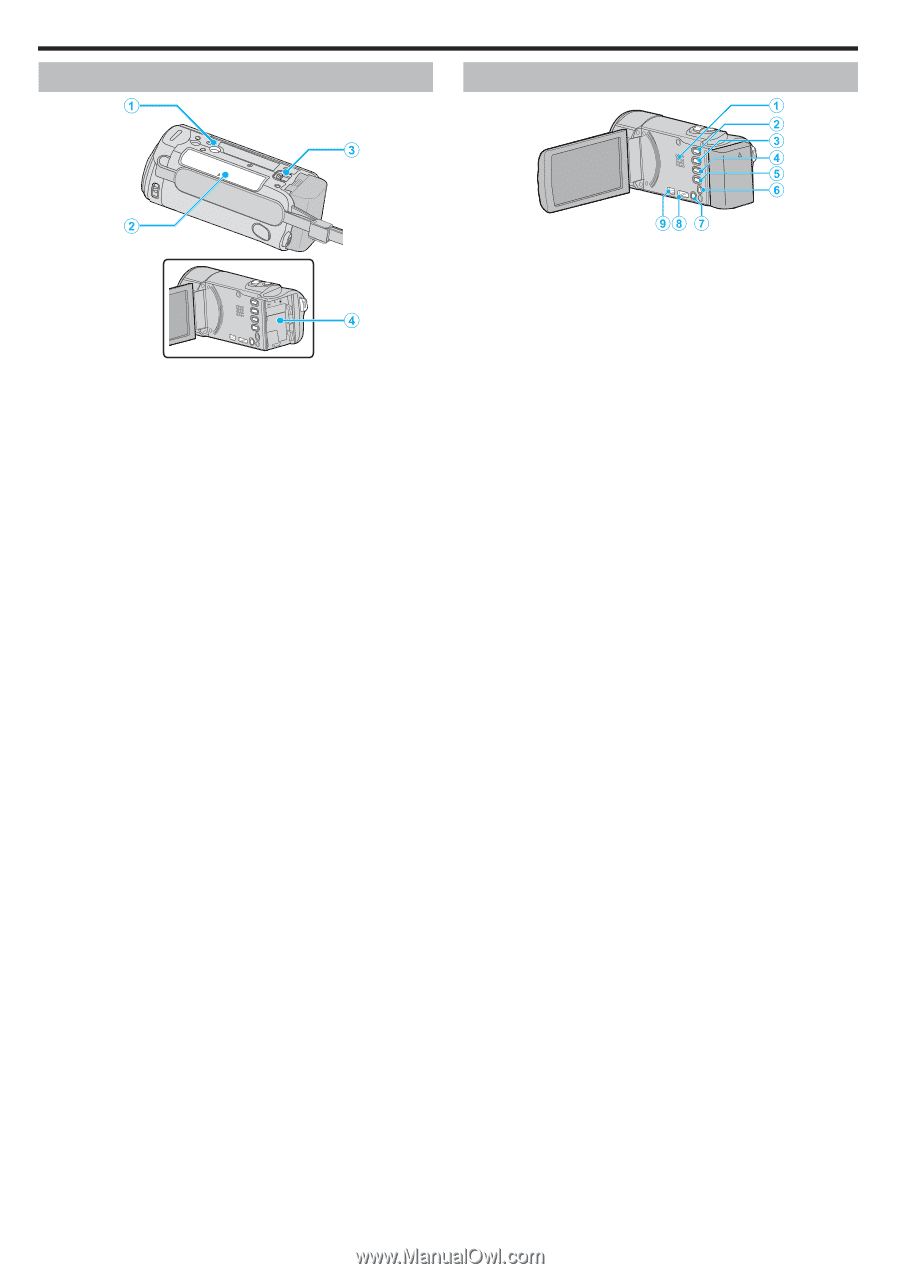
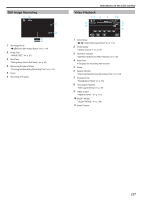
Names of Parts Bottom . 1 Tripod Mounting Hole "Tripod Mounting" (A p. 19) 2 SD Card Slot 0 Insert an optional SD card. "Inserting an SD Card" (A p. 13) 3 Battery Release Lever "Charging the Battery Pack" (A p. 12) 4 Battery Mount Interior . 1 Speaker 0 Outputs audio sound during video playback. 2 A / B (Video/Still Image) Button 0 Switches between video and still image modes. 3 SILENT Button 0 Press and hold the SILENT button to turn on the Silent mode. To turn it off, press and hold the button again. " SILENT MODE " (A p. 106) 4 a Button 0 The setting of image stabilizer changes with every press during video recording. "Reducing Camera Shake" (A p. 47) 5 INFO (Information) Button 0 Recording: Displays the remaining time (for video only) and battery power. 0 Playback: Displays file information such as recording date. 6 AV Connector 0 Connects to the AV connector of a TV, etc. 7 M (Power) Button 0 Press and hold to turn the power on/off while the LCD monitor is opened. 8 HDMI Mini Connector 0 Connects to TV using an HDMI mini cable. 9 USB Connector 0 Connects to computer using a USB cable. 114
-
 1
1 -
2
-
3
-
4
-
5
-
6
-
7
-
8
-
9
-
10
-
11
-
12
-
13
-
14
-
15
-
16
-
17
-
18
-
19
-
20
-
21
-
22
-
23
-
24
-
25
-
26
-
27
-
28
-
29
-
30
-
31
-
32
-
33
-
34
-
35
-
36
-
37
-
38
-
39
-
40
-
41
-
42
-
43
-
44
-
45
-
46
-
47
-
48
-
49
-
50
-
51
-
52
-
53
-
54
-
55
-
56
-
57
-
58
-
59
-
60
-
61
-
62
-
63
-
64
-
65
-
66
-
67
-
68
-
69
-
70
-
71
-
72
-
73
-
74
-
75
-
76
-
77
-
78
-
79
-
80
-
81
-
82
-
83
-
84
-
85
-
86
-
87
-
88
-
89
-
90
-
91
-
92
-
93
-
94
-
95
-
96
-
97
-
98
-
99
-
100
-
101
-
102
-
103
-
104
-
105
-
106
-
107
-
108
-
 109
109 -
 110
110 -
 111
111 -
 112
112 -
 113
113 -
 114
114 -
 115
115 -
 116
116 -
 117
117 -
 118
118 -
 119
119 -
120
-
121
-
122
-
123
-
124
-
125
-
126
-
127
 |
 |