JVC GZ-E200 User Manual - English - Page 52
Recording Videos with Date and Time, Photographer
 |
View all JVC GZ-E200 manuals
Add to My Manuals
Save this manual to your list of manuals |
Page 52 highlights
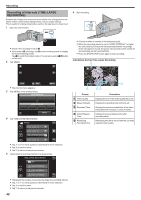
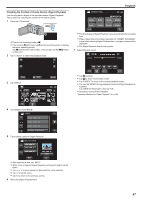
Recording . 0 Frames appear around the faces of the subjects. 0 Pressing the SNAPSHOT button again starts the 10-second self- timer. 7 The photographer enters the frame. Photographer Recording Videos with Date and Time You can record videos together with the date and time. Set this when you want to save the file with date and time display. (The date and time cannot be deleted after recording.) 1 Open the LCD monitor. . 0 Check if the recording mode is A. 0 If the mode is B still image, tap B on the recording screen to display the mode switching screen. Tap A to switch the mode to video. (You can also use the A/B button on this unit.) 2 Tap "MENU". . 0 The shutter is released 3 seconds after the photographer enters the frame. 0 To stop the self-timer, press the SNAPSHOT button again. Memo : 0 The "FACE DETECTION" function may fail to detect faces depending on the shooting environment. ˻PLAY REC . 0 The shortcut menu appears. 3 Tap "MENU" in the shortcut menu. MENU . 4 Tap "DATE/TIME RECORDING". VIDEO MENU DATE/TIME RECORDING . 0 Tap 3 or 2 to move upward or downward for more selection. 0 Tap L to exit the menu. 0 Tap J to return to the previous screen. 0 When the item is tapped, the precaution for date/time recording appears. 5 Press the START/STOP button to start recording. . 0 Press the START/STOP button again to stop recording. 0 To perform operations other than recording, tap L to cancel the "DATE/TIME RECORDING" first. 52
-
 1
1 -
2
-
3
-
4
-
5
-
6
-
7
-
8
-
9
-
10
-
11
-
12
-
13
-
14
-
15
-
16
-
17
-
18
-
19
-
20
-
21
-
22
-
23
-
24
-
25
-
26
-
27
-
28
-
29
-
30
-
31
-
32
-
33
-
34
-
35
-
36
-
37
-
38
-
39
-
40
-
41
-
42
-
43
-
44
-
45
-
46
-
 47
47 -
 48
48 -
 49
49 -
 50
50 -
 51
51 -
 52
52 -
 53
53 -
 54
54 -
 55
55 -
 56
56 -
 57
57 -
58
-
59
-
60
-
61
-
62
-
63
-
64
-
65
-
66
-
67
-
68
-
69
-
70
-
71
-
72
-
73
-
74
-
75
-
76
-
77
-
78
-
79
-
80
-
81
-
82
-
83
-
84
-
85
-
86
-
87
-
88
-
89
-
90
-
91
-
92
-
93
-
94
-
95
-
96
-
97
-
98
-
99
-
100
-
101
-
102
-
103
-
104
-
105
-
106
-
107
-
108
-
109
-
110
-
111
-
112
-
113
-
114
-
115
-
116
-
117
-
118
-
119
-
120
-
121
-
122
-
123
-
124
-
125
-
126
-
127
 |
 |
