JVC GZ-E200 User Manual - English - Page 34
Setting White Balance, Setting, Details
 |
View all JVC GZ-E200 manuals
Add to My Manuals
Save this manual to your list of manuals |
Page 34 highlights
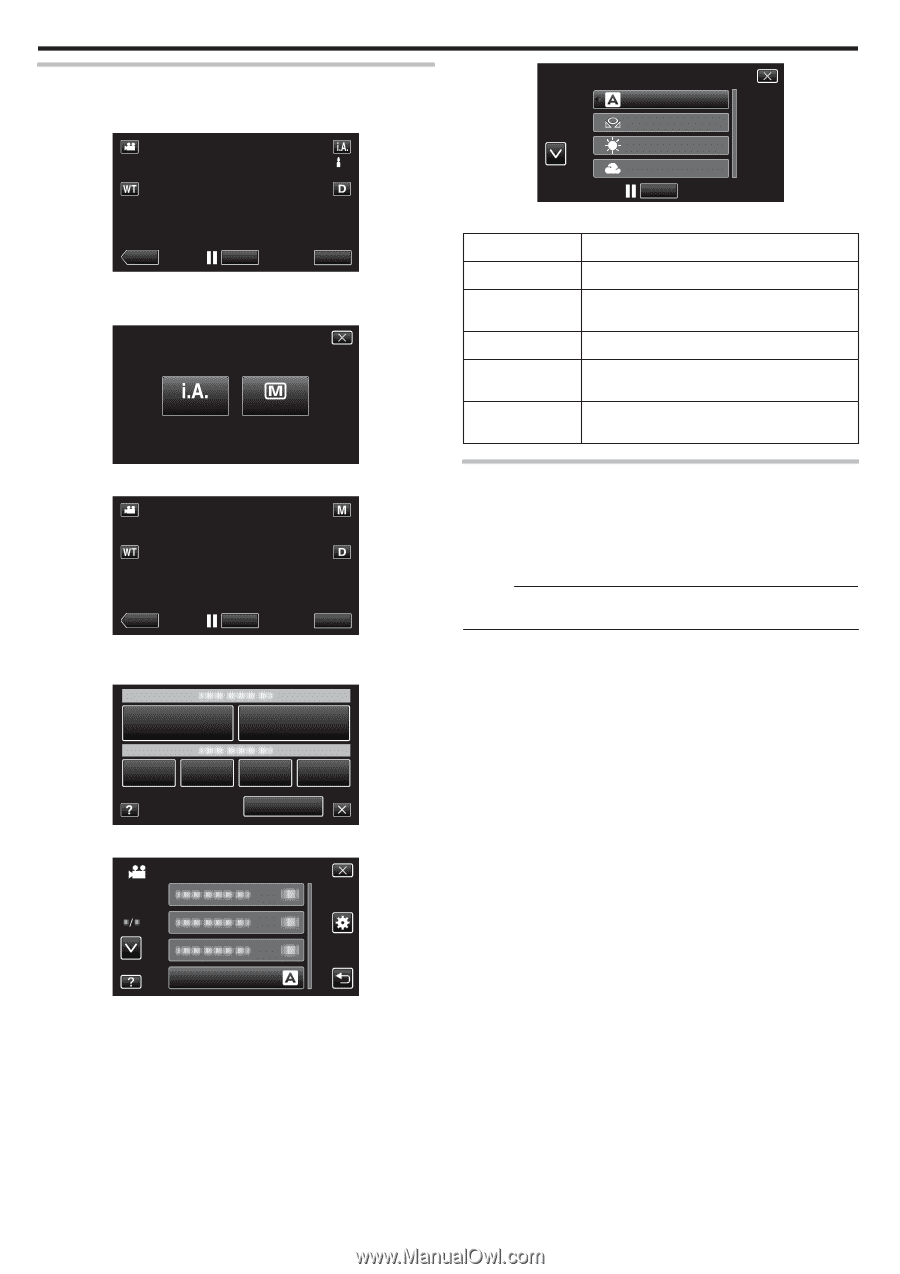
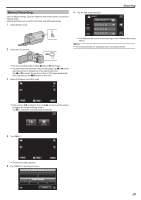
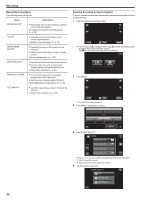
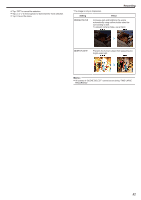
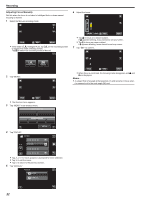
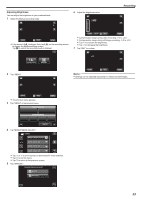
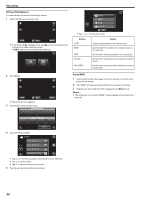
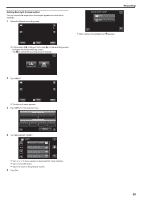
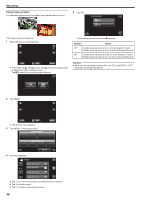
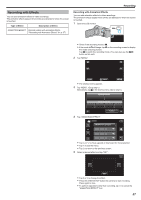
Recording Setting White Balance You can set the color tone to suit the light source. 1 Select the Manual recording mode. ˻PLAY REC MENU . 0 If the mode is P Intelligent Auto, tap P on the recording screen to display the mode switching screen. Tap H to switch the recording mode to Manual. intelligent AUTO MANUAL AUTO MWB FINE CLOUD REC . 0 Tap 3 or 2 to move the cursor. Setting AUTO MWB FINE CLOUD HALOGEN Details Adjusts automatically to the natural colors. Use this when the problem of unnatural colors is not resolved. Set this when shooting outdoors on a sunny day. Set this when shooting on a cloudy day or inside a shade. Set this when shooting under illumination such as a video light. . 2 Tap "MENU". ˻PLAY REC . 0 The shortcut menu appears. 3 Tap "MENU" in the shortcut menu. MENU Using MWB 1 Hold a sheet of plain white paper in front of the lens so that the white paper fills the screen. 2 Tap "MWB" and keep touching while the icon appears and blinks. 3 Release your touch after the menu disappears and o lights up. Memo : 0 The setting will not change if "MWB" is being tapped too fast (less than 1 second). . 4 Tap "WHITE BALANCE". VIDEO MENU WHITE BALANCE . 0 Tap 3 or 2 to move upward or downward for more selection. 0 Tap L to exit the menu. 0 Tap J to return to the previous screen. 5 Tap the appropriate shooting environment. 34
-
 1
1 -
2
-
3
-
4
-
5
-
6
-
7
-
8
-
9
-
10
-
11
-
12
-
13
-
14
-
15
-
16
-
17
-
18
-
19
-
20
-
21
-
22
-
23
-
24
-
25
-
26
-
27
-
28
-
 29
29 -
 30
30 -
 31
31 -
 32
32 -
 33
33 -
 34
34 -
 35
35 -
 36
36 -
 37
37 -
 38
38 -
 39
39 -
40
-
41
-
42
-
43
-
44
-
45
-
46
-
47
-
48
-
49
-
50
-
51
-
52
-
53
-
54
-
55
-
56
-
57
-
58
-
59
-
60
-
61
-
62
-
63
-
64
-
65
-
66
-
67
-
68
-
69
-
70
-
71
-
72
-
73
-
74
-
75
-
76
-
77
-
78
-
79
-
80
-
81
-
82
-
83
-
84
-
85
-
86
-
87
-
88
-
89
-
90
-
91
-
92
-
93
-
94
-
95
-
96
-
97
-
98
-
99
-
100
-
101
-
102
-
103
-
104
-
105
-
106
-
107
-
108
-
109
-
110
-
111
-
112
-
113
-
114
-
115
-
116
-
117
-
118
-
119
-
120
-
121
-
122
-
123
-
124
-
125
-
126
-
127
 |
 |