JVC GZ-E200 User Manual - English - Page 16
Names of Buttons and Functions on the LCD Monitor, Operation Buttons for Still Image Playback
 |
View all JVC GZ-E200 manuals
Add to My Manuals
Save this manual to your list of manuals |
Page 16 highlights
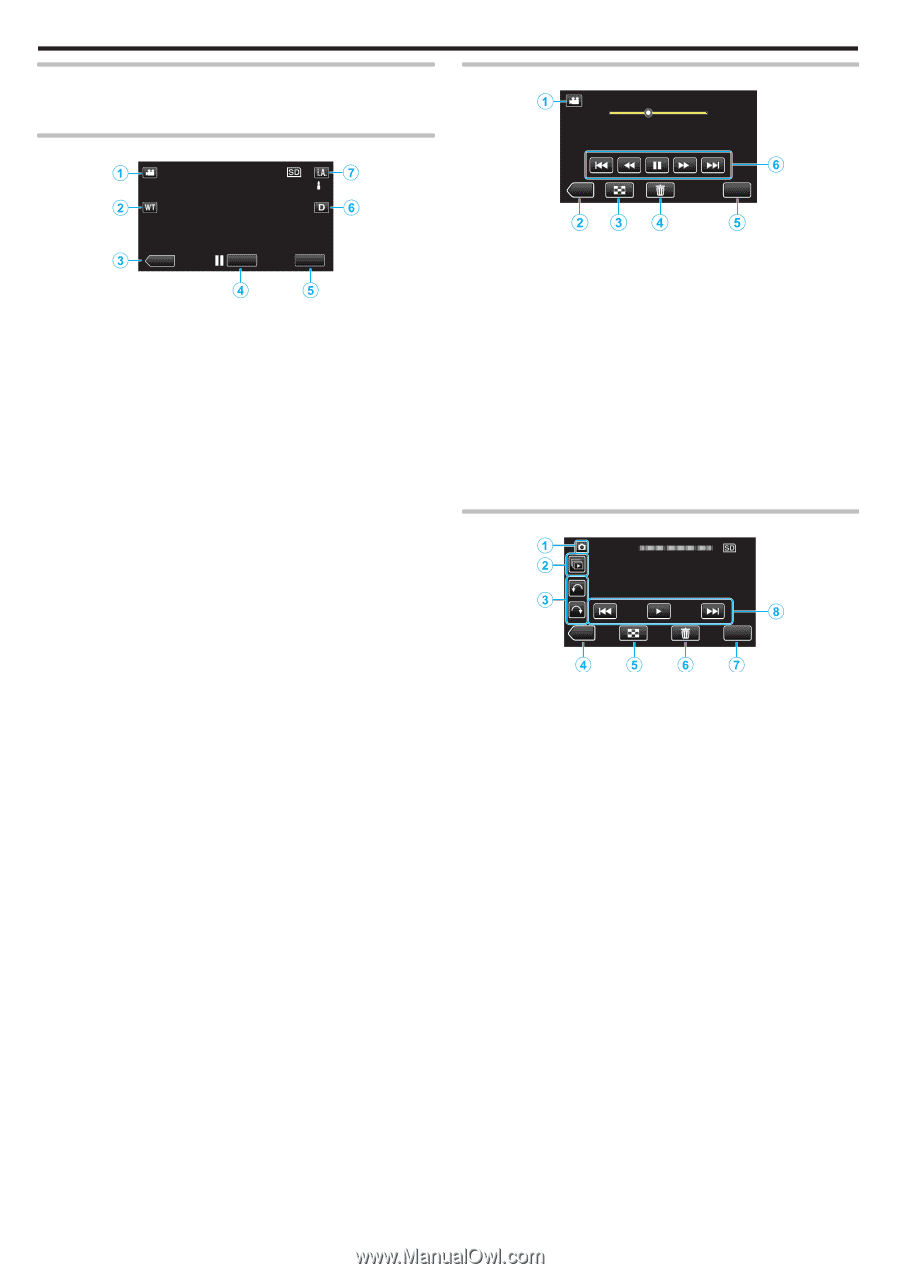
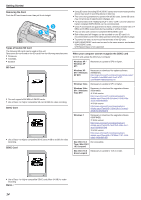
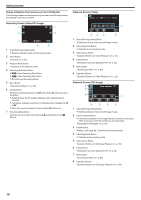
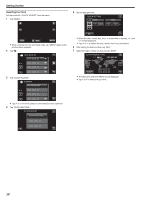
Getting Started Names of Buttons and Functions on the LCD Monitor The following screens are displayed during the video and still image modes, and operate as the touch screens. Recording Screen (Video/Still Image) Playback Screen (Video) 00:01:23 00:12:34 ˻REC MENU ˻PLAY REC MENU . 1 Video/Still Image Mode Button 0 Switches between video and still image modes. 2 Zoom Button "Zooming" (A p. 25) 3 Playback Mode Button 0 Switches to the playback mode. 4 Recording Start/Stop Button 0 6: Video Recording Start Button 0 7: Video Recording Stop Button 0 Q: Still Image Recording Button 5 Menu Button "Operating the Menu" (A p. 85) 6 Display Button Switches the display between full (m) and simple (n) with every tap of the button. 0 Simple display: Some displays disappear after approximately 3 seconds. 0 Full display: Displays everything. The display button changes from n to m. 0 When the power is turned off, simple display (n) will be set. 7 Recording Mode Button Switches the recording mode between P Intelligent Auto and H Manual. . 1 Video/Still Image Mode Button 0 Switches between video and still image modes. 2 Recording Mode Button 0 Switches to the recording mode. 3 Index Screen Button "Operation Buttons for Video Playback" (A p. 55) 4 Delete Button "Deleting the Currently Displayed File" (A p. 64) 5 Menu Button "Operating the Menu" (A p. 85) 6 Operation Buttons "Operation Buttons for Video Playback" (A p. 55) Playback Screen (Still Image) ˻REC MENU . 1 Video/Still Image Mode Button 0 Switches between video and still image modes. 2 Group Playback Button 0 Continuous playback of still images that are recorded continuously within 2 seconds or with the continuous shooting mode. "Playing Back Still Images" (A p. 59) 3 Rotate Button Rotates a still image 90°. (Clockwise/Counterclockwise) 4 Recording Mode Button 0 Switches to the recording mode. 5 Index Screen Button "Operation Buttons for Still Image Playback" (A p. 59) 6 Delete Button "Deleting the Currently Displayed File" (A p. 64) 7 Menu Button "Operating the Menu" (A p. 85) 8 Operation Buttons "Operation Buttons for Still Image Playback" (A p. 59) 16
-
 1
1 -
2
-
3
-
4
-
5
-
6
-
7
-
8
-
9
-
10
-
 11
11 -
 12
12 -
 13
13 -
 14
14 -
 15
15 -
 16
16 -
 17
17 -
 18
18 -
 19
19 -
 20
20 -
 21
21 -
22
-
23
-
24
-
25
-
26
-
27
-
28
-
29
-
30
-
31
-
32
-
33
-
34
-
35
-
36
-
37
-
38
-
39
-
40
-
41
-
42
-
43
-
44
-
45
-
46
-
47
-
48
-
49
-
50
-
51
-
52
-
53
-
54
-
55
-
56
-
57
-
58
-
59
-
60
-
61
-
62
-
63
-
64
-
65
-
66
-
67
-
68
-
69
-
70
-
71
-
72
-
73
-
74
-
75
-
76
-
77
-
78
-
79
-
80
-
81
-
82
-
83
-
84
-
85
-
86
-
87
-
88
-
89
-
90
-
91
-
92
-
93
-
94
-
95
-
96
-
97
-
98
-
99
-
100
-
101
-
102
-
103
-
104
-
105
-
106
-
107
-
108
-
109
-
110
-
111
-
112
-
113
-
114
-
115
-
116
-
117
-
118
-
119
-
120
-
121
-
122
-
123
-
124
-
125
-
126
-
127
 |
 |