JVC GZ-E200 User Manual - English - Page 53
Checking the Remaining Recording Time
 |
View all JVC GZ-E200 manuals
Add to My Manuals
Save this manual to your list of manuals |
Page 53 highlights
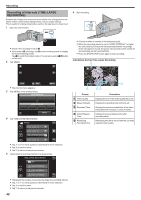
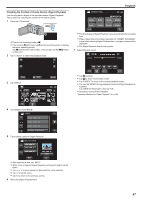
Caution : 0 The date and time cannot be deleted after recording. Recording Checking the Remaining Recording Time You can check the remaining recording time on the SD card as well as the remaining battery power. 1 Open the LCD monitor. . 0 Set the recording mode to either A video or B still image. 0 To switch the mode between video and still image, tap A or B on the recording screen to display the mode switching screen. Tap A or B to switch the mode to video or still image respectively. 2 Press the INFO button. . 0 If in the still image mode, go directly to step 4. 3 Display the remaining recording time. MAX RECORDING TIME 0h46m FREE USED . 0 The remaining recording time is displayed only in the video recording mode. 0 Press the INFO button to check the remaining recording time of each recording media. 0 To display the remaining battery power, tap l. 0 l will not be displayed when the AC adapter is connected. 0 Tap J to return to the recording mode. 0 To exit the display, tap L. 4 Display the remaining battery power. REMAINING BATTERY MAX TIME MIN . 0 For video recording, tap J to return to the remaining recording time display. For still image recording, tap to return to the recording mode. 0 To exit the display, press the INFO button or tap L. 0 Remaining battery power will not be displayed when the AC adapter is connected. Memo : 0 You can change to the desired video quality by tapping on it from the remaining recording time display. 53
-
 1
1 -
2
-
3
-
4
-
5
-
6
-
7
-
8
-
9
-
10
-
11
-
12
-
13
-
14
-
15
-
16
-
17
-
18
-
19
-
20
-
21
-
22
-
23
-
24
-
25
-
26
-
27
-
28
-
29
-
30
-
31
-
32
-
33
-
34
-
35
-
36
-
37
-
38
-
39
-
40
-
41
-
42
-
43
-
44
-
45
-
46
-
47
-
 48
48 -
 49
49 -
 50
50 -
 51
51 -
 52
52 -
 53
53 -
 54
54 -
 55
55 -
 56
56 -
 57
57 -
 58
58 -
59
-
60
-
61
-
62
-
63
-
64
-
65
-
66
-
67
-
68
-
69
-
70
-
71
-
72
-
73
-
74
-
75
-
76
-
77
-
78
-
79
-
80
-
81
-
82
-
83
-
84
-
85
-
86
-
87
-
88
-
89
-
90
-
91
-
92
-
93
-
94
-
95
-
96
-
97
-
98
-
99
-
100
-
101
-
102
-
103
-
104
-
105
-
106
-
107
-
108
-
109
-
110
-
111
-
112
-
113
-
114
-
115
-
116
-
117
-
118
-
119
-
120
-
121
-
122
-
123
-
124
-
125
-
126
-
127
 |
 |
