Konica Minolta bizhub 363 bizhub 423/363/283/223 Copy Operations User Guide - Page 202
Main Power Switch - scan to usb
 |
View all Konica Minolta bizhub 363 manuals
Add to My Manuals
Save this manual to your list of manuals |
Page 202 highlights
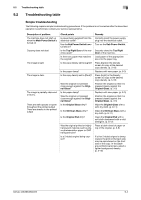
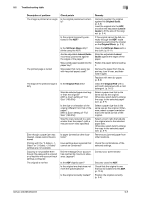
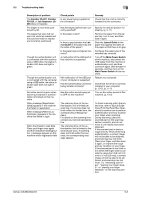
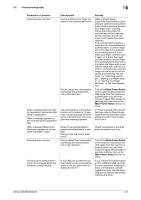
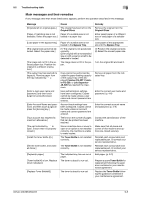
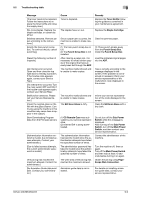
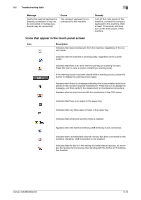
9.2 Troubleshooting table 9 Description of problem The Finisher FS-527, Finisher FS-529, or Job Separator JS505 does not operate The staple is incorrectly positioned by 90 The pages that were fed out were not uniformly loaded and the punched holes or staples are incorrectly positioned Though the authentication unit is connected with this machine sing a USB cable, the status indicator LED does not light in green Though the authentication unit is connected with the computer using a USB cable, the status indicator LED does not light in green No notice sound is given when scanning is started or authentication is finished on this machine When message [Registration failed] appears in the machine that failed in registration When message [Failed to authenticate.] appears in the machine that failed in login When the [Failed to read data. Place your finger once again and the Click [Start reading] button. ] message appears on this machine where registration fails Check points Is any power being supplied to the connector? Has the staple position been correctly specified? Is the paper curled? Is there a gap between the Lateral Guide in the paper tray and the sides of the paper? Is the paper type configured correctly? A malfunction of the USB port of this machine is suspected. MA malfunction of the USB port of your computer is suspected. Has the authentication unit driver being installed correctly? Has the notice sound being set to OFF on this machine? The scanning time on the authentication unit is limited per scanning. If scanning does not finish within the limited time, the corresponding message appears. For details on the scanning time, contact your service representative. The scanning time on the authentication unit is limited to five seconds per scan. If scanning does not finish within five seconds, the corresponding message appears. Remedy Check that the cord is correctly inserted into the connector. Specify the desired position for stapling. (p. 5-11) Remove the paper from the paper tray, turn it over, and then load it again. Slide the Lateral Guide in the paper tray against the sides of the paper so that there is no gap. Configure the paper type of the selected tray correctly. Turn off the Main Power Switch of this machine, disconnect the USB cable from this machine or authentication unit, and then connect it again. Wait at least 10 seconds, and then turn on the Main Power Switch of this machine. Restart your computer. Check that the driver is correctly installed in your computer. (p. 10-2), (p. 11-2) Turn on the notice sound of this machine. (p. 10-2) To finish scanning within the limited time, refer to [Quick Guide Copy/Print/Fax/Scan/Box Operations] to confirm how to perform authentication and how to place your finger when scanning. During scanning, place the scanned part on the scanning section correctly, and do not move it until results have been obtained. If the scanned part is dusty or rough and dry when performing authentication, a correct image will not be able to be obtained, and scanning may not finish. Clean your finger, and then scan it again, or improve the rough and dry condition of your finger. If the scanned part is too thick or thin (when the finger width is outside the range from 3/8 inch (10 mm) to 1 inch (25 mm)), a correct image will not be able to be obtained, and scanning may not finish. Try "stretching your finger", "placing your finger deeply", or "placing your finger shallowly" on the scanning section. bizhub 423/363/283/223 9-6
-
 1
1 -
2
-
3
-
4
-
5
-
6
-
7
-
8
-
9
-
10
-
11
-
12
-
13
-
14
-
15
-
16
-
17
-
18
-
19
-
20
-
21
-
22
-
23
-
24
-
25
-
26
-
27
-
28
-
29
-
30
-
31
-
32
-
33
-
34
-
35
-
36
-
37
-
38
-
39
-
40
-
41
-
42
-
43
-
44
-
45
-
46
-
47
-
48
-
49
-
50
-
51
-
52
-
53
-
54
-
55
-
56
-
57
-
58
-
59
-
60
-
61
-
62
-
63
-
64
-
65
-
66
-
67
-
68
-
69
-
70
-
71
-
72
-
73
-
74
-
75
-
76
-
77
-
78
-
79
-
80
-
81
-
82
-
83
-
84
-
85
-
86
-
87
-
88
-
89
-
90
-
91
-
92
-
93
-
94
-
95
-
96
-
97
-
98
-
99
-
100
-
101
-
102
-
103
-
104
-
105
-
106
-
107
-
108
-
109
-
110
-
111
-
112
-
113
-
114
-
115
-
116
-
117
-
118
-
119
-
120
-
121
-
122
-
123
-
124
-
125
-
126
-
127
-
128
-
129
-
130
-
131
-
132
-
133
-
134
-
135
-
136
-
137
-
138
-
139
-
140
-
141
-
142
-
143
-
144
-
145
-
146
-
147
-
148
-
149
-
150
-
151
-
152
-
153
-
154
-
155
-
156
-
157
-
158
-
159
-
160
-
161
-
162
-
163
-
164
-
165
-
166
-
167
-
168
-
169
-
170
-
171
-
172
-
173
-
174
-
175
-
176
-
177
-
178
-
179
-
180
-
181
-
182
-
183
-
184
-
185
-
186
-
187
-
188
-
189
-
190
-
191
-
192
-
193
-
194
-
195
-
196
-
 197
197 -
 198
198 -
 199
199 -
 200
200 -
 201
201 -
 202
202 -
 203
203 -
 204
204 -
 205
205 -
 206
206 -
 207
207 -
208
-
209
-
210
-
211
-
212
-
213
-
214
-
215
-
216
-
217
-
218
-
219
-
220
-
221
-
222
-
223
-
224
-
225
-
226
-
227
-
228
-
229
-
230
-
231
-
232
-
233
-
234
-
235
-
236
-
237
-
238
-
239
-
240
-
241
-
242
-
243
-
244
-
245
-
246
-
247
-
248
-
249
-
250
-
251
-
252
-
253
-
254
-
255
-
256
-
257
-
258
-
259
-
260
-
261
-
262
-
263
-
264
-
265
-
266
 |
 |