Konica Minolta bizhub 601 bizhub 751/601 Print Operations User Manual - IC-208 - Page 174
Setting up the printer driver - windows 7 driver
 |
View all Konica Minolta bizhub 601 manuals
Add to My Manuals
Save this manual to your list of manuals |
Page 174 highlights
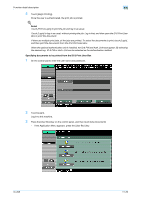
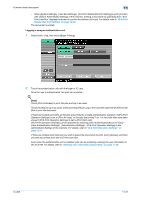
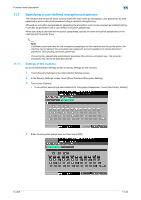
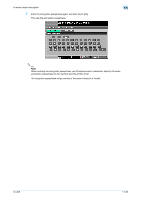
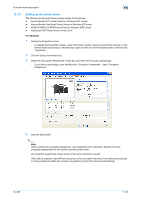
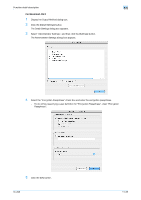
Function detail description 11 11.7.2 Setting up the printer driver The following three printer drivers support setup of this feature: - Konica Minolta PCL Printer Driver for Windows (PCL driver) - Konica Minolta PostScript Printer Driver for Windows (PS driver) - KONICA MINOLTA XPS Printer Driver for Windows (XPS driver) - PostScript PPD Printer Driver for Mac OS X For Windows 1 Display the Properties screen. - To display the Properties window, open the Printers window, Devices and Printers window, or the Printers and Faxes window. In that window, right-click the icon of the installed printer, and then click "Properties". 2 Click the Device Information tab. 3 Select the "Encryption Passphrase" check box and enter the encryption passphrase. - To do without specifying a user definition for "Encryption Passphrase", clear "Encryption Passphrase". 4 Click the [OK] button. 2 Note When entering the encryption passphrase, use 20 alphanumeric characters. Specify the same encryption passphrase for the machine and the printer driver. An encryption passphrase using a series of the same character is invalid. When SSL is enabled in OpenAPI and the printer driver can obtain the device information automatically, it is also possible to obtain the common encryption key from this machine automatically. IC-208 11-34
-
 1
1 -
2
-
3
-
4
-
5
-
6
-
7
-
8
-
9
-
10
-
11
-
12
-
13
-
14
-
15
-
16
-
17
-
18
-
19
-
20
-
21
-
22
-
23
-
24
-
25
-
26
-
27
-
28
-
29
-
30
-
31
-
32
-
33
-
34
-
35
-
36
-
37
-
38
-
39
-
40
-
41
-
42
-
43
-
44
-
45
-
46
-
47
-
48
-
49
-
50
-
51
-
52
-
53
-
54
-
55
-
56
-
57
-
58
-
59
-
60
-
61
-
62
-
63
-
64
-
65
-
66
-
67
-
68
-
69
-
70
-
71
-
72
-
73
-
74
-
75
-
76
-
77
-
78
-
79
-
80
-
81
-
82
-
83
-
84
-
85
-
86
-
87
-
88
-
89
-
90
-
91
-
92
-
93
-
94
-
95
-
96
-
97
-
98
-
99
-
100
-
101
-
102
-
103
-
104
-
105
-
106
-
107
-
108
-
109
-
110
-
111
-
112
-
113
-
114
-
115
-
116
-
117
-
118
-
119
-
120
-
121
-
122
-
123
-
124
-
125
-
126
-
127
-
128
-
129
-
130
-
131
-
132
-
133
-
134
-
135
-
136
-
137
-
138
-
139
-
140
-
141
-
142
-
143
-
144
-
145
-
146
-
147
-
148
-
149
-
150
-
151
-
152
-
153
-
154
-
155
-
156
-
157
-
158
-
159
-
160
-
161
-
162
-
163
-
164
-
165
-
166
-
167
-
168
-
 169
169 -
 170
170 -
 171
171 -
 172
172 -
 173
173 -
 174
174 -
 175
175 -
 176
176 -
 177
177 -
 178
178 -
 179
179 -
180
-
181
-
182
-
183
-
184
-
185
-
186
-
187
-
188
-
189
-
190
-
191
-
192
-
193
-
194
-
195
-
196
-
197
-
198
-
199
-
200
-
201
-
202
-
203
-
204
-
205
-
206
-
207
-
208
-
209
-
210
-
211
-
212
-
213
-
214
-
215
-
216
-
217
-
218
-
219
-
220
-
221
-
222
-
223
-
224
-
225
-
226
-
227
-
228
-
229
-
230
-
231
-
232
-
233
-
234
-
235
-
236
-
237
-
238
-
239
-
240
-
241
-
242
-
243
-
244
-
245
-
246
-
247
-
248
-
249
-
250
-
251
-
252
-
253
-
254
-
255
-
256
-
257
-
258
-
259
-
260
-
261
-
262
-
263
-
264
-
265
-
266
-
267
-
268
-
269
-
270
-
271
-
272
-
273
 |
 |