Konica Minolta bizhub 601 bizhub 751/601 Print Operations User Manual - IC-208 - Page 53
In Windows 7/Server 2008 R2, select View device and printer from Hardware and Sound. When
 |
View all Konica Minolta bizhub 601 manuals
Add to My Manuals
Save this manual to your list of manuals |
Page 53 highlights
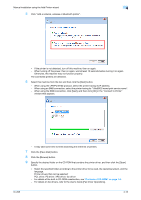
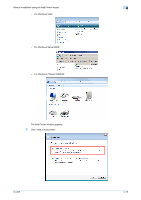
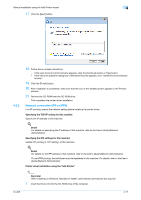
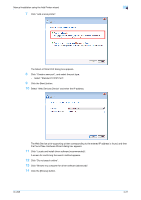
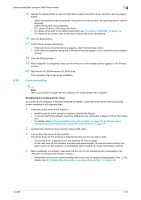
Manual installation using the Add Printer wizard 4 2 Click the [Start] button, and then click "Control Panel". 3 Select the desired printer function in "Hardware and Sound". - In Windows Vista/Server 2008, click "Printers" in "Hardware and Sound". If Control Panel is displayed in Classic View, double-click "Printers". - In Windows 7/Server 2008 R2, select "View device and printer" from "Hardware and Sound". When Control Panel is displayed in Icon View, double-click "Devices and Printers". 4 Click "Add a printer" from the toolbar. The Add Printer window appears. 5 Click "Add a network, wireless or Bluetooth printer". The connected printers are found. 6 In the window showing the search results, click "The printer that I want isn't Listed". 7 In the "Select a shared printer by name" box, enter the URL for this machine in the following format, and then click the [Next] button. - http:// (IP_address_of_machine) /ipp Example: If the IP address of this machine is 192.168.1.20, enter http://192.168.1.20/ipp. - When specifying to use IPP printing, enter "https:// < host name>./ipp". The window for confirming the user name and password may appear in the course of installation. For the host name and domain name, use the names specified on this machine and which are the names specified for "Common Name" settings for the certificate. - When the certificate of this machine is not published by certificate authority, register the certificate of this machine to Windows Vista/Server 2008/7 as a certificate of "Trusted Publishers" for "Computer account" in advance. 8 Click the [Have Disk] button. 9 Click the [Browse] button. 10 Specify the desired folder on the CD-ROM that contains the printer driver, and then click the [Open] button. - Select the specified folder according to the printer driver to be used, the operating system, and the language. Printer drivers that can be selected: PCL driver, PS driver, XPS driver, fax driver - For details of the built-in CD-ROM construction, see "Contents of CD-ROM" on page 1-9. - For details on fax drivers, refer to the User's Guide [Fax Driver Operations]. 11 Click the [OK] button. The "Printer" list appears. 12 Click the [Next] button. 13 Follow the on-screen instructions. - If the "User Account Control" window appears, click the [Continue] button or [Yes] button. - If the Verify the publisher dialog box of Windows Security appears, click "Install this driver software anyway". 14 Click the [Finish] button. 15 When the installation is completed, make sure that the icon of the installed printer appears in the Printers window. 16 Remove the CD-ROM from the CD-ROM drive. This completes the printer driver installation. Once the settings for the printer have been specified, you can use the printer in the same way as a default local printer. Also, if you set up the printer for sharing in Windows, it can be used as a network printer by other Windows computers over the network. IC-208 4-18
-
 1
1 -
2
-
3
-
4
-
5
-
6
-
7
-
8
-
9
-
10
-
11
-
12
-
13
-
14
-
15
-
16
-
17
-
18
-
19
-
20
-
21
-
22
-
23
-
24
-
25
-
26
-
27
-
28
-
29
-
30
-
31
-
32
-
33
-
34
-
35
-
36
-
37
-
38
-
39
-
40
-
41
-
42
-
43
-
44
-
45
-
46
-
47
-
 48
48 -
 49
49 -
 50
50 -
 51
51 -
 52
52 -
 53
53 -
 54
54 -
 55
55 -
 56
56 -
 57
57 -
 58
58 -
59
-
60
-
61
-
62
-
63
-
64
-
65
-
66
-
67
-
68
-
69
-
70
-
71
-
72
-
73
-
74
-
75
-
76
-
77
-
78
-
79
-
80
-
81
-
82
-
83
-
84
-
85
-
86
-
87
-
88
-
89
-
90
-
91
-
92
-
93
-
94
-
95
-
96
-
97
-
98
-
99
-
100
-
101
-
102
-
103
-
104
-
105
-
106
-
107
-
108
-
109
-
110
-
111
-
112
-
113
-
114
-
115
-
116
-
117
-
118
-
119
-
120
-
121
-
122
-
123
-
124
-
125
-
126
-
127
-
128
-
129
-
130
-
131
-
132
-
133
-
134
-
135
-
136
-
137
-
138
-
139
-
140
-
141
-
142
-
143
-
144
-
145
-
146
-
147
-
148
-
149
-
150
-
151
-
152
-
153
-
154
-
155
-
156
-
157
-
158
-
159
-
160
-
161
-
162
-
163
-
164
-
165
-
166
-
167
-
168
-
169
-
170
-
171
-
172
-
173
-
174
-
175
-
176
-
177
-
178
-
179
-
180
-
181
-
182
-
183
-
184
-
185
-
186
-
187
-
188
-
189
-
190
-
191
-
192
-
193
-
194
-
195
-
196
-
197
-
198
-
199
-
200
-
201
-
202
-
203
-
204
-
205
-
206
-
207
-
208
-
209
-
210
-
211
-
212
-
213
-
214
-
215
-
216
-
217
-
218
-
219
-
220
-
221
-
222
-
223
-
224
-
225
-
226
-
227
-
228
-
229
-
230
-
231
-
232
-
233
-
234
-
235
-
236
-
237
-
238
-
239
-
240
-
241
-
242
-
243
-
244
-
245
-
246
-
247
-
248
-
249
-
250
-
251
-
252
-
253
-
254
-
255
-
256
-
257
-
258
-
259
-
260
-
261
-
262
-
263
-
264
-
265
-
266
-
267
-
268
-
269
-
270
-
271
-
272
-
273
 |
 |