Konica Minolta bizhub 601 bizhub 751/601 Print Operations User Manual - IC-208 - Page 72
Adding a printer - konica driver
 |
View all Konica Minolta bizhub 601 manuals
Add to My Manuals
Save this manual to your list of manuals |
Page 72 highlights
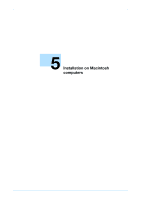
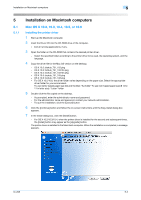
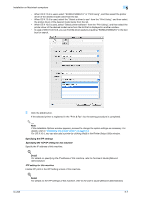
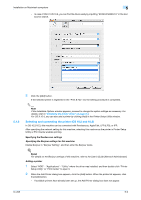
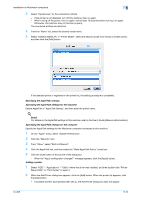
Installation on Macintosh computers 5 - For OS X 10.5, select "Ethernet", and then click the [Advanced] button. 4 Click the AppleTalk tab to enable AppleTalk. 5 Click the close button at the upper left corner of the dialog box. - When the "Apply configuration changes?" message appears, click the [Apply] button. Adding a printer 1 On the "Apple" menu, select "System Preferences". 2 Click the "Print & Fax" icon. 3 Click [+] in the Print & Fax window. 4 Click "Default". Connected printers are detected. - If no printer is detected, turn this machine off, then on again. In this case, turn off this machine, and then wait approximately 10 seconds before turning it on again. If you turn this machine on immediately after turning it off, it may not function correctly. 5 From the "Printer Name" list, select the desired model name and connection (AppleTalk). - After the printer driver is selected automatically, go to Step 7. - If an incorrect printer driver is selected, go to Step 6. 6 Select the desired printer driver manually. - When OS X 10.4 is used, select "KONICA MINOLTA" in "Print Using", and then select the printer driver of the desired model name from the list. - When OS X 10.5 is used, select the "Select a driver to use" from the "Print Using", and then select the printer driver of the desired model name from the list. - In case of OS X 10.5, you can find the driver easily by inputting "KONICA MINOLTA" in the text box for search. 7 Click the [Add] button. If the selected printer is registered in the "Print & Fax", the setting procedure is completed. IC-208 5-5
-
 1
1 -
2
-
3
-
4
-
5
-
6
-
7
-
8
-
9
-
10
-
11
-
12
-
13
-
14
-
15
-
16
-
17
-
18
-
19
-
20
-
21
-
22
-
23
-
24
-
25
-
26
-
27
-
28
-
29
-
30
-
31
-
32
-
33
-
34
-
35
-
36
-
37
-
38
-
39
-
40
-
41
-
42
-
43
-
44
-
45
-
46
-
47
-
48
-
49
-
50
-
51
-
52
-
53
-
54
-
55
-
56
-
57
-
58
-
59
-
60
-
61
-
62
-
63
-
64
-
65
-
66
-
 67
67 -
 68
68 -
 69
69 -
 70
70 -
 71
71 -
 72
72 -
 73
73 -
 74
74 -
 75
75 -
 76
76 -
 77
77 -
78
-
79
-
80
-
81
-
82
-
83
-
84
-
85
-
86
-
87
-
88
-
89
-
90
-
91
-
92
-
93
-
94
-
95
-
96
-
97
-
98
-
99
-
100
-
101
-
102
-
103
-
104
-
105
-
106
-
107
-
108
-
109
-
110
-
111
-
112
-
113
-
114
-
115
-
116
-
117
-
118
-
119
-
120
-
121
-
122
-
123
-
124
-
125
-
126
-
127
-
128
-
129
-
130
-
131
-
132
-
133
-
134
-
135
-
136
-
137
-
138
-
139
-
140
-
141
-
142
-
143
-
144
-
145
-
146
-
147
-
148
-
149
-
150
-
151
-
152
-
153
-
154
-
155
-
156
-
157
-
158
-
159
-
160
-
161
-
162
-
163
-
164
-
165
-
166
-
167
-
168
-
169
-
170
-
171
-
172
-
173
-
174
-
175
-
176
-
177
-
178
-
179
-
180
-
181
-
182
-
183
-
184
-
185
-
186
-
187
-
188
-
189
-
190
-
191
-
192
-
193
-
194
-
195
-
196
-
197
-
198
-
199
-
200
-
201
-
202
-
203
-
204
-
205
-
206
-
207
-
208
-
209
-
210
-
211
-
212
-
213
-
214
-
215
-
216
-
217
-
218
-
219
-
220
-
221
-
222
-
223
-
224
-
225
-
226
-
227
-
228
-
229
-
230
-
231
-
232
-
233
-
234
-
235
-
236
-
237
-
238
-
239
-
240
-
241
-
242
-
243
-
244
-
245
-
246
-
247
-
248
-
249
-
250
-
251
-
252
-
253
-
254
-
255
-
256
-
257
-
258
-
259
-
260
-
261
-
262
-
263
-
264
-
265
-
266
-
267
-
268
-
269
-
270
-
271
-
272
-
273
 |
 |