Konica Minolta bizhub 601 bizhub 751/601 Print Operations User Manual - IC-208 - Page 54
Network connection Web Service print
 |
View all Konica Minolta bizhub 601 manuals
Add to My Manuals
Save this manual to your list of manuals |
Page 54 highlights
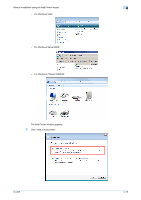
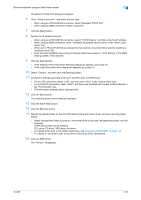
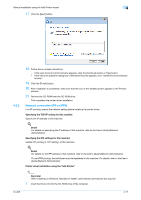
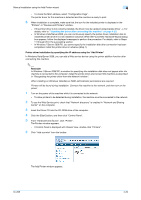
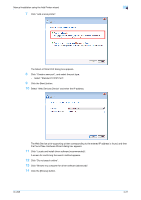
Manual installation using the Add Printer wizard 4 4.2.3 Network connection (Web Service print) In Windows Vista/Server 2008/7, Web Service print-supporting printers on the network can be located and installed. 2 Note When the different kind of printer driver install after installing the printer driver, delete the installed printer driver in advance. For details, refer to "Manual uninstallation" on page 7-3. TCP/IP setting for this machine Specify the IP address in the TCP/IP Setting screen of this machine. ! Detail For details on specifying the IP address of this machine, refer to the User's Guide [Network Administrator]. Web Service settings for this machine To use the Web Service print, enable the print function in the Web Service Settings screen of this machine. ! Detail For details on the Web Service settings of this machine, refer to the User's Guide [Network Administrator]. Recognizing the printer driver from the Network window When using Web service print in Windows Vista/Server 2008/7, install the printer driver before having the system recognize it with plug and play. 2 Reminder When installing the driver on Windows Vista/Server 2008/7-based computers, administrator permissions are required. 1 Install the printer driver of this machine. - Install the printer driver using the installer or Add Printer Wizard. - The printer driver can be installed in any port. - For details, refer to"Easy installation using the installer" on page 3-3, or "Printer driver installation by searching printers using the "Add Printer"" on page 4-11. 2 Turn on the power of the machine while it is connected to the network. - To allow printers to be detected during installation, the machine must be connected to the network. 3 To use the Web service print, check that "Network discovery" is enabled in "Network and Sharing Center "on the computer. 4 Open the Network window. - In Windows Vista/Server 2008, click [], and "Network". - In Windows 7/Server 2008 R2, open "Computer" and click "Network". If "Network" is not displayed in "Computer", click the "Network and Internet" category in Control Panel, and also click "View network computers and devices". The connected computers and devices are detected. 5 Select the device name of the machine, and then click [Install] on the toolbar. - To check the device name, select "Network Settings" - "Web Service Settings" - "Printer Settings" in "Administrator Settings" of this machine. In the default setting, the last six characters of "printer name" correspond to the low-order three bytes of the MAC address. IC-208 4-19
-
 1
1 -
2
-
3
-
4
-
5
-
6
-
7
-
8
-
9
-
10
-
11
-
12
-
13
-
14
-
15
-
16
-
17
-
18
-
19
-
20
-
21
-
22
-
23
-
24
-
25
-
26
-
27
-
28
-
29
-
30
-
31
-
32
-
33
-
34
-
35
-
36
-
37
-
38
-
39
-
40
-
41
-
42
-
43
-
44
-
45
-
46
-
47
-
48
-
 49
49 -
 50
50 -
 51
51 -
 52
52 -
 53
53 -
 54
54 -
 55
55 -
 56
56 -
 57
57 -
 58
58 -
 59
59 -
60
-
61
-
62
-
63
-
64
-
65
-
66
-
67
-
68
-
69
-
70
-
71
-
72
-
73
-
74
-
75
-
76
-
77
-
78
-
79
-
80
-
81
-
82
-
83
-
84
-
85
-
86
-
87
-
88
-
89
-
90
-
91
-
92
-
93
-
94
-
95
-
96
-
97
-
98
-
99
-
100
-
101
-
102
-
103
-
104
-
105
-
106
-
107
-
108
-
109
-
110
-
111
-
112
-
113
-
114
-
115
-
116
-
117
-
118
-
119
-
120
-
121
-
122
-
123
-
124
-
125
-
126
-
127
-
128
-
129
-
130
-
131
-
132
-
133
-
134
-
135
-
136
-
137
-
138
-
139
-
140
-
141
-
142
-
143
-
144
-
145
-
146
-
147
-
148
-
149
-
150
-
151
-
152
-
153
-
154
-
155
-
156
-
157
-
158
-
159
-
160
-
161
-
162
-
163
-
164
-
165
-
166
-
167
-
168
-
169
-
170
-
171
-
172
-
173
-
174
-
175
-
176
-
177
-
178
-
179
-
180
-
181
-
182
-
183
-
184
-
185
-
186
-
187
-
188
-
189
-
190
-
191
-
192
-
193
-
194
-
195
-
196
-
197
-
198
-
199
-
200
-
201
-
202
-
203
-
204
-
205
-
206
-
207
-
208
-
209
-
210
-
211
-
212
-
213
-
214
-
215
-
216
-
217
-
218
-
219
-
220
-
221
-
222
-
223
-
224
-
225
-
226
-
227
-
228
-
229
-
230
-
231
-
232
-
233
-
234
-
235
-
236
-
237
-
238
-
239
-
240
-
241
-
242
-
243
-
244
-
245
-
246
-
247
-
248
-
249
-
250
-
251
-
252
-
253
-
254
-
255
-
256
-
257
-
258
-
259
-
260
-
261
-
262
-
263
-
264
-
265
-
266
-
267
-
268
-
269
-
270
-
271
-
272
-
273
 |
 |