Kyocera KM-2560 Fax System (M) Operation Guide Rev-2.0 - Page 190
Dual FAX, Dual FAX Settings, Reception Port Selection, System Menu, Job Accounting Port Restrictions
 |
View all Kyocera KM-2560 manuals
Add to My Manuals
Save this manual to your list of manuals |
Page 190 highlights
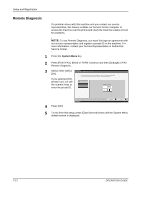
Optional Equipment Dual FAX Installing the Dual FAX option allows you to use 2 phone lines. This reduces the time until faxes are sent to all the recipients in tasks such as sequential broadcast transmissions to multiple recipients. Also, because you can then send and receive simultaneously, there will be fewer occasions when you cannot receive a fax during fax transmission. Dual FAX Settings Refer to Selection of Telephone Line (Inch version only) on page 2-2 and Local FAX Information Entry on page 2-5 when specifying the settings for the second line. Reception Port Selection You can make one of the 2 phone lines a receive-only line. 1 Press the System Menu key. 2 Press [FAX/i-FAX], [Next] of Reception and then press [Change] of FAX. Press [Change] of Reception Port. 3 Select a receive-only FAX/i-FAX - Receptio n Port port. If you do not Specify the po rt to be used for reception only. want to set up a receive-only port, select [Off]. Off Po rt 1 Po rt 2 Status 4 Press [OK]. Cancel OK 6/6/2006 10:00 5 To exit from this setup, press [Close] several times until the System Menu default screen is displayed. Job Accounting Port Restrictions If job accounting is enabled, you can restrict access so that departments can only use one port. 8-4 OPERATION GUIDE
-
 1
1 -
2
-
3
-
4
-
5
-
6
-
7
-
8
-
9
-
10
-
11
-
12
-
13
-
14
-
15
-
16
-
17
-
18
-
19
-
20
-
21
-
22
-
23
-
24
-
25
-
26
-
27
-
28
-
29
-
30
-
31
-
32
-
33
-
34
-
35
-
36
-
37
-
38
-
39
-
40
-
41
-
42
-
43
-
44
-
45
-
46
-
47
-
48
-
49
-
50
-
51
-
52
-
53
-
54
-
55
-
56
-
57
-
58
-
59
-
60
-
61
-
62
-
63
-
64
-
65
-
66
-
67
-
68
-
69
-
70
-
71
-
72
-
73
-
74
-
75
-
76
-
77
-
78
-
79
-
80
-
81
-
82
-
83
-
84
-
85
-
86
-
87
-
88
-
89
-
90
-
91
-
92
-
93
-
94
-
95
-
96
-
97
-
98
-
99
-
100
-
101
-
102
-
103
-
104
-
105
-
106
-
107
-
108
-
109
-
110
-
111
-
112
-
113
-
114
-
115
-
116
-
117
-
118
-
119
-
120
-
121
-
122
-
123
-
124
-
125
-
126
-
127
-
128
-
129
-
130
-
131
-
132
-
133
-
134
-
135
-
136
-
137
-
138
-
139
-
140
-
141
-
142
-
143
-
144
-
145
-
146
-
147
-
148
-
149
-
150
-
151
-
152
-
153
-
154
-
155
-
156
-
157
-
158
-
159
-
160
-
161
-
162
-
163
-
164
-
165
-
166
-
167
-
168
-
169
-
170
-
171
-
172
-
173
-
174
-
175
-
176
-
177
-
178
-
179
-
180
-
181
-
182
-
183
-
184
-
 185
185 -
 186
186 -
 187
187 -
 188
188 -
 189
189 -
 190
190 -
 191
191 -
 192
192 -
 193
193 -
 194
194 -
 195
195 -
196
-
197
-
198
-
199
-
200
-
201
-
202
-
203
-
204
-
205
-
206
-
207
-
208
-
209
-
210
-
211
-
212
-
213
-
214
-
215
-
216
-
217
-
218
-
219
-
220
-
221
-
222
-
223
-
224
-
225
-
226
-
227
-
228
-
229
-
230
-
231
-
232
-
233
-
234
-
235
-
236
-
237
-
238
-
239
-
240
-
241
-
242
-
243
-
244
-
245
-
246
-
247
-
248
 |
 |
