Kyocera KM-2560 Fax System (M) Operation Guide Rev-2.0 - Page 40
IMPORTANT, Selecting the Density
 |
View all Kyocera KM-2560 manuals
Add to My Manuals
Save this manual to your list of manuals |
Page 40 highlights
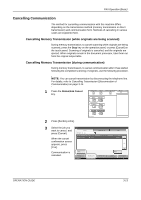
FAX Operation (Basic) IMPORTANT: • If you select a high resolution, the image becomes clearer. However, the higher the resolution is, the longer the send time is. • When you send originals at a resolution of 200 × 400 dpi (Super Fine) or higher, the fax machine on the receiving system needs to be capable of receiving the originals at such image quality. When the receiving system does not have such capability, originals are sent at an image quality of 200 × 200 dpi (Fine). Selecting the Density 6 Adjusting the density when scanning originals • Manual (-3 to +3): You can adjust the density using seven levels or 13 levels. • Auto: The optimal density is chosen according to the density of the originals. 1 To change the original density, press [Color/ Image], and then [Density]. Ready to send. Sending Image Density S h arp n es s Original Image Scan Reso lution Backgro und Density Adj. Original : Letter Zoom : 100% Send : Letter Preview Destinatio n Status Quick Setup Type of Original/ Transmissio n Co lo r/Im ag e Destinatio n 1 Color S electio n Advanced Setup 6/6/2006 10:00 NOTE: You can see a preview of the image to be sent by pressing [Preview]. For details, refer to Previewing Images on page 3-32. 2 Select the density. 3 Press [OK]. Ready to send. D en s ity Au to Press [OK] to display the image. Lig h ter N o rmal D es t in at io n 1 D arker -3 -2 -1 0 +1 +2 +3 -2 .5 -1 .5 -0 .5 +0 .5 +1 . 5 +2 .5 Status Add Shortcut Cancel OK 6/6/2006 10:00 3-8 OPERATION GUIDE
-
 1
1 -
2
-
3
-
4
-
5
-
6
-
7
-
8
-
9
-
10
-
11
-
12
-
13
-
14
-
15
-
16
-
17
-
18
-
19
-
20
-
21
-
22
-
23
-
24
-
25
-
26
-
27
-
28
-
29
-
30
-
31
-
32
-
33
-
34
-
 35
35 -
 36
36 -
 37
37 -
 38
38 -
 39
39 -
 40
40 -
 41
41 -
 42
42 -
 43
43 -
 44
44 -
 45
45 -
46
-
47
-
48
-
49
-
50
-
51
-
52
-
53
-
54
-
55
-
56
-
57
-
58
-
59
-
60
-
61
-
62
-
63
-
64
-
65
-
66
-
67
-
68
-
69
-
70
-
71
-
72
-
73
-
74
-
75
-
76
-
77
-
78
-
79
-
80
-
81
-
82
-
83
-
84
-
85
-
86
-
87
-
88
-
89
-
90
-
91
-
92
-
93
-
94
-
95
-
96
-
97
-
98
-
99
-
100
-
101
-
102
-
103
-
104
-
105
-
106
-
107
-
108
-
109
-
110
-
111
-
112
-
113
-
114
-
115
-
116
-
117
-
118
-
119
-
120
-
121
-
122
-
123
-
124
-
125
-
126
-
127
-
128
-
129
-
130
-
131
-
132
-
133
-
134
-
135
-
136
-
137
-
138
-
139
-
140
-
141
-
142
-
143
-
144
-
145
-
146
-
147
-
148
-
149
-
150
-
151
-
152
-
153
-
154
-
155
-
156
-
157
-
158
-
159
-
160
-
161
-
162
-
163
-
164
-
165
-
166
-
167
-
168
-
169
-
170
-
171
-
172
-
173
-
174
-
175
-
176
-
177
-
178
-
179
-
180
-
181
-
182
-
183
-
184
-
185
-
186
-
187
-
188
-
189
-
190
-
191
-
192
-
193
-
194
-
195
-
196
-
197
-
198
-
199
-
200
-
201
-
202
-
203
-
204
-
205
-
206
-
207
-
208
-
209
-
210
-
211
-
212
-
213
-
214
-
215
-
216
-
217
-
218
-
219
-
220
-
221
-
222
-
223
-
224
-
225
-
226
-
227
-
228
-
229
-
230
-
231
-
232
-
233
-
234
-
235
-
236
-
237
-
238
-
239
-
240
-
241
-
242
-
243
-
244
-
245
-
246
-
247
-
248
 |
 |
