Kyocera KM-2560 Fax System (M) Operation Guide Rev-2.0 - Page 28
Local FAX Name Entry
 |
View all Kyocera KM-2560 manuals
Add to My Manuals
Save this manual to your list of manuals |
Page 28 highlights
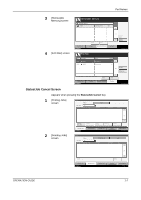
Preparation Before Use Local FAX Name Entry When you enter the Local FAX Name, the name is printed on faxes on the receiving system. The receiving side can then easily recognize where the originals are sent from. NOTE: To change the entry, follow the same operation. 1 Press the System Menu key. 2 Press [FAX/i-FAX], [Next] of Transmission, [Next] of Basic, and then [Change] of Local FAX Name Entry. The entry screen will be displayed. 3 Enter the Local FAX Local FAX Name Entry Name to be Use the keyboard to enter. registered. Up to 16 Limit:16 characters Input: 0 characters characters can be L K I J Backspace entered. 1 2 3 4 5 6 7 8 9 0 - = ` q w e r t y u i o p [ ] a s d f g h j k l ; · z x c v b n m , . / Upper-case Lo wer-case No./Symbol Space Status Cancel OK 6/6/2006 10:00 NOTE: For details on character entry, refer to Character Entry Method on page 2 of the Appendix. 4 Press [OK]. 5 To exit from this setup, press [Close] several times until the System Menu default screen is displayed. 2-4 OPERATION GUIDE
-
 1
1 -
2
-
3
-
4
-
5
-
6
-
7
-
8
-
9
-
10
-
11
-
12
-
13
-
14
-
15
-
16
-
17
-
18
-
19
-
20
-
21
-
22
-
 23
23 -
 24
24 -
 25
25 -
 26
26 -
 27
27 -
 28
28 -
 29
29 -
 30
30 -
 31
31 -
 32
32 -
 33
33 -
34
-
35
-
36
-
37
-
38
-
39
-
40
-
41
-
42
-
43
-
44
-
45
-
46
-
47
-
48
-
49
-
50
-
51
-
52
-
53
-
54
-
55
-
56
-
57
-
58
-
59
-
60
-
61
-
62
-
63
-
64
-
65
-
66
-
67
-
68
-
69
-
70
-
71
-
72
-
73
-
74
-
75
-
76
-
77
-
78
-
79
-
80
-
81
-
82
-
83
-
84
-
85
-
86
-
87
-
88
-
89
-
90
-
91
-
92
-
93
-
94
-
95
-
96
-
97
-
98
-
99
-
100
-
101
-
102
-
103
-
104
-
105
-
106
-
107
-
108
-
109
-
110
-
111
-
112
-
113
-
114
-
115
-
116
-
117
-
118
-
119
-
120
-
121
-
122
-
123
-
124
-
125
-
126
-
127
-
128
-
129
-
130
-
131
-
132
-
133
-
134
-
135
-
136
-
137
-
138
-
139
-
140
-
141
-
142
-
143
-
144
-
145
-
146
-
147
-
148
-
149
-
150
-
151
-
152
-
153
-
154
-
155
-
156
-
157
-
158
-
159
-
160
-
161
-
162
-
163
-
164
-
165
-
166
-
167
-
168
-
169
-
170
-
171
-
172
-
173
-
174
-
175
-
176
-
177
-
178
-
179
-
180
-
181
-
182
-
183
-
184
-
185
-
186
-
187
-
188
-
189
-
190
-
191
-
192
-
193
-
194
-
195
-
196
-
197
-
198
-
199
-
200
-
201
-
202
-
203
-
204
-
205
-
206
-
207
-
208
-
209
-
210
-
211
-
212
-
213
-
214
-
215
-
216
-
217
-
218
-
219
-
220
-
221
-
222
-
223
-
224
-
225
-
226
-
227
-
228
-
229
-
230
-
231
-
232
-
233
-
234
-
235
-
236
-
237
-
238
-
239
-
240
-
241
-
242
-
243
-
244
-
245
-
246
-
247
-
248
 |
 |
