Lexmark X4550 User's Guide - Page 14
Networking the printer, Installing the printer on a network - power cord
 |
UPC - 734646040556
View all Lexmark X4550 manuals
Add to My Manuals
Save this manual to your list of manuals |
Page 14 highlights
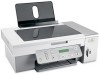
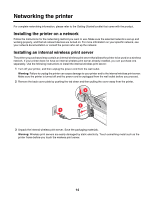
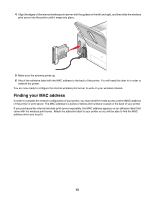
Networking the printer For complete networking information, please refer to the Getting Started booklet that came with the product. Installing the printer on a network Follow the instructions for the networking method you want to use. Make sure the selected network is set up and working properly, and that all relevant devices are turned on. For more information on your specific network, see your network documentation or consult the person who set up the network. Installing an internal wireless print server The printer you purchased may contain an internal wireless print server that allows the printer to be used on a wireless network. If your printer does not have an internal wireless print server already installed, you can purchase one separately. Use the following instructions to install the internal wireless print server: 1 Turn off your printer, and then unplug the power cord from the wall outlet. Warning: Failure to unplug the printer can cause damage to your printer and to the internal wireless print server. Make sure the printer is turned off and the power cord is unplugged from the wall outlet before you proceed. 2 Remove the back cover plate by pushing the tab down and then pulling the cover away from the printer. 3 Unpack the internal wireless print server. Save the packaging materials. Warning: Wireless print servers are easily damaged by static electricity. Touch something metal such as the printer frame before you touch the wireless print server. 14
-
 1
1 -
2
-
3
-
4
-
5
-
6
-
7
-
8
-
 9
9 -
 10
10 -
 11
11 -
 12
12 -
 13
13 -
 14
14 -
 15
15 -
 16
16 -
 17
17 -
 18
18 -
 19
19 -
20
-
21
-
22
-
23
-
24
-
25
-
26
-
27
-
28
-
29
-
30
-
31
-
32
-
33
-
34
-
35
-
36
-
37
-
38
-
39
-
40
-
41
-
42
-
43
-
44
-
45
-
46
-
47
-
48
-
49
-
50
-
51
-
52
-
53
-
54
-
55
-
56
-
57
-
58
-
59
-
60
-
61
-
62
-
63
-
64
-
65
-
66
-
67
-
68
-
69
-
70
-
71
-
72
-
73
-
74
-
75
-
76
-
77
-
78
-
79
-
80
-
81
-
82
-
83
-
84
-
85
-
86
-
87
-
88
-
89
-
90
-
91
-
92
-
93
-
94
-
95
-
96
-
97
-
98
-
99
-
100
-
101
-
102
-
103
-
104
-
105
-
106
-
107
-
108
-
109
 |
 |