Lexmark X945e User's Guide - Page 64
Copy to, Scale, Darkness, Color, Photo, Sides (Duplex), Collate, Options, Manual Feeder
 |
View all Lexmark X945e manuals
Add to My Manuals
Save this manual to your list of manuals |
Page 64 highlights
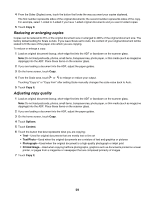
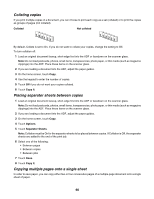
Copy to This option opens a screen where you can enter the size and type of paper on which your copies will be printed. • Touch a paper size button to select it as the "Copy to" setting. The copy screen appears with your new setting displayed. • If the size settings for "Copy from" and "Copy to" are different, the printer automatically adjusts the Scale setting to accommodate the difference. • If the type or size of paper that you want to copy onto is not loaded in one of the trays, touch Manual Feeder, and manually send the paper through the multipurpose feeder. • When "Copy to" is set to Auto Size Match, each copy matches the size of the original document. If a matching paper size is not in one of the trays, the printer scales each copy to fit loaded paper. Scale This option creates an image from your copy that is proportionally scaled anywhere between 25% and 400%. Scale can also be set for you automatically. • When you want to copy from one size of paper to another, such as from legal-size to letter-size paper, setting the "Copy from" and "Copy to" paper sizes automatically changes the scale to keep all the original document information on your copy. • Touch to decrease the value by 1%; touch to increase the value by 1%. • Hold your finger on an arrow to make a continuous increment. • Hold your finger on an arrow for two seconds to cause the pace of the change to accelerate. Darkness This option adjusts how light or dark your copies will turn out in relation to the original document. Color Touching the Color button tells the printer to copy the original document in color. Photo Touching the Photo button tells the printer to pay extra attention to shading or tones. Note: To copy a color image, make sure the color button is also selected. Sides (Duplex) Use this option to select duplex settings. You can print copies on one or two sides, make two-sided copies (duplex) of two-sided original documents, make two-sided copies from one-sided original documents, or make one-sided copies (simplex) from two-sided original documents. Note: For two-sided output, you must have a duplex unit attached to the printer. Collate This option keeps the pages of a print job stacked in sequence when printing multiple copies of the document. The factory default setting for Collate is on; the output pages of your copies will be ordered (1,2,3) (1,2,3) (1,2,3). If you want all the copies of each page to remain together, turn Collate off, and your copies will be ordered (1,1,1) (2,2,2) (3,3,3). Options Touching the Options button opens a screen where you can change Paper Saver, Advanced Imaging, Separator Sheets, Margin Shift, Edge Erase, Date/Time Stamp, Overlay, Content, and Advanced Duplex settings. 64
-
 1
1 -
2
-
3
-
4
-
5
-
6
-
7
-
8
-
9
-
10
-
11
-
12
-
13
-
14
-
15
-
16
-
17
-
18
-
19
-
20
-
21
-
22
-
23
-
24
-
25
-
26
-
27
-
28
-
29
-
30
-
31
-
32
-
33
-
34
-
35
-
36
-
37
-
38
-
39
-
40
-
41
-
42
-
43
-
44
-
45
-
46
-
47
-
48
-
49
-
50
-
51
-
52
-
53
-
54
-
55
-
56
-
57
-
58
-
 59
59 -
 60
60 -
 61
61 -
 62
62 -
 63
63 -
 64
64 -
 65
65 -
 66
66 -
 67
67 -
 68
68 -
 69
69 -
70
-
71
-
72
-
73
-
74
-
75
-
76
-
77
-
78
-
79
-
80
-
81
-
82
-
83
-
84
-
85
-
86
-
87
-
88
-
89
-
90
-
91
-
92
-
93
-
94
-
95
-
96
-
97
-
98
-
99
-
100
-
101
-
102
-
103
-
104
-
105
-
106
-
107
-
108
-
109
-
110
-
111
-
112
-
113
-
114
-
115
-
116
-
117
-
118
-
119
-
120
-
121
-
122
-
123
-
124
-
125
-
126
-
127
-
128
-
129
-
130
-
131
-
132
-
133
-
134
-
135
-
136
-
137
-
138
-
139
-
140
-
141
-
142
-
143
-
144
-
145
-
146
-
147
-
148
-
149
-
150
-
151
-
152
-
153
-
154
-
155
-
156
-
157
-
158
-
159
-
160
-
161
-
162
-
163
-
164
-
165
-
166
-
167
-
168
-
169
-
170
-
171
-
172
-
173
-
174
-
175
-
176
-
177
-
178
-
179
-
180
-
181
-
182
-
183
-
184
-
185
-
186
-
187
-
188
-
189
-
190
-
191
-
192
-
193
-
194
-
195
-
196
-
197
-
198
-
199
-
200
-
201
-
202
-
203
-
204
-
205
-
206
-
207
-
208
-
209
-
210
-
211
-
212
-
213
-
214
-
215
-
216
-
217
-
218
-
219
-
220
-
221
-
222
-
223
-
224
-
225
-
226
-
227
-
228
-
229
-
230
-
231
-
232
-
233
-
234
-
235
-
236
-
237
-
238
-
239
-
240
-
241
-
242
-
243
-
244
-
245
-
246
-
247
-
248
-
249
-
250
-
251
-
252
-
253
-
254
-
255
-
256
-
257
-
258
-
259
-
260
-
261
-
262
-
263
-
264
-
265
-
266
-
267
-
268
-
269
-
270
-
271
-
272
 |
 |