Lexmark X945e User's Guide - Page 65
Paper Saver, Create Booklet, Advanced Imaging, Custom Job Job Build, Separator Sheets, Margin Shift
 |
View all Lexmark X945e manuals
Add to My Manuals
Save this manual to your list of manuals |
Page 65 highlights
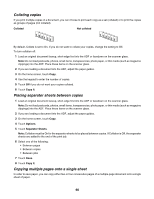
Paper Saver This option lets you print two or more sheets of an original document together on the same page. Paper Saver is also called N-up printing. The N stands for Number. For example, 2-up would print two pages of your document on a single page, and 4-up would print four pages of your document on a single page. Touching Print Page Borders adds or removes the outline border surrounding the original document pages on the output page. Create Booklet This option creates a sequence of collated output that, when folded or folded and stapled, forms a booklet half the page size of the original document and with all the pages in order. Note: To use Create Booklet, you must have a duplex unit attached to the printer. Advanced Imaging This option lets you adjust Background Removal, Contrast, Shadow Detail, Scan Edge to Edge, Color Balance, and mirror image before you copy the document. Custom Job (Job Build) This option combines multiple scanning jobs into a single job. Separator Sheets This option places a blank piece of paper between copies, pages, and print jobs. The separator sheets can be drawn from a tray that contains a type or color of paper that is different from the paper your copies are printed on. Margin Shift This option increases the size of the margin a specified distance. This can be useful in providing space to bind or hole-punch copies. Use the increase or decrease arrows to set how much of a margin you want. If the additional margin is too large, the copy will be cropped. Edge Erase This option eliminates smudges or information around the edges of your document. You can choose to eliminate an equal area around all four sides of the paper, or pick a particular edge. Edge Erase erases whatever is within the selected area, leaving nothing printed on that portion of the paper. Date/Time Stamp This option turns the Date/Time Stamp on and prints the date and time at the top of every page. Overlay This option creates a watermark (or message) that overlays the content of your copy. You can choose between Urgent, Confidential, Copy, and Draft. The word you pick will appear, faintly, in large print across each page. Note: A custom overlay can be created by your system support person. When a custom overlay is created, a button with an icon of that overlay will be available. Content This option enhances copy quality. Choose from Text, Text/Photo, Photograph, or Printed Image. • Text-Use this setting when copying original documents that are mostly text or line art. • Text/Photo-Use this setting when copying original documents that are a mixture of text and graphics or pictures. • Photograph-Use this setting when copying an original document that is a high-quality photograph or inkjet print. • Printed Image-Use this setting when copying halftone photographs, documents printed on a laser printer, or pages from a magazine or newspaper. 65
-
 1
1 -
2
-
3
-
4
-
5
-
6
-
7
-
8
-
9
-
10
-
11
-
12
-
13
-
14
-
15
-
16
-
17
-
18
-
19
-
20
-
21
-
22
-
23
-
24
-
25
-
26
-
27
-
28
-
29
-
30
-
31
-
32
-
33
-
34
-
35
-
36
-
37
-
38
-
39
-
40
-
41
-
42
-
43
-
44
-
45
-
46
-
47
-
48
-
49
-
50
-
51
-
52
-
53
-
54
-
55
-
56
-
57
-
58
-
59
-
 60
60 -
 61
61 -
 62
62 -
 63
63 -
 64
64 -
 65
65 -
 66
66 -
 67
67 -
 68
68 -
 69
69 -
 70
70 -
71
-
72
-
73
-
74
-
75
-
76
-
77
-
78
-
79
-
80
-
81
-
82
-
83
-
84
-
85
-
86
-
87
-
88
-
89
-
90
-
91
-
92
-
93
-
94
-
95
-
96
-
97
-
98
-
99
-
100
-
101
-
102
-
103
-
104
-
105
-
106
-
107
-
108
-
109
-
110
-
111
-
112
-
113
-
114
-
115
-
116
-
117
-
118
-
119
-
120
-
121
-
122
-
123
-
124
-
125
-
126
-
127
-
128
-
129
-
130
-
131
-
132
-
133
-
134
-
135
-
136
-
137
-
138
-
139
-
140
-
141
-
142
-
143
-
144
-
145
-
146
-
147
-
148
-
149
-
150
-
151
-
152
-
153
-
154
-
155
-
156
-
157
-
158
-
159
-
160
-
161
-
162
-
163
-
164
-
165
-
166
-
167
-
168
-
169
-
170
-
171
-
172
-
173
-
174
-
175
-
176
-
177
-
178
-
179
-
180
-
181
-
182
-
183
-
184
-
185
-
186
-
187
-
188
-
189
-
190
-
191
-
192
-
193
-
194
-
195
-
196
-
197
-
198
-
199
-
200
-
201
-
202
-
203
-
204
-
205
-
206
-
207
-
208
-
209
-
210
-
211
-
212
-
213
-
214
-
215
-
216
-
217
-
218
-
219
-
220
-
221
-
222
-
223
-
224
-
225
-
226
-
227
-
228
-
229
-
230
-
231
-
232
-
233
-
234
-
235
-
236
-
237
-
238
-
239
-
240
-
241
-
242
-
243
-
244
-
245
-
246
-
247
-
248
-
249
-
250
-
251
-
252
-
253
-
254
-
255
-
256
-
257
-
258
-
259
-
260
-
261
-
262
-
263
-
264
-
265
-
266
-
267
-
268
-
269
-
270
-
271
-
272
 |
 |