Magellan MobileMapper CX Getting Started Guide - Page 34
Troubleshooting, Message, Action
 |
UPC - 009905860047
View all Magellan MobileMapper CX manuals
Add to My Manuals
Save this manual to your list of manuals |
Page 34 highlights
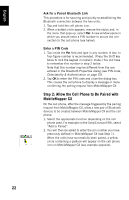
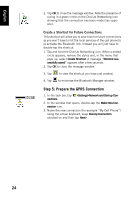
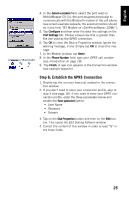
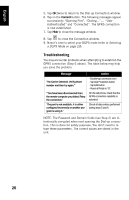
English 5. Tap OK twice to return to the Dial-up Connection window. 6. Tap on the Connect button. The following messages appear successively: "Opening Port", "Dialing...",... "User Authenticated" and "Connected". The GPRS connection is now established. 7. Tap Hide to close the message window. 8. Tap to close the Connection window. 9. Now it's time to select your DGPS mode (refer to Selecting a DGPS Mode on page 29). Troubleshooting You may encounter problems when attempting to establish the GPRS connection (Step 6 above). The table below may help you solve the problem. Message "No Carrier Detected. Verify phone number and then try again." "You have been disconnected from the remote computer you dialed. Retry the connection." "The port is not available: it is either configured incorrectly or another program is using it." Action - Double-tap connection icon - Tap Dial Properties button - Tap Edit button - Reset all fields to "G". On the cell phone, check that the GPRS connection capability is activated. Check all data entries performed during steps 5 and 6. NOTE: The Password and Domain fields (see Step 2) are intentionally corrupted when next opening the Dial-up connection. This is done for safety purposes. You don't need to retype these parameters. The correct values are stored in the unit. 26
-
 1
1 -
2
-
3
-
4
-
5
-
6
-
7
-
8
-
9
-
10
-
11
-
12
-
13
-
14
-
15
-
16
-
17
-
18
-
19
-
20
-
21
-
22
-
23
-
24
-
25
-
26
-
27
-
28
-
 29
29 -
 30
30 -
 31
31 -
 32
32 -
 33
33 -
 34
34 -
 35
35 -
 36
36 -
 37
37 -
 38
38 -
 39
39 -
40
-
41
-
42
-
43
-
44
-
45
-
46
-
47
-
48
-
49
-
50
-
51
-
52
-
53
-
54
-
55
-
56
-
57
-
58
-
59
-
60
-
61
-
62
-
63
-
64
-
65
-
66
-
67
-
68
-
69
-
70
-
71
-
72
-
73
-
74
-
75
-
76
-
77
-
78
-
79
-
80
-
81
-
82
-
83
-
84
-
85
-
86
 |
 |