Magellan MobileMapper CX Getting Started Guide - Page 41
Programs>GPS Utilities>DGPS Configuration, Select Mode, Beacon, Update, Configuration
 |
UPC - 009905860047
View all Magellan MobileMapper CX manuals
Add to My Manuals
Save this manual to your list of manuals |
Page 41 highlights
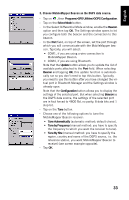
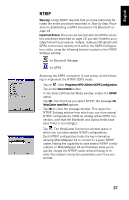
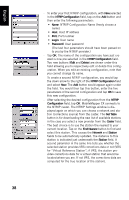
English 3. Choose MobileMapper Beacon as the DGPS data source: - Tap on , then Programs>GPS Utilities>DGPS Configuration. - Tap on the Select Mode button. - In the Select Differential Mode window, enable the Beacon option and then tap OK. The Settings window opens to let you configure both the beacon and the connection to this beacon. - In the Port field, on top of the screen, set the port through which you will communicate with the MobileMapper beacon. Typically, you will select: • COM1, if you are using a wire connection to MobileMapper Beacon. • COM4, if you are using Bluetooth. Note that the Update button allows you to update the list of available ports attached to the Port field. When selecting Beacon and tapping OK, this update function is automatically run so you don't need to tap this button. Typically, you need to use this button after you have changed the virtual port in Bluetooth Manager and the Settings window is already open. Note that the Configuration button allows you to display the settings of the selected port. But when selecting Beacon as the DGPS data source, the settings of the selected port are in fact forced to 4800 Bd, no parity, 8 data bits and 1 stop bit. - Tap on the Tune button. - Choose one of the following options to tune the MobileMapper Beacon receiver: • Tune Automatically (automatic method; default choice). • Tune by Frequency (manual method: you have to specify the frequency to which you want the receiver to tune). • Tune By Site (manual method: you have to specify the region, country and name of the DGPS source, i.e. the reference station, you want MobileMapper Beacon to receive) (see screen example opposite). - Tap OK. 33
-
 1
1 -
2
-
3
-
4
-
5
-
6
-
7
-
8
-
9
-
10
-
11
-
12
-
13
-
14
-
15
-
16
-
17
-
18
-
19
-
20
-
21
-
22
-
23
-
24
-
25
-
26
-
27
-
28
-
29
-
30
-
31
-
32
-
33
-
34
-
35
-
 36
36 -
 37
37 -
 38
38 -
 39
39 -
 40
40 -
 41
41 -
 42
42 -
 43
43 -
 44
44 -
 45
45 -
 46
46 -
47
-
48
-
49
-
50
-
51
-
52
-
53
-
54
-
55
-
56
-
57
-
58
-
59
-
60
-
61
-
62
-
63
-
64
-
65
-
66
-
67
-
68
-
69
-
70
-
71
-
72
-
73
-
74
-
75
-
76
-
77
-
78
-
79
-
80
-
81
-
82
-
83
-
84
-
85
-
86
 |
 |
