McAfee VLF09E002RAA User Guide - Page 29
Scanning via Windows Explorer, Scanning via Microsoft Outlook
 |
UPC - 731944541938
View all McAfee VLF09E002RAA manuals
Add to My Manuals
Save this manual to your list of manuals |
Page 29 highlights
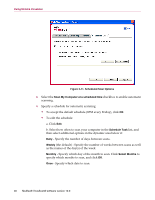
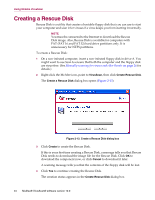
Manually scanning your computer 6 If Scan finds no viruses or other threats, click Back to select another drive or folder to scan, or click Close to close the dialog box. Otherwise, see Understanding threat detections on page 31. Scanning via Windows Explorer VirusScan provides a shortcut menu to scan selected files, folders, or drives for viruses and other threats from within Windows Explorer. To scan files in Windows Explorer: 1 Open Windows Explorer. 2 Right-click the drive, folder, or file that you want to scan, and then click Scan. The Scan dialog box opens and starts scanning files. By default, all of the default Scan Options are pre-selected to provide the most thorough scan possible (Figure 2-8 on page 26). Scanning via Microsoft Outlook VirusScan provides a toolbar icon to scan for viruses and other threats in selected message stores and their subfolders, mailbox folders, or e-mail messages containing attachments from within Microsoft Outlook 97 or later. To scan e-mail in Microsoft Outlook: 1 Open Microsoft Outlook. 2 Click the message store, folder, or e-mail message containing an attachment that you want to scan, and then click the e-mail scanning toolbar icon . The e-mail scanner opens and starts scanning files. By default, all of the default Scan Options are pre-selected to provide the most thorough scan possible (Figure 2-8 on page 26). Automatically scanning for viruses and other threats Although VirusScan scans files when they are accessed by either you or your computer, you can schedule automatic scanning in Windows Scheduler to thoroughly check your computer for viruses and other threats at specified intervals. To schedule a scan: 1 Right-click the McAfee icon, point to VirusScan, then click Options. The VirusScan Options dialog box opens. 2 Click the Scheduled Scan tab (Figure 2-11 on page 30). User Guide 29
-
 1
1 -
2
-
3
-
4
-
5
-
6
-
7
-
8
-
9
-
10
-
11
-
12
-
13
-
14
-
15
-
16
-
17
-
18
-
19
-
20
-
21
-
22
-
23
-
 24
24 -
 25
25 -
 26
26 -
 27
27 -
 28
28 -
 29
29 -
 30
30 -
 31
31 -
 32
32 -
 33
33 -
 34
34 -
35
-
36
-
37
-
38
-
39
-
40
-
41
-
42
-
43
-
44
-
45
-
46
-
47
-
48
-
49
-
50
-
51
-
52
-
53
-
54
-
55
-
56
-
57
-
58
-
59
-
60
-
61
-
62
-
63
-
64
-
65
-
66
-
67
-
68
-
69
-
70
-
71
-
72
-
73
-
74
-
75
-
76
-
77
-
78
-
79
-
80
-
81
-
82
-
83
-
84
-
85
-
86
-
87
-
88
-
89
-
90
-
91
-
92
-
93
-
94
-
95
-
96
-
97
-
98
 |
 |
