McAfee VLF09E002RAA User Guide - Page 35
Write-protecting a Rescue Disk, Using a Rescue Disk, Automatically reporting viruses
 |
UPC - 731944541938
View all McAfee VLF09E002RAA manuals
Add to My Manuals
Save this manual to your list of manuals |
Page 35 highlights
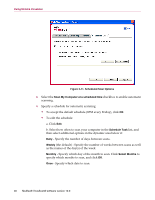
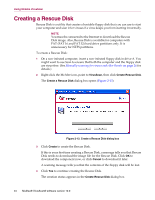
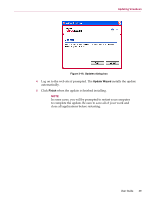
Automatically reporting viruses 5 When the message "Rescue disk created" appears, click OK, then close the Create Rescue Disk dialog box. 6 Remove the Rescue Disk from the drive, write-protect it, and store it in a safe location. Write-protecting a Rescue Disk To write-protect a Rescue Disk: 1 Turn the floppy disk label-side down (the metal circle should be visible). 2 Locate the write-protect tab. Slide the tab so the hole is visible. Using a Rescue Disk To use a Rescue Disk: 1 Turn off the infected computer. 2 Insert the Rescue Disk into the drive. 3 Turn the computer on. A gray window with several options appears. 4 Choose the option that best suits your needs by pressing the Function keys (for example, F2, F3). NOTE Rescue Disk starts automatically in 60 seconds if you do not press any of the keys. Updating a Rescue Disk It is a good idea to update your Rescue Disk regularly. To update your Rescue Disk, follow the same instructions for creating a new Rescue Disk. Automatically reporting viruses You can anonymously send virus tracking information for inclusion in our World Virus Map. Automatically opt-in for this free, secure feature either during VirusScan installation (in the Virus Map Reporting dialog box), or at any time in the Virus Map Reporting tab of the VirusScan Options dialog box. User Guide 35
-
 1
1 -
2
-
3
-
4
-
5
-
6
-
7
-
8
-
9
-
10
-
11
-
12
-
13
-
14
-
15
-
16
-
17
-
18
-
19
-
20
-
21
-
22
-
23
-
24
-
25
-
26
-
27
-
28
-
29
-
 30
30 -
 31
31 -
 32
32 -
 33
33 -
 34
34 -
 35
35 -
 36
36 -
 37
37 -
 38
38 -
 39
39 -
 40
40 -
41
-
42
-
43
-
44
-
45
-
46
-
47
-
48
-
49
-
50
-
51
-
52
-
53
-
54
-
55
-
56
-
57
-
58
-
59
-
60
-
61
-
62
-
63
-
64
-
65
-
66
-
67
-
68
-
69
-
70
-
71
-
72
-
73
-
74
-
75
-
76
-
77
-
78
-
79
-
80
-
81
-
82
-
83
-
84
-
85
-
86
-
87
-
88
-
89
-
90
-
91
-
92
-
93
-
94
-
95
-
96
-
97
-
98
 |
 |