Samsung SGH-A827 User Manual - Page 114
Options, Copy to FDN Contacts, Address Book, Group Settings, My Stuff, Audio - reset
 |
View all Samsung SGH-A827 manuals
Add to My Manuals
Save this manual to your list of manuals |
Page 114 highlights
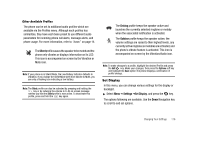
Copy to FDN Contacts 1. Highlight an entry in the Address Book, press the Options soft key, and select the Copy to FDN Contacts option. 2. You must enter your PIN2 password. This number is provided to you by your Service Provider. 3. Press the finished. key to return to Idle mode when you are Once FDN mode is activated and a Contact list established, all calls made from the handset must be made from the FDN Contact list. You must have the PIN2 number to add contacts to the list or to reset the FDN mode. The only exception to this is 911, where this service is available. Group Settings Groups allow you to associate entries in your Address Book. Preassigned groups are: Business, Family, and Friends. One feature of assigning a contact to a group is that you can send text or multimedia messages to "selected one member" or "ALL" after adding all members. You may also assign a Group Picture or Ringtone that will identify a member of the Group when you receive a call or message from one of the members. Editing a Caller Group 1. At the Idle screen, select Menu ➔ Address Book and press 111 the key. Note: When in the Address Book, you can toggle between the Contacts list and Group listing by using the Right or Left Navigation keys. If FDN is On, it is listed as a third option. 2. Toggle to the Group listing. 3. Scroll through the list of groups by pressing the Up or Down Navigation key. 4. Highlight the target group entry and press the Options soft key. 5. Highlight Group Settings, press the key. The following options are then available: • Picture: allows you to view the assigned group image. • Ringtone: allows you to set the ringtone associated with this group. Selecting Ringtones takes you to your My Stuff folder, where you can choose recorded audio files, default ringtones, or downloaded ringtones from the Audio folder. 6. Once you've made your changes, press the Options soft key, select Save and press the key. 7. Press the finished. key to return to Idle mode when you are
-
 1
1 -
2
-
3
-
4
-
5
-
6
-
7
-
8
-
9
-
10
-
11
-
12
-
13
-
14
-
15
-
16
-
17
-
18
-
19
-
20
-
21
-
22
-
23
-
24
-
25
-
26
-
27
-
28
-
29
-
30
-
31
-
32
-
33
-
34
-
35
-
36
-
37
-
38
-
39
-
40
-
41
-
42
-
43
-
44
-
45
-
46
-
47
-
48
-
49
-
50
-
51
-
52
-
53
-
54
-
55
-
56
-
57
-
58
-
59
-
60
-
61
-
62
-
63
-
64
-
65
-
66
-
67
-
68
-
69
-
70
-
71
-
72
-
73
-
74
-
75
-
76
-
77
-
78
-
79
-
80
-
81
-
82
-
83
-
84
-
85
-
86
-
87
-
88
-
89
-
90
-
91
-
92
-
93
-
94
-
95
-
96
-
97
-
98
-
99
-
100
-
101
-
102
-
103
-
104
-
105
-
106
-
107
-
108
-
 109
109 -
 110
110 -
 111
111 -
 112
112 -
 113
113 -
 114
114 -
 115
115 -
 116
116 -
 117
117 -
 118
118 -
 119
119 -
120
-
121
-
122
-
123
-
124
-
125
-
126
-
127
-
128
-
129
-
130
-
131
-
132
-
133
-
134
-
135
-
136
-
137
-
138
-
139
-
140
-
141
-
142
-
143
-
144
-
145
-
146
-
147
-
148
-
149
-
150
-
151
-
152
-
153
-
154
-
155
-
156
-
157
-
158
-
159
-
160
-
161
-
162
-
163
-
164
 |
 |