Samsung SGH-A827 User Manual - Page 115
Copy to Phone, View Contact, Address Book, Copy to, Options, Delete, Multiple, Phone, Phone & SIM - model
 |
View all Samsung SGH-A827 manuals
Add to My Manuals
Save this manual to your list of manuals |
Page 115 highlights
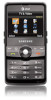
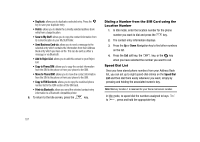
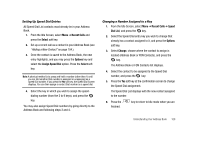
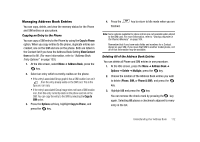
Managing Address Book Entries You can copy, delete, and view the memory status for the Phone and SIM entries on your phone. Copying an Entry to the Phone You can copy a SIM entry to the Phone by using the Copy to Phone option. When you copy entries to the phone, duplicate entries are created; one on the SIM and one on the phone. Both are listed in the Contact list if you have the Address Book Setting View Contact from set to All. (For more information, refer to "Address Book Entry Options" on page 103.) 1. At the Idle screen, select Menu ➔ Address Book, press the key. 2. Select an entry which currently resides on the phone. • If the entry's associated Group graphic has a SIM location icon on it , then the entry already exists on the SIM card. This is the type you can copy. • If the entry's associated Group image does not have a SIM location icon, then this entry currently exists on the phone and not on the SIM. You can copy the entry to the SIM by selecting the Copy to SIM option. 3. Press the Options soft key, highlight Copy to Phone, and press the key. 4. Press the finished. key to return to Idle mode when you are Note: Some options available for phone entries are not available when stored to the SIM card. For more information, refer to "Storing a Number in the Phone's Memory" on page 104. Remember that if you have extra fields and numbers for a Contact stored on your SIM, if you move that SIM to another model phone, not all of that information may be available. Deleting All of the Address Book Entries You can delete all Phone and SIM entries in one procedure. 1. At the Idle screen, press the Menu ➔ Address Book ➔ Options ➔ Delete ➔ Multiple, press the key. 2. Choose the location of the Address Book entries you wish to delete (Phone, SIM, or Phone & SIM), and press the key. 3. Highlight All and press the key. You can remove the check mark by pressing the key again. Selecting All places a checkmark adjacent to every entry in the list. Understanding Your Address Book 112
-
 1
1 -
2
-
3
-
4
-
5
-
6
-
7
-
8
-
9
-
10
-
11
-
12
-
13
-
14
-
15
-
16
-
17
-
18
-
19
-
20
-
21
-
22
-
23
-
24
-
25
-
26
-
27
-
28
-
29
-
30
-
31
-
32
-
33
-
34
-
35
-
36
-
37
-
38
-
39
-
40
-
41
-
42
-
43
-
44
-
45
-
46
-
47
-
48
-
49
-
50
-
51
-
52
-
53
-
54
-
55
-
56
-
57
-
58
-
59
-
60
-
61
-
62
-
63
-
64
-
65
-
66
-
67
-
68
-
69
-
70
-
71
-
72
-
73
-
74
-
75
-
76
-
77
-
78
-
79
-
80
-
81
-
82
-
83
-
84
-
85
-
86
-
87
-
88
-
89
-
90
-
91
-
92
-
93
-
94
-
95
-
96
-
97
-
98
-
99
-
100
-
101
-
102
-
103
-
104
-
105
-
106
-
107
-
108
-
109
-
 110
110 -
 111
111 -
 112
112 -
 113
113 -
 114
114 -
 115
115 -
 116
116 -
 117
117 -
 118
118 -
 119
119 -
 120
120 -
121
-
122
-
123
-
124
-
125
-
126
-
127
-
128
-
129
-
130
-
131
-
132
-
133
-
134
-
135
-
136
-
137
-
138
-
139
-
140
-
141
-
142
-
143
-
144
-
145
-
146
-
147
-
148
-
149
-
150
-
151
-
152
-
153
-
154
-
155
-
156
-
157
-
158
-
159
-
160
-
161
-
162
-
163
-
164
 |
 |